
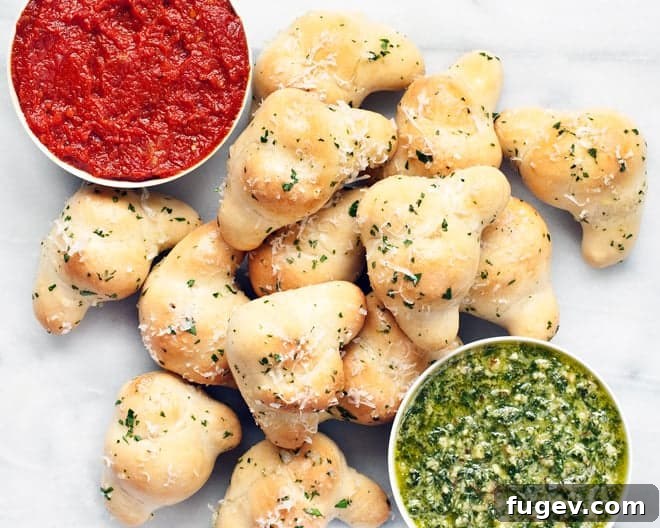
Homemade Garlic Knots: An Irresistible Italian Treat
There’s a special kind of comfort that comes with warm bread, fresh from the oven, especially when it’s infused with aromatic garlic and savory herbs. For many, the sight of a breadbasket arriving at the dining table is an irresistible invitation, a prelude to a delicious meal. This homemade garlic knots recipe aims to recreate that cherished experience right in your kitchen, offering an easy yet incredibly rewarding baking adventure that will quickly become a family favorite.
Crafted from simple, versatile pizza dough, these delightful garlic knots are transformed into culinary gems. Once baked to a beautiful golden-brown perfection, they are generously tossed in a luscious, fragrant mixture of melted butter, finely minced garlic, fresh Italian parsley, and grated Parmesan cheese. The result is a soft, chewy knot with a delicately crisp exterior, bursting with a rich, savory garlic flavor that’s utterly captivating. Forget the endless struggle of resisting restaurant bread; with this easy-to-follow recipe, you’ll have an even better, healthier, and more satisfying option at your fingertips, ready to be enjoyed any time.
The Irresistible Charm of Homemade Garlic Knots
The allure of a freshly baked garlic knot is truly undeniable. It’s more than just a simple bread roll; it’s a sensory experience that awakens the palate and warms the soul from the very first bite. The moment these savory knots emerge from the oven, a tantalizing aroma of baking dough and roasted garlic fills your entire home, promising a treat that’s impossible to resist. Each knot is a testament to how simple, wholesome ingredients can come together to create something truly extraordinary. The golden-brown crust offers a satisfyingly subtle crispness, beautifully yielding to a wonderfully soft, airy, and chewy interior that has been lovingly infused with a rich garlic butter blend. This isn’t just a side dish; it’s a star in its own right, perfect for elevating any meal or simply enjoying as a standalone, comforting snack.
I must admit, when dining out, I often find myself severely lacking in restraint when a warm breadbasket makes its way to the table. My eyes instinctively scan, hoping for those perfect, fresh-baked rolls that inevitably lead to an unintended carb-loading session long before the main course even arrives. At home, however, I surprisingly often overlook the simple pleasure of baking fresh bread, despite knowing how little effort it truly requires for such a rewarding outcome. That habit happily changed the day I started experimenting with this incredible garlic knots recipe. Instead of dedicating my homemade pizza dough to a traditional flat pizza, I decided to channel its delicious potential into these charming, bite-sized wonders. Hot from the oven, each knot is immediately coated in that glorious mixture of melted butter, fragrant olive oil, fresh parsley, pungent minced garlic, and savory Parmesan cheese – a truly transformative experience that makes them utterly irresistible.
Crafting the Perfect Pizza Dough Base for Your Garlic Knots
The true secret to achieving exceptional garlic knots lies in their foundation: a well-made, pliable pizza dough. Don’t let the idea of homemade dough intimidate you; it’s a surprisingly straightforward process that consistently yields unparalleled results, far superior to most store-bought alternatives. The core ingredients are wonderfully simple: warm water, active dry yeast, a touch of granulated sugar to awaken and feed the yeast, a good quality olive oil for added flavor and tender texture, bread flour for its essential gluten structure, and salt for fundamental seasoning. The entire process gracefully begins with proofing the yeast in warm water along with the sugar, creating a visibly foamy mixture that confidently confirms your yeast is vibrant, active, and perfectly ready to work its magic. This crucial initial step is absolutely vital for achieving the light, airy, and wonderfully fluffy knots we all crave.
Mixing and Kneading for Elastic Perfection
Once your yeast mixture is cheerfully bubbling, it’s time to bring the rest of the dough together. In a large mixing bowl, combine the bread flour and salt, then gradually incorporate the activated wet yeast mixture and the olive oil. Stir these ingredients together until they just begin to combine and form a shaggy, somewhat rough dough – this is a good sign that the hydration process is starting. The real transformation, however, truly happens during the kneading phase. Turn the dough out onto a lightly floured work surface and knead it diligently for approximately 10 minutes. This physical process is essential for developing the gluten strands within the flour, which are paramount for the dough’s elasticity, strength, and ultimately, the desirable chewy texture of the finished garlic knots. You’ll intuitively know the dough is ready when it feels noticeably smooth, supple, no longer sticky, and effortlessly bounces back when gently poked with a finger. For those fortunate enough to own a stand mixer, a reliable dough hook can perform all the hard work for you, achieving the exact same smooth and elastic consistency with remarkable ease, saving your arms for enjoying the finished product.
The Magic of Rising: A Patient Process for Flavor and Texture
Following the kneading, the dough needs ample time to rest and undergo its crucial first rise. Gently gather the dough into a smooth ball, carefully transfer it to a lightly oiled bowl, and then cover the bowl tightly with plastic wrap or a clean kitchen towel. Find a warm, draft-free spot in your kitchen – perhaps a slightly warmed oven (ensure it’s turned off!), a sunny windowsill, or even near a warm appliance – to create the ideal environment for the yeast to flourish. During this initial rise, the dough will visibly double in size, which is a clear and satisfying indicator that the yeast is actively fermenting and diligently creating those wonderful air pockets that contribute so much to a light, tender, and fluffy texture. This process typically takes about 1.5 to 2 hours, but remember that patience is a virtue here; resisting the urge to rush this vital step is key. A slow, steady, and unhurried rise almost always leads to superior flavor development and a significantly better overall texture in your finished garlic knots.
From Dough to Delicious Knots: The Art of Shaping and Second Rise
Once your dough has proudly completed its first spectacular rise, it’s time for the truly fun and creative part: meticulously shaping your individual garlic knots. Gently punch down the dough to release the accumulated air, then turn it out onto a lightly floured work surface. With a sharp knife or a dough scraper, divide the dough into small, manageable, approximately 1-ounce portions, which should be roughly 1.5 inches in diameter. While absolute precision isn’t critically essential here, aiming for consistently sized portions will greatly help ensure that all your knots bake evenly. Each small ball of dough is then rolled into a slender, approximately 6-inch-long log. This long, uniform shape is perfectly designed for tying into the classic, appealing knot formation. It’s a simple, rhythmic, and almost meditative process that quickly becomes intuitive with a little practice.
Tying the Perfect Knot for Rustic Charm
To form each delightful knot, simply take one of your 6-inch dough logs and carefully tie it into a loose, single knot. You can either tuck the ends neatly underneath the knot or gently fold them over the top, depending on your aesthetic preference and what feels most natural. The inherent beauty of homemade knots lies in their charmingly rustic appearance, so there’s absolutely no need to strive for absolute perfection – embrace the individuality of each piece! Once shaped, arrange the knots on a parchment-lined sheet pan, ensuring they are spaced approximately 2 inches apart. This crucial spacing allows ample room for their second rise without crowding. Loosely cover the sheet pan with plastic wrap or a clean kitchen towel and let the knots rise again for about 30 minutes in a warm spot. During this important second rise, they will visibly plump up and double in size once more, indicating they are fully ready for their baking transformation.
Baking to Golden Perfection and the Signature Garlic Butter Glaze
Preheat your oven to a precise 400 degrees Fahrenheit (200 degrees Celsius). This hot initial temperature is vital as it helps the knots achieve a gorgeously golden-brown crust while simultaneously ensuring they cook through evenly and develop a tender interior. Carefully bake the shaped knots for approximately 12 to 15 minutes. It’s important to keep a close eye on them during this time; they should develop a beautiful light golden-brown color, which is the perfect indicator that they are perfectly baked and eagerly awaiting their flavorful coating. Be mindful not to overbake, as this can lead to dry knots; aim for that ideal golden hue that promises a soft, fluffy center.
The Unforgettable Garlic Butter Coating: The Finishing Touch
While your delightful knots are happily baking in the oven, it’s the perfect time to prepare the true star of the show: the signature garlic butter glaze. In a small saucepan, gently melt the unsalted butter along with the remaining olive oil and all of your finely minced garlic over a medium heat. Cook the mixture carefully for just a minute or two, stirring occasionally, until the garlic becomes wonderfully fragrant but importantly, not browned. This ensures its sweet and pungent flavor is fully released into the butter without becoming bitter. Once fragrant, remove the saucepan from the heat and stir in the fresh chopped Italian parsley. The intoxicating aroma alone is often enough to get anyone’s mouth watering in anticipation!
The timing of the glaze application is absolutely crucial for maximum flavor and adherence. As soon as the garlic knots come out of the oven, while they are still piping hot and receptive, immediately transfer them to a large mixing bowl. Generously pour the aromatic butter mixture over them and gently toss to ensure every single surface of every knot is thoroughly coated in that buttery, garlicky goodness. Finish this masterpiece by sprinkling generously with freshly grated Parmesan cheese, a delicate pinch of kosher salt (to taste), and a dash of freshly ground black pepper. The residual heat from the warm knots will help the Parmesan cheese melt ever so slightly and adhere perfectly, creating that utterly irresistible cheesy, garlicky crust that defines a truly great garlic knot. Serve these warm or even at room temperature alongside your favorite rich marinara sauce or vibrant homemade pesto for an unforgettable appetizer, side dish, or simply a delightful snack.
Tips for Garlic Knot Success: Ensuring Every Batch is Perfect
- Fresh Yeast is Key: Always double-check the expiration date on your active dry yeast. Old or inactive yeast will significantly hinder the dough’s ability to rise properly, potentially leading to dense, heavy knots instead of light and airy ones.
- Warm Water, Not Hot: The temperature of your water for activating the yeast is critical. Water that is too hot can kill the yeast, rendering it ineffective, while water that is too cold will fail to activate it sufficiently. Aim for a comfortable temperature between 105-115°F (40-46°C), which feels like warm bathwater.
- Don’t Rush the Rise: Patience during both the first and second rising periods is absolutely crucial for achieving the desired light, airy texture and optimal flavor development in your knots. Find a warm, draft-free spot in your kitchen to encourage a steady and successful rise.
- Measure Flour Accurately: Precision in measuring flour makes a significant difference. Too much flour can result in a stiff, dry dough that’s difficult to work with and yields tough knots. Use the “spoon and level” method (spoon flour into the measuring cup, then level off with a straight edge) or, even better, use a digital kitchen scale for the most accurate results.
- Ensure Even Knot Size: Try your best to make all your knots roughly the same size and thickness. This consistency is important for uniform baking, ensuring that all pieces cook through at the same rate and come out perfectly golden.
- Fresh Garlic & Parsley: These two fresh ingredients make an enormous difference in the final, vibrant flavor of your garlic knots. Avoid dried garlic or pre-minced garlic in a jar for the butter glaze; fresh is always best for that signature pungent and aromatic punch.
- Serve Warm: While garlic knots are undeniably delicious at room temperature, they truly reach their magical peak when served warm, with the butter still glistening and the garlic aroma filling the air.
- Storage: To keep any leftover garlic knots fresh, allow them to cool completely to room temperature. Then, store them in an airtight container for up to 2-3 days on your countertop.
- Reheating: For the best results when reheating, place leftover garlic knots in a preheated oven or toaster oven at 350°F (175°C) for 5-10 minutes. This method helps restore their warmed-through softness and a delightful slight crispness on the exterior. Microwaving can make them soft and chewy, but won’t bring back the crisp crust.
Serving Suggestions and Creative Variations for Your Garlic Knots
Garlic knots are incredibly versatile and pair beautifully with a wide multitude of dishes, making them a fantastic addition to almost any meal. They are a timeless, classic accompaniment to any authentic Italian meal, ranging from a rich, hearty lasagna to a simple, comforting spaghetti with meatballs. Beyond pasta, they also make fantastic, crowd-pleasing appetizers for casual gatherings, exciting game nights, or relaxed family dinners. Don’t feel limited to serving them with just marinara sauce; a vibrant homemade pesto, a creamy Alfredo sauce, or even a spicy arrabbiata dip can make for a delightful and exciting dipping companion, truly enhancing the experience.
Creative Twists to Elevate Your Garlic Knots:
- Cheesy Knots Galore: For an extra layer of indulgence, consider incorporating shredded mozzarella, provolone, or even a sharp cheddar cheese directly into the dough before you begin the shaping process. Alternatively, sprinkle a generous amount of extra cheese on top of the shaped knots just before they go into the oven for a crispy, cheesy crust.
- Herbaceous Variations: Feel free to experiment with a variety of different herbs in your garlic butter mixture for an aromatic and unique twist. Dried oregano, fresh rosemary (a fantastic pairing with garlic), thyme, or even a pre-mixed blend of Italian herbs would all be wonderfully delicious additions, offering distinct flavor profiles.
- A Zesty Spicy Kick: For those who enjoy a bit of heat, add a generous pinch of red pepper flakes to your butter mixture. This will introduce a subtle, warming kick that beautifully complements the pungent garlic flavor, adding an exciting dimension.
- Everything Bagel Seasoning Knots: For a truly unique savory crunch and an interesting texture, generously sprinkle some everything bagel seasoning (which typically includes sesame seeds, poppy seeds, dried garlic, dried onion, and salt) on the unbaked knots just before they enter the oven.
- Sweet Garlic Glaze with a Twist: For an adventurous palate, a touch of honey or brown sugar can be delicately added to the garlic butter. This creates a fascinating slightly sweet and savory profile, which is particularly delicious when combined with a hint of fresh rosemary, offering a gourmet touch.
Garlic Knots Recipe
Garlic Knots
Paige Adams
20
20
2
30
3
10
28
knots
Print Recipe
Ingredients
- 1-1/4 cups warm water
- 1 packet dry active yeast (2-1/4 teaspoons)
- 1 teaspoon granulated sugar
- 3 tablespoons olive oil plus more for oiling bowl
- 3 cups bread flour plus more for work surface
- 1 teaspoon kosher salt
- 1/2 teaspoon black pepper
- 2 tablespoons unsalted butter
- 3 garlic cloves, minced
- 2 tablespoons chopped Italian parsley
- 1/4 cup grated Parmesan cheese
- 1 teaspoon kosher salt (for tossing)
- 1/2 teaspoon black pepper (for tossing)
- Marinara sauce and pesto for serving
Instructions
- For the dough, combine the water, yeast, sugar and 1 tablespoon olive oil and let stand for 5 minutes until foamy. In a large bowl, mix together the flour and salt. Add the wet ingredients to the dry and stir until it forms a shaggy dough. Turn the dough onto a lightly floured work surface and knead for 10 minutes until the dough is smooth and elastic. (Alternatively, the dough can be mixed in the bowl of a stand mixer using a dough hook.)
- Gather the dough into a ball, transfer to an oiled bowl and cover. Place the bowl in a warm spot to allow the dough to rise until it has doubled in size, about 1-1/2 – 2 hours.
- On a lightly floured work surface, divide the dough into 1-ounce balls about 1-1/2 inches in diameter. Roll each ball into a 6-inch log and tie in a knot. Place the knots on a parchment lined sheet pan 2 inches apart. Cover with plastic wrap and let rise for 30 minutes until they have doubled in size.
- Preheat the oven to 400 degrees F. Bake the knots for 12-15 minutes until they turn light brown.
- While the knots are baking, melt the butter with the remaining olive oil and garlic over medium heat. Stir in the parsley. When the knots are finished baking but still warm, toss them in the butter mixture and Parmesan and season with salt and pepper. Serve warm or at room temperature with marinara sauce and pesto.
Nutrition
Calories:
75
kcal
|
Carbohydrates:
10
g
|
Protein:
2
g
|
Fat:
3
g
|
Saturated Fat:
1
g
|
Polyunsaturated Fat:
0.3
g
|
Monounsaturated Fat:
1
g
|
Trans Fat:
0.03
g
|
Cholesterol:
3
mg
|
Sodium:
183
mg
|
Potassium:
21
mg
|
Fiber:
0.4
g
|
Sugar:
0.2
g
|
Vitamin A:
57
IU
|
Vitamin C:
0.5
mg
|
Calcium:
12
mg
|
Iron:
0.2
mg
Nutrition information is automatically calculated, so should only be used as an approximation.
Additional Info
Appetizers, Bread
Italian
Did you make this recipe?
Mention @lastingredient on Instagram and tag it #lastingredient!
Frequently Asked Questions About Garlic Knots
- Can I use store-bought pizza dough for this recipe?
- Yes, absolutely! While homemade dough offers the very best flavor and texture, using quality store-bought pizza dough is a fantastic and convenient shortcut for those times when you’re short on time. Just ensure it’s at room temperature before you begin shaping for easier handling and better rising results.
- How should I store leftover garlic knots?
- Allow any leftover garlic knots to cool completely to room temperature. Then, store them in an airtight container to maintain freshness. They will keep well at room temperature for up to 2-3 days. For longer storage, you have the option to freeze them.
- Can I freeze garlic knots?
- Yes, you certainly can! There are a couple of effective ways to freeze them:
- Baked and Glazed: Bake and glaze the knots as directed in the recipe, then let them cool completely. Freeze them in a single layer on a baking sheet until solid, then transfer them to a freezer-safe bag or airtight container. They can be stored for up to 1-2 months. Reheat from frozen in a preheated 350°F (175°C) oven until warmed through and slightly crisp.
- Unbaked (After First Rise): After the first rise, shape the knots and arrange them on a parchment-lined baking sheet. Freeze until solid, then transfer to a freezer-safe bag. When you’re ready to bake, thaw them overnight in the refrigerator, then let them come to room temperature and complete their second rise before baking as usual. This method generally yields the freshest, most homemade-like results.
- What’s the best way to reheat garlic knots?
- For the best and most delicious results, reheat garlic knots in a preheated oven or toaster oven at 350°F (175°C) for 5-10 minutes, or until they are warmed through and have regained a slightly crisp texture on the outside. While microwaving them can make them soft and chewy, it won’t restore that desirable crisp crust.
- Can I add other herbs to the garlic butter?
- Certainly! While fresh parsley is a classic and delightful choice, feel free to experiment with other fresh or dried herbs to customize the flavor. Rosemary, oregano, basil, or a blend of classic Italian herbs would all be wonderfully delicious additions to the garlic butter glaze, offering different aromatic dimensions.
Final Thoughts on Your Homemade Garlic Knot Journey
Embarking on the journey of making garlic knots from scratch is a culinary endeavor that promises not only incredibly delicious flavors but also a truly satisfying and rewarding baking experience. From the therapeutic and engaging process of kneading the dough to the delightful, comforting aroma that gracefully fills your entire kitchen as they bake, every single step is a joy. These homemade garlic knots are far more than just a recipe; they are an invitation to slow down, create something genuinely delicious and comforting with your own hands, and then share that warmth and flavor with your loved ones. Whether served as a stellar appetizer, a perfect side to a hearty pasta dish, or simply enjoyed on their own as a comforting snack, these fluffy, wonderfully garlicky bites are absolutely sure to become a cherished and beloved staple in your home kitchen. So, roll up your sleeves, gather your ingredients with enthusiasm, and embark on your very own garlic knot journey – we promise, you certainly won’t regret it!