

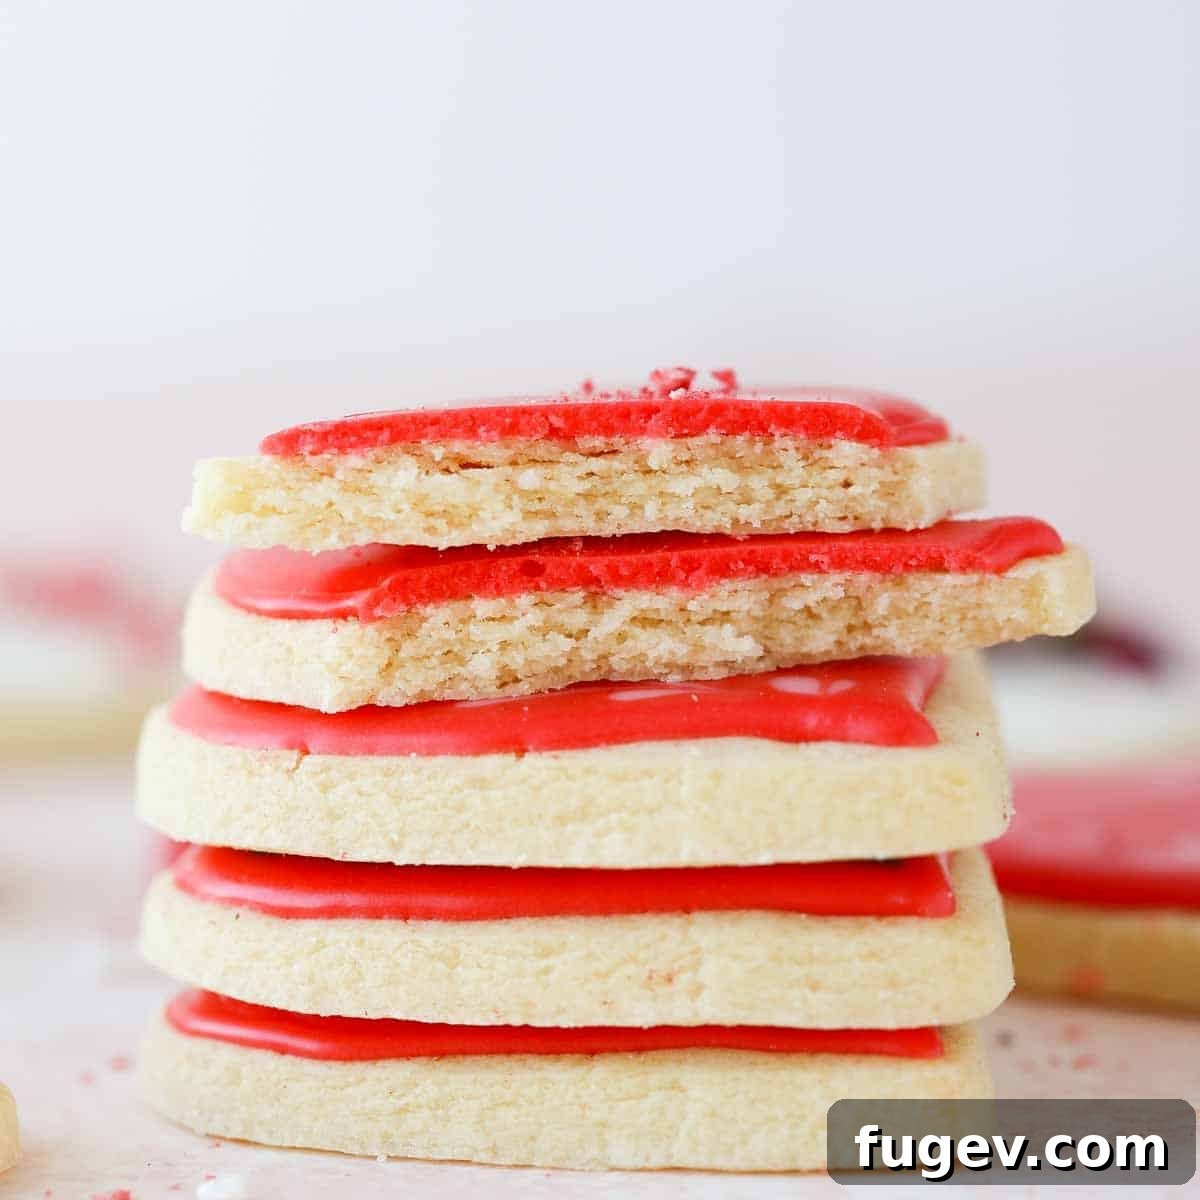
Welcome to the ultimate guide for crafting the most exquisite soft sugar cookies you’ll ever bake! This recipe isn’t just easy; it’s a game-changer. Imagine a delightful cookie made in just one bowl, with a mere six pantry staples, yielding a dough that’s a dream to roll. Best of all, these cookies maintain their perfect shape without spreading during baking, resulting in a tender, slightly chewy texture infused with a luxurious vanilla flavor. Whether you’re a seasoned baker or just starting your culinary journey, these cut-out sugar cookies are destined to become your go-to.


A Quick Glance at the Recipe
This is a brief summary of the recipe. For comprehensive details and instructions, you can jump directly to the full recipe card.
Jump to Recipe
Prep Time
15 minutes
Cook Time
8 minutes
Decorating Time
30 minutes
Total Time
23 minutes (excluding chilling and full drying time)
Servings
40 Cookies
Difficulty
Easy
Calories *
121 kcal per serving
Technique
Prepare dough, roll, chill, cut, bake, make royal icing, ice cooled cookies.
Flavor Profile
Classic vanilla sugar cookie with a bright lemon royal icing.
* Based on approximate nutrition panel
Perfect cookies! I made these in a stand mixer and they turned out great! Super easy to make, I cut them into rounds, hearts, and stars. I will be making these for Christmas to use in a cookie decorating session with my little niece and nephew; they will love it!⭐⭐⭐⭐⭐
Mara
Why This is the Best Soft Sugar Cookie Recipe You’ll Find
There are countless sugar cookie recipes out there, but this one stands out from the rest. Here’s why these soft cut-out sugar cookies are an absolute must-try for any baking enthusiast:
- Effortless Preparation & Rolling: Say goodbye to complicated steps and messy countertops! This cookie dough comes together beautifully in just one bowl using simple, everyday pantry ingredients and melted butter. The dough is incredibly pliable and easy to handle, allowing you to roll it out effortlessly. Our secret parchment paper technique even eliminates the need for extra flour, ensuring perfect consistency every time.
- Unforgettable Flavor, Even Without Decoration: While many recipes prioritize appearance, these cookies are a triumph of both taste and aesthetics. Each bite offers a perfectly balanced sweetness and a delightful vanilla essence. The soft, slightly chewy texture is irresistible on its own, making them a fantastic treat even before any icing is applied. You don’t have to sacrifice flavor for a cookie that holds its shape.
- The Ideal Canvas for Creative Decorating: Designed with decorators in mind, these soft sugar cookies boast an incredible ability to hold intricate shapes without spreading in the oven. They bake up remarkably flat, providing a smooth and even surface that’s perfect for detailed royal icing designs. This characteristic makes them a joy to decorate, allowing you to create stunning edible art without the frustration of runny or pooled icing.
Table of Contents
- Why This is the Best Soft Sugar Cookie Recipe You’ll Find
- Baking Essentials: Ingredients Needed
- Variations & Substitutions: Get Creative!
- Professional Tips for Flawless Cut-Out Sugar Cookies
- Step-by-Step: How to Make Soft Cut-Out Sugar Cookies
- Chef Lindsey’s Pro Baking Tips
- Troubleshooting Common Sugar Cookie Issues
- Recipe FAQs: Your Questions Answered
- More Delicious Cookie Recipes You’ll Love
- Full Recipe: Soft Cut-Out Sugar Cookies
- Before You Go: Explore More Baking Delights
This article presents a thoroughly updated and perfected recipe for rolled sugar cookies. Drawing inspiration from the soft, slightly chewy texture of the cookies we once proudly sold in our bakery, this recipe delivers cookies that consistently bake flat for effortless decorating and, most importantly, possess an exquisite flavor even without a single drop of icing. These characteristics make them the ideal foundation for all your cookie artistry.
In the accompanying photographs, these delightful cookies are adorned with my trusted and true royal icing recipe. However, the possibilities are endless! Feel free to experiment with an easy cookie icing, a sprinkle of sanding sugar for a touch of sparkle, or simply enjoy them unadorned. These versatile cut-out sugar cookies are a fantastic addition to any holiday platter, perfectly complementing other festive favorites like chewy molasses cookies, classic peanut butter blossoms, elegant snowball cookies, and traditional pfeffernusse.
Originally published in 2014, the initial version of this recipe produced a soft yet slightly cakey rolled sugar cookie. That recipe is phenomenal in its own right, though distinct from the delightful cookies pictured here. To ensure that returning bakers can find the recipe they remember, I’ve thoughtfully preserved the original instructions within the Notes section of the Recipe Card below. This allows you to choose your preferred soft sugar cookie experience!
Baking Essentials: Ingredients Needed for Perfect Sugar Cookies
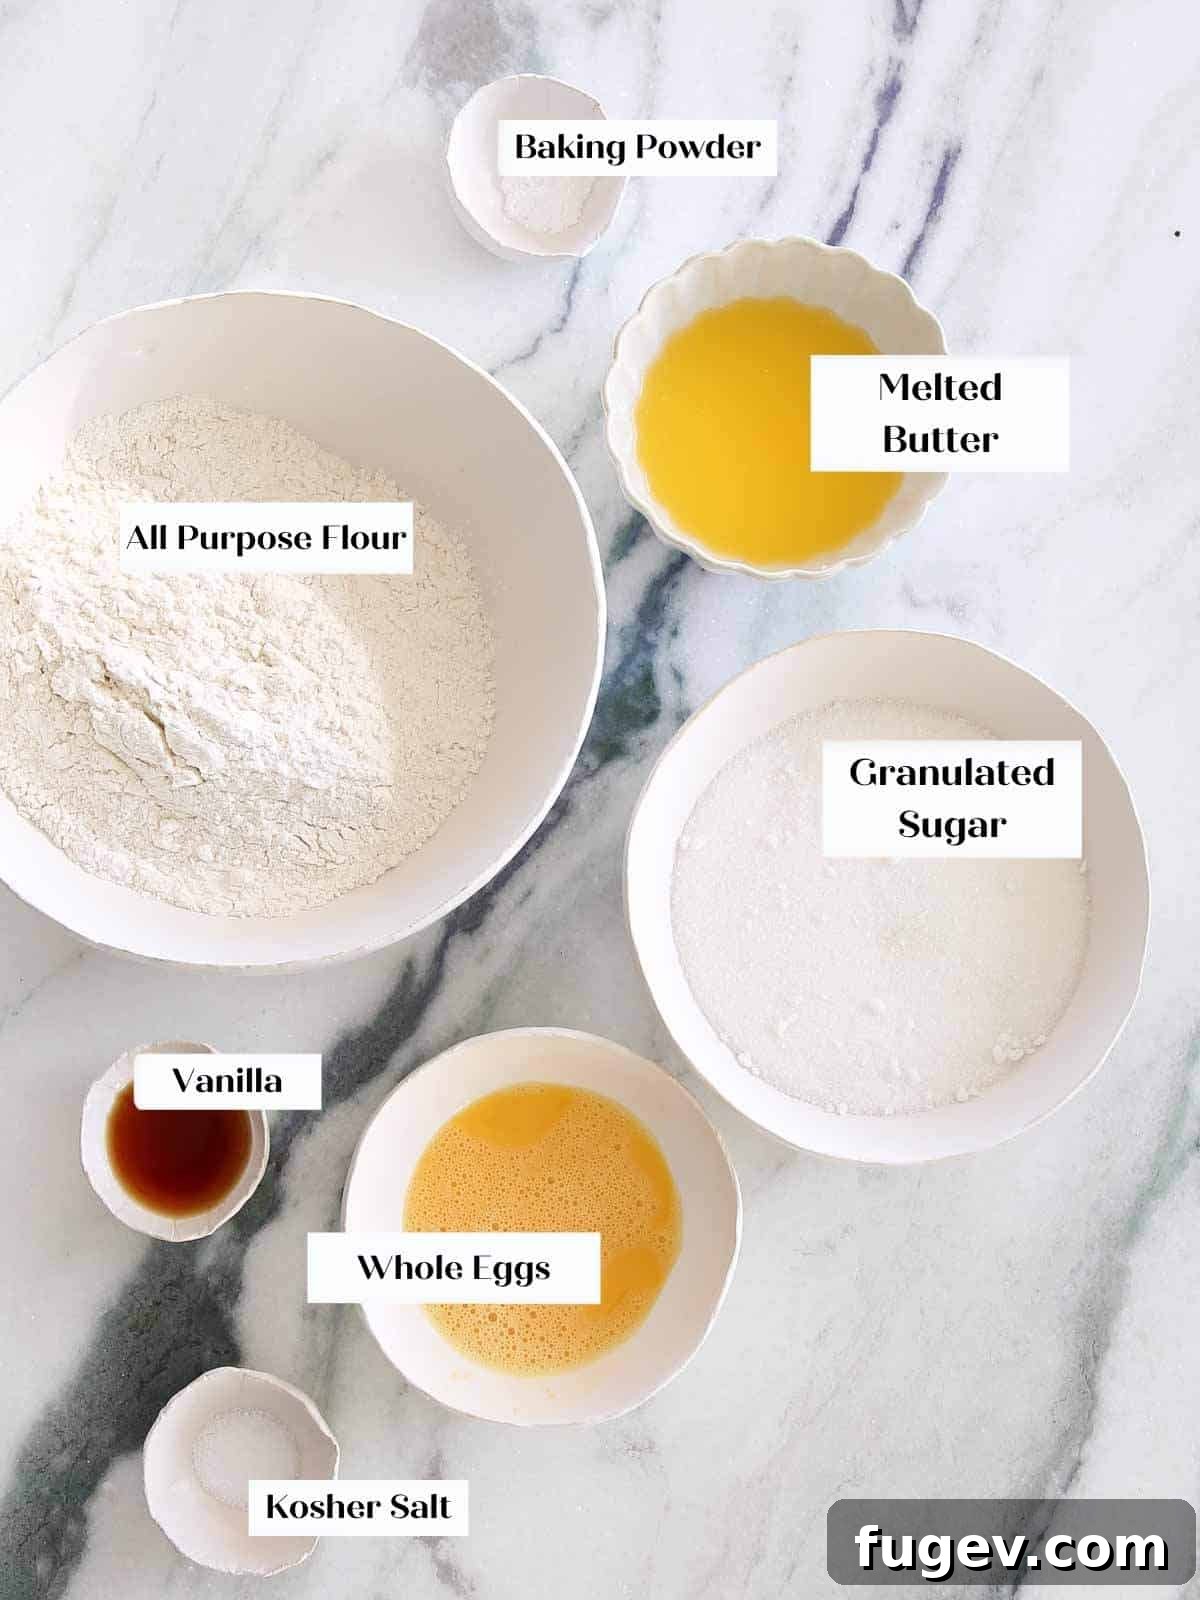
Creating extraordinary soft cut-out sugar cookies starts with understanding the role of each ingredient. Here’s a detailed look at what you’ll need and why it matters:
- All-Purpose Flour: This is the backbone of our cookies. All-purpose flour or pastry flour will provide just the right amount of gluten to give the cookies structure without making them tough or overly chewy. Avoid bread flour, as its high protein content would result in a very firm, undesirable texture for these delicate cookies.
- Baking Powder: A touch of baking powder is crucial for a slight lift, ensuring your cookies are soft and tender, not flat and dense. We use a minimal amount to prevent them from becoming puffy or developing a dome, which would make decorating a challenge.
- Kosher Salt: Salt isn’t just for savory dishes; it’s a flavor enhancer in baking. Kosher salt balances the sweetness and brings out the rich vanilla notes, contributing to a more complex and satisfying flavor profile.
- Unsalted Butter (Melted): Using unsalted butter allows you to precisely control the salt content in your recipe. Melting the butter contributes significant fat and moisture, which is key to achieving that wonderfully soft and chewy texture. Unlike recipes that use softened butter, melted butter creates a dough that’s easier to mix and roll.
- Granulated Sugar: The granulated sugar provides the perfect level of sweetness, ensuring the cookies are delightful without being cloying. Crucially, the amount used is carefully balanced to prevent excessive spreading during baking, allowing your cut-out shapes to remain crisp and defined. This differs from other chewy sugar cookie recipes, which are often designed to spread.
- Whole Egg: Eggs play multiple vital roles. They add richness and moisture, helping to bind the dough and emulsify the ingredients for a smooth consistency. The fat from the yolk contributes to the chewy texture, while the egg white adds structure.
- Vanilla Extract: High-quality vanilla extract is paramount. It’s the primary flavoring agent in classic sugar cookies, infusing them with a warm, inviting aroma and a deep, comforting taste that truly defines a great sugar cookie. Don’t skimp on this!
Refer to the recipe card below for precise measurements and quantities.
Variations & Substitutions: Get Creative with Your Sugar Cookies!
While the classic vanilla sugar cookie is undeniably delicious, this recipe offers a fantastic base for endless creativity. Don’t hesitate to experiment and personalize your cookies:
- Experiment with Icing Styles: Beyond traditional royal icing, consider a creamy cream cheese icing for a softer, tangier flavor. For a quick and easy sparkle, brush the unbaked cookies with a beaten egg white and then dip them generously in sanding sugar or your favorite sprinkles. You can achieve a completely different look with the same delicious cookie, like these vibrant Valentine’s Day Cookies.
- Infuse the Dough with Different Flavors: Tired of plain vanilla? We understand! Unleash your inner flavor artist. Try swapping a portion of the vanilla extract for almond, peppermint, lemon, or even coffee extract for a unique twist. For a brighter, citrusy note, zest a lemon, orange, or lime directly into the granulated sugar before mixing – this helps release the oils and deepen the flavor. For chocolate lovers, adapt the recipe to create these indulgent soft chocolate sugar cookies, or embrace warmth with my beloved cinnamon sugar cookies.
- Incorporate Fun Add-ins: That’s right, you absolutely can (and should!) add exciting mix-ins to the dough! Think finely chopped nuts, miniature chocolate chips, colorful sprinkles, or other small, delightful additions. Just ensure your chosen mix-ins are small enough to allow for easy rolling and cutting of the dough without causing tears or uneven textures.

Professional Tips for Flawless Cut-Out Sugar Cookies
Achieving perfectly uniform, soft, and delicious cut-out sugar cookies requires a few expert techniques. Here are some professional tips to elevate your baking:
- Roll Out Dough Between Parchment Paper: This is a game-changer! Rolling your dough between two sheets of parchment paper completely eliminates the need for additional flour. Why is this important? Excess flour can dry out your dough, making your cookies tough, brittle, and diminishing their delicate flavor. Plus, it makes for a much cleaner workspace!
- Optimal Rolling Temperature: This dough is incredibly forgiving and rolls best at room temperature. You have two options: either roll it immediately after mixing, or if you prefer to chill the dough first, allow it to sit out at room temperature for a short while to become pliable again before rolling. This flexibility makes the process much smoother.
- The Crucial Chilling Step: Do NOT skip chilling! While you *can* technically make the dough, roll, cut, and freeze for 15 minutes before baking for decent results, those cookies might be slightly tougher. For the most wonderfully tender, soft sugar cookies, it’s best to refrigerate the dough after rolling it out, and then give the cut-out shapes another quick chill just before baking. This two-stage chilling process relaxes the gluten, preventing spreading and ensuring a delicate crumb.
- Maintain Consistent Thickness: For even baking and a professional appearance, aim for a uniform dough thickness, ideally around ¼ inch. Using a rolling pin with adjustable guides or a simple set of dowels can help you achieve this consistency effortlessly.
- Don’t Overwork the Dough: While combining ingredients, mix just until everything is incorporated. Overworking the dough develops too much gluten, which can lead to tough, dense cookies. A light touch is key for tenderness.
- Even Baking is Key: To ensure all your cookies bake perfectly, group similar shapes and sizes on the same baking sheet. Smaller cookies will bake faster than larger ones, so baking them separately prevents some from burning while others remain undercooked. Rotate your baking sheets halfway through baking for even browning.
Step-by-Step: How to Make Soft Cut-Out Sugar Cookies
Follow these detailed instructions to create the perfect soft sugar cookies, ready for any occasion! I’ve also included guidelines for making royal icing and a quick tutorial on how to use it. For a comprehensive guide to royal icing, refer to my dedicated royal icing with meringue powder post.
Phase 1: Crafting the Perfect Cookie Dough
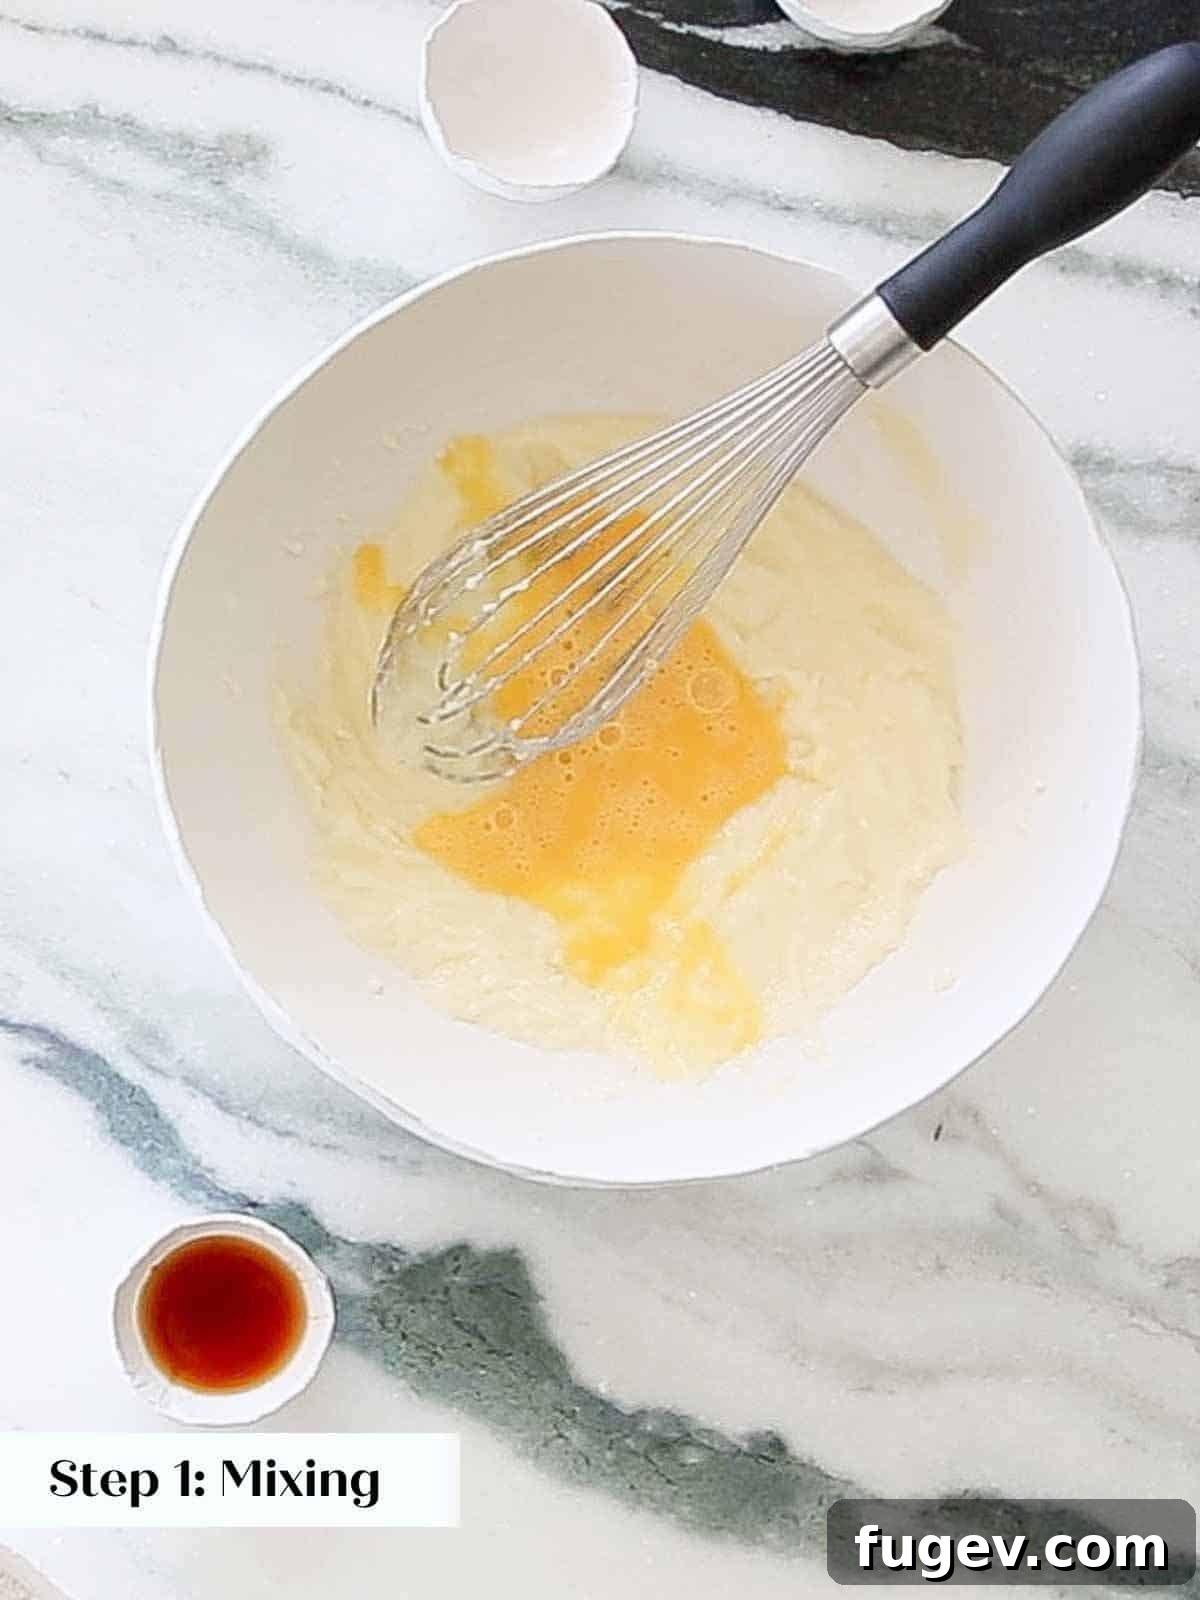
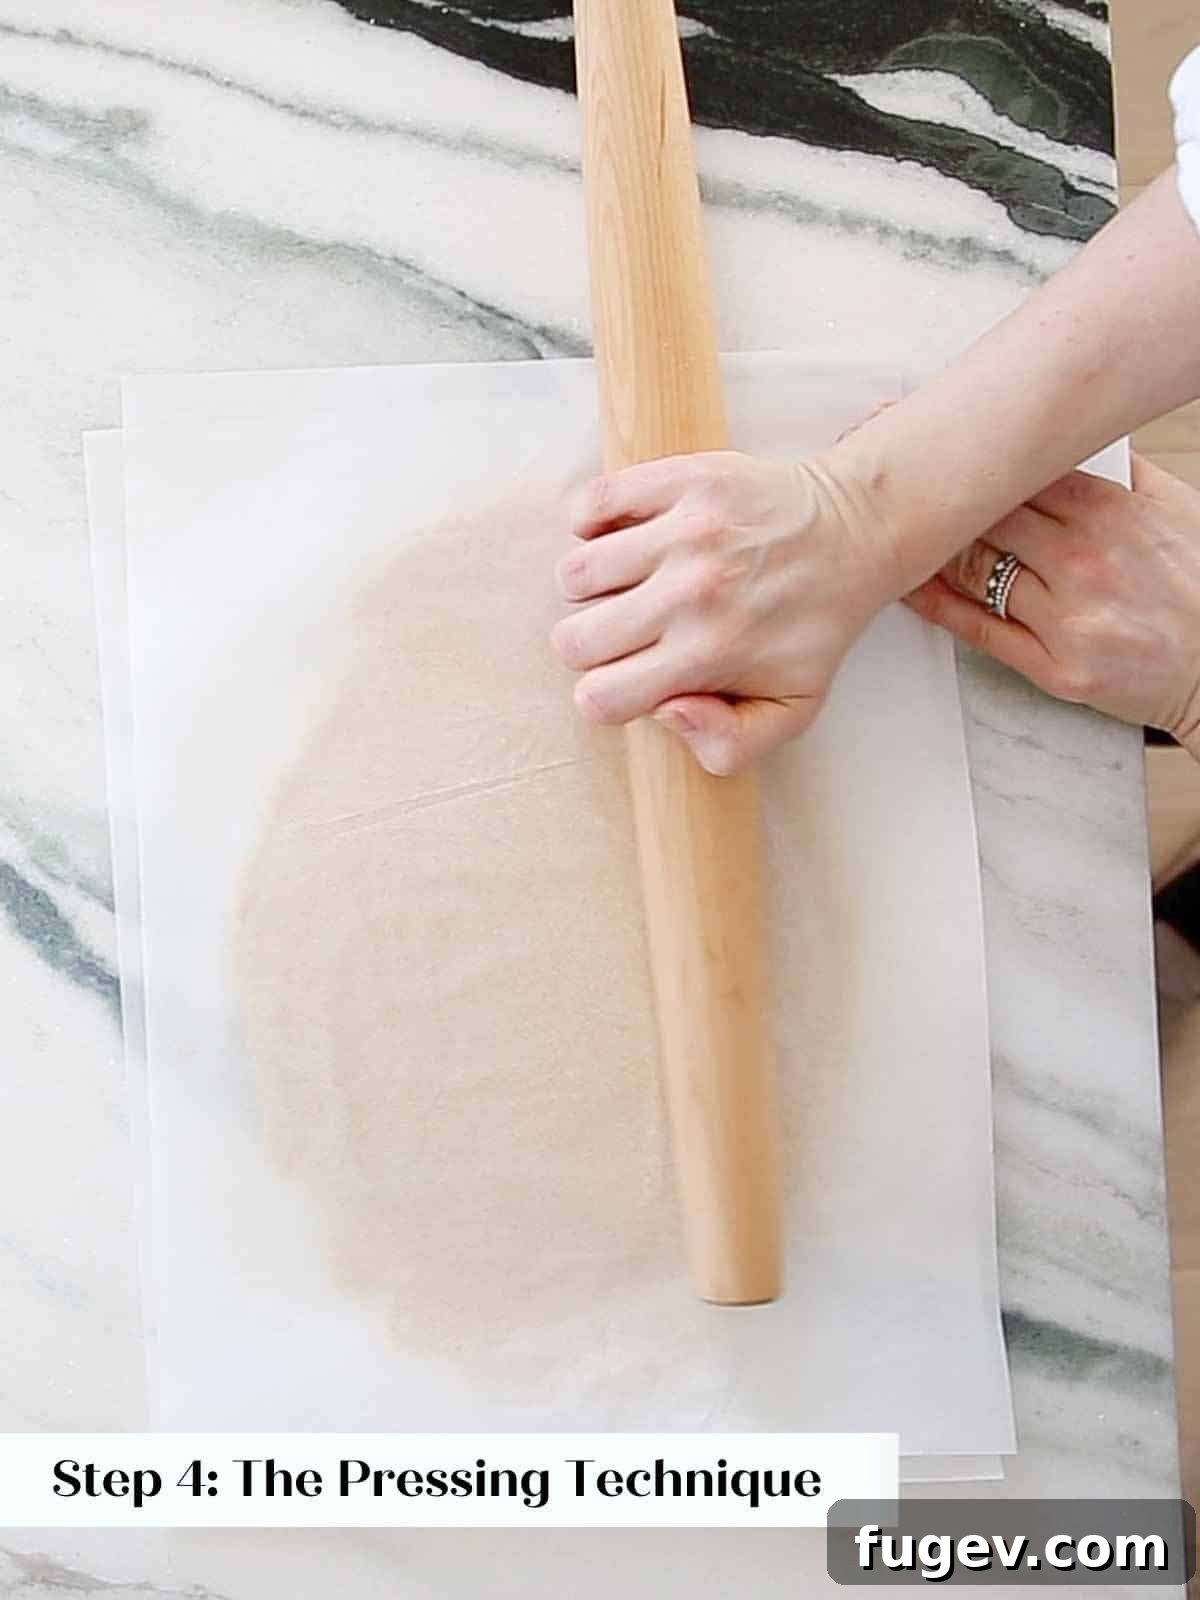
Step 1: Combine Dry Ingredients. In a large mixing bowl, thoroughly whisk together the all-purpose flour, baking powder, and kosher salt. Ensure these dry ingredients are well combined before setting the bowl aside. This step helps distribute the leavening evenly.
Step 2: Prepare Wet Ingredients. In a separate, even larger bowl, melt the butter. You can use a microwave for this, heating it just until melted but not boiling hot. Once melted, whisk in the granulated sugar vigorously until it’s fully incorporated. Then, add the whole egg and vanilla extract, continuing to whisk vigorously until the mixture is beautifully emulsified. You should see no distinct streaks of butter or egg, indicating a smooth, cohesive liquid base.
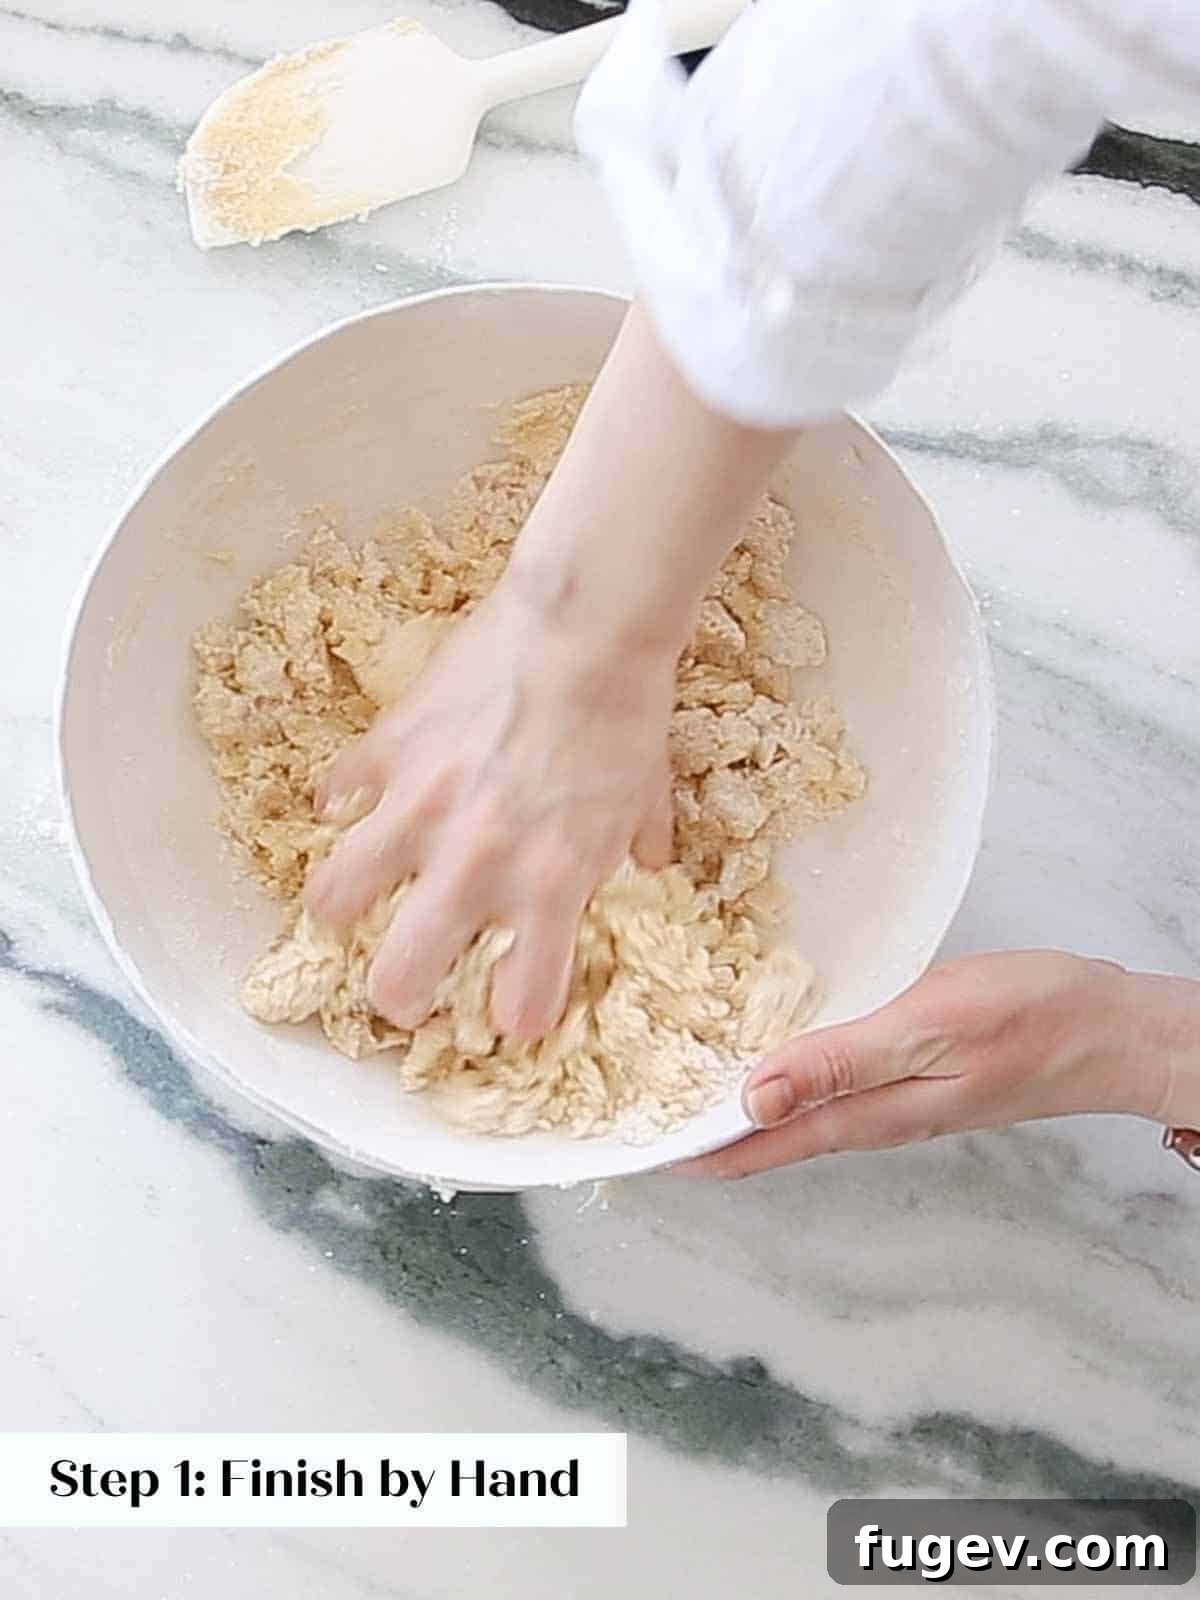
Step 3: Integrate Wet and Dry. Gradually add the dry flour mixture to the wet ingredients, stirring slowly. Initially, the dough might appear dry and crumbly. To ensure all ingredients are well-incorporated without overdeveloping gluten, finish mixing by hand. Gently squeeze the dough together until it forms a cohesive ball. This technique helps combine the flour faster and results in a more tender cookie.
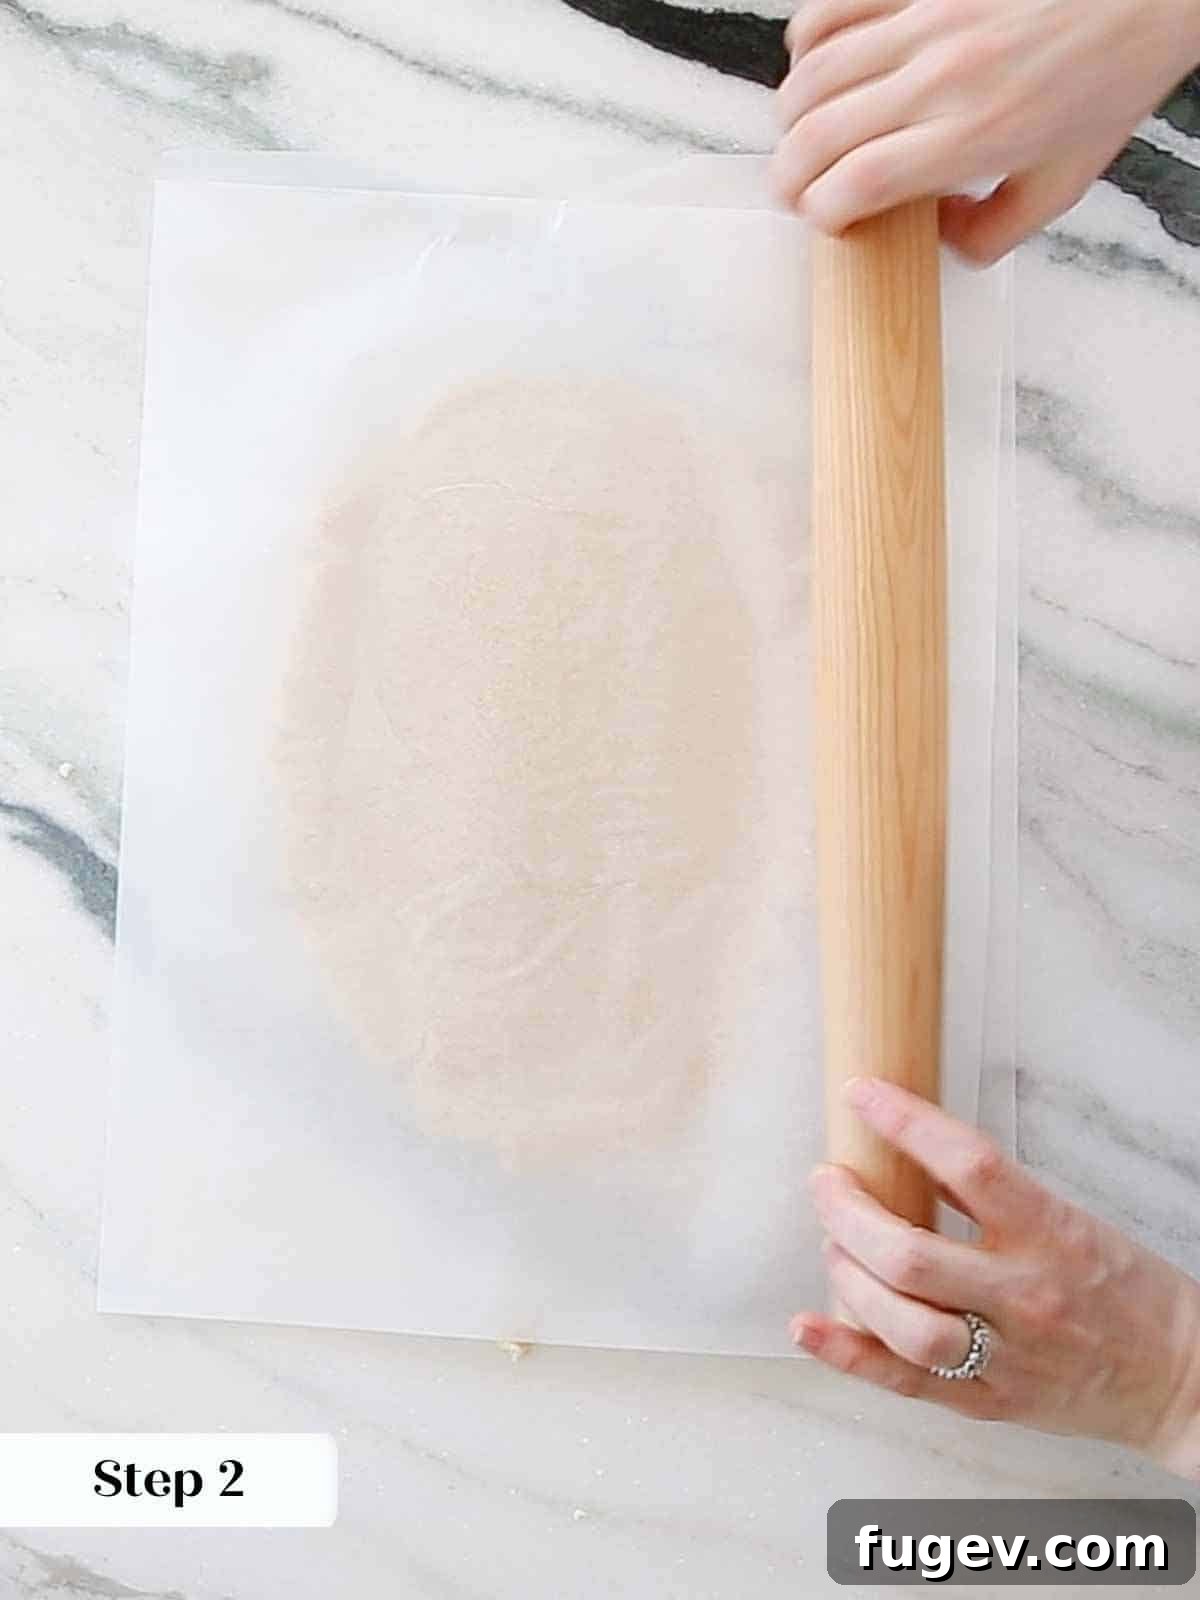
Step 4: Roll the Dough. While the dough is at room temperature, roll it out to an approximate thickness of ¼ inch. For the best, most consistent results and to avoid adding excess flour, I highly recommend rolling the dough between two pieces of parchment paper. If parchment isn’t available, you can lightly flour your work surface, but be mindful not to incorporate too much flour into the dough.
Chef Lindsey’s Pro Baking Tips
Chef Lindsey’s Dough Pressing Technique: To easily smooth and flatten cookie dough between pieces of parchment paper, I like to press the dough away from me with a rolling pin in one hand while the other hand securely holds both pieces of parchment. This method essentially creates a manual dough sheeter, ensuring an even thickness without sticking! While a flat rolling pin works best for this, you can achieve excellent results with a tapered French pin, as demonstrated in the photos.
Step 5: Chill the Dough. Refrigerate the rolled dough until it is thoroughly chilled. While a minimum of 30 minutes will suffice, for truly superior, tender, and soft sugar cookies, I recommend allowing it to chill for a full 2 hours, or even overnight. This extended chilling period allows the gluten to relax completely, which is crucial for preventing spreading and ensuring a perfectly delicate texture.
Phase 2: Cutting & Baking Your Masterpiece
Step 6: Preheat and Prepare. When you’re ready to bake, preheat your oven to 325° F (160° C) if using a convection setting, or 350° F (175° C) for a conventional oven. Line two baking sheets with parchment paper. If you’ve already rolled your dough between parchment sheets, you can simply transfer those to line your pans.
Step 7: Cut and Re-Chill. Gently unstick the parchment paper from both sides of your chilled dough. Using a lightly floured cookie cutter, cut your desired shapes. Arrange the cut-out cookies on your prepared baking sheets. Crucially, chill these cut cookies again for approximately 20 minutes before baking. This second chill helps them hold their shape flawlessly in the oven.
Step 8: Bake to Perfection. Bake in the preheated oven for 7-9 minutes. Keep a close eye on them; the cookies are done when they appear matte in the center with a few small cracks, and the edges may just begin to turn a very light golden brown. For uniform baking, always bake cookies of the same shape and size together on one sheet. This prevents over or under-baking.
Step 9: Cool Completely. Once baked, transfer the cookies to a wire rack and allow them to cool entirely before attempting to ice them. Icing warm cookies will cause the icing to melt and run.
Phase 3: Crafting & Applying Royal Icing
Making the Royal Icing:
Step 1: Whisk Egg Whites and Lemon Juice. In a large bowl, or in the bowl of a stand mixer fitted with the whisk attachment, combine the dried egg whites (or meringue powder) and fresh lemon juice. Whisk on medium-high speed until soft peaks begin to form. The lemon juice not only adds a lovely flavor but also helps stabilize the egg whites.
Step 2: Add Powdered Sugar. Gradually add all the powdered sugar to the mixture and continue whisking until thoroughly combined and smooth. The icing should be thick and glossy.
Step 3: Color and Adjust Consistency. Separate the icing into different bowls for coloring with food dye. As you add dye, be mindful of the consistency; some gel dyes can thin the icing. If your icing becomes too thin, add a small amount of extra powdered sugar; if too thick, add a tiny bit of milk or water, drop by drop.
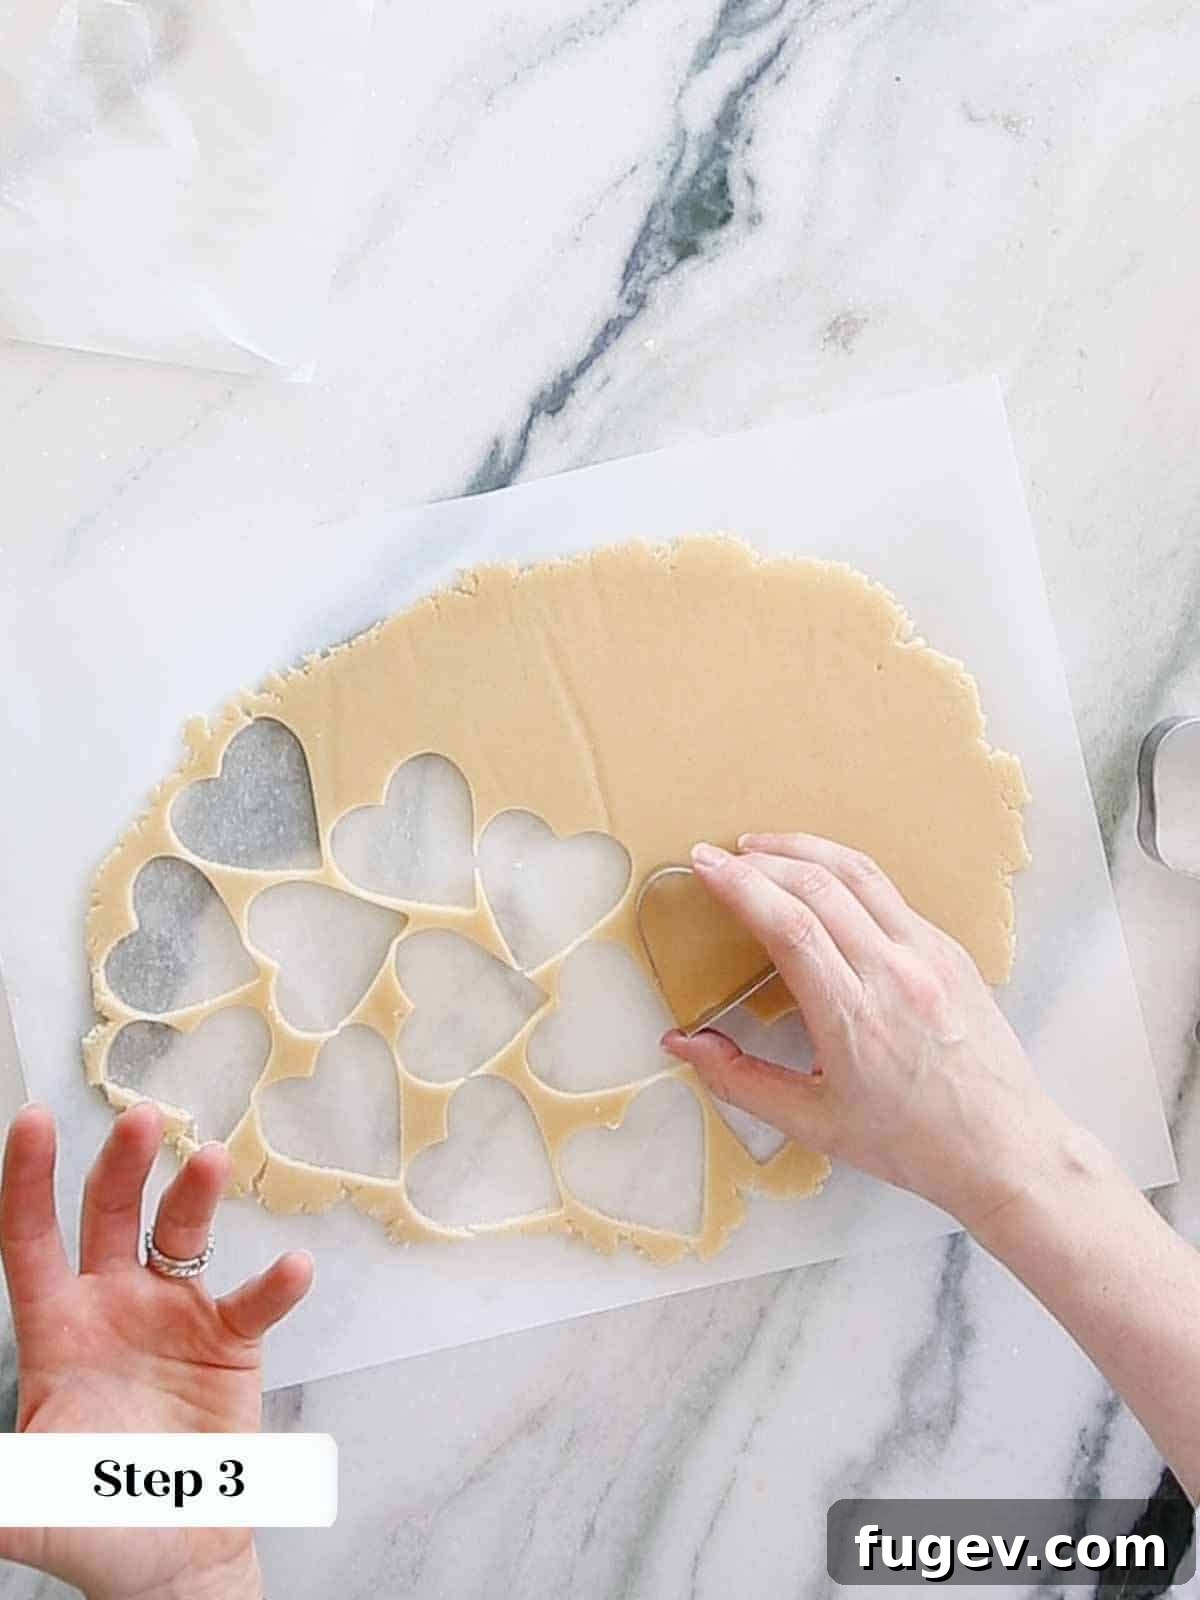
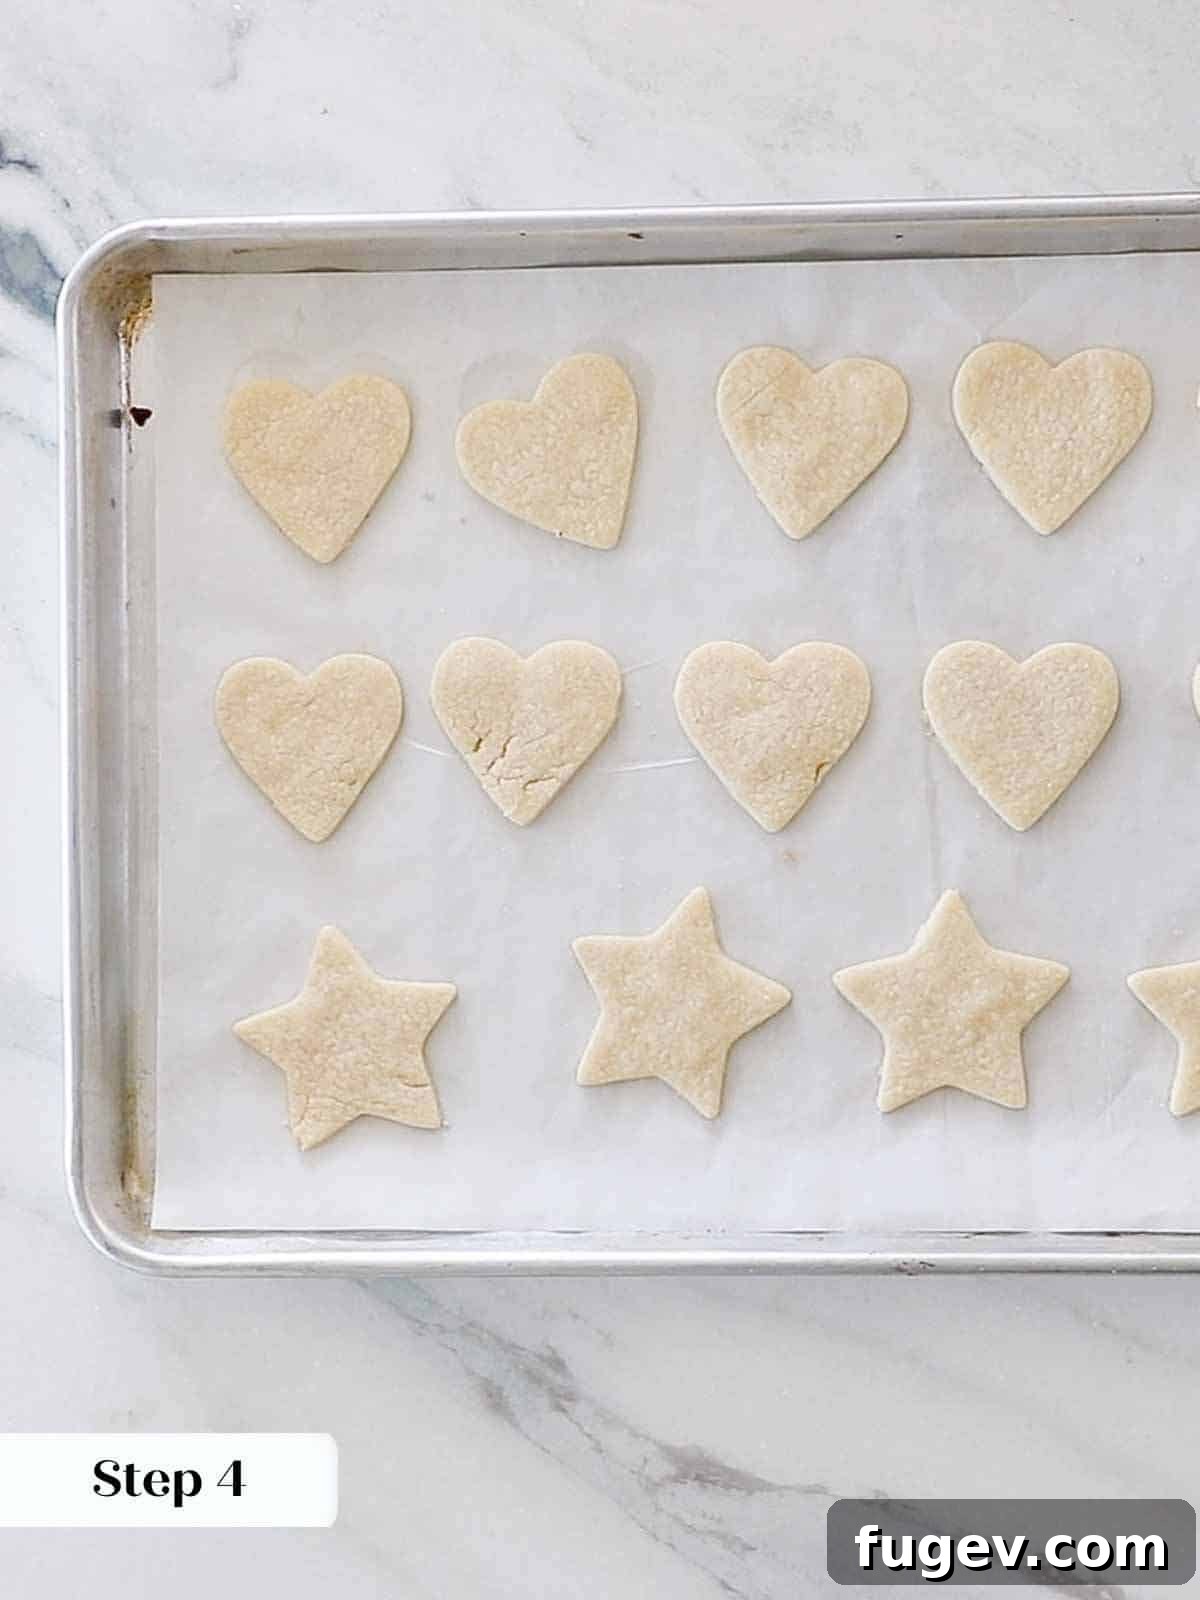
Step 4: Achieving Outlining Consistency (Ribbon Test). For outlining, the icing needs to be thick enough to hold a crisp line. Perform the “ribbon test”: Lift your spatula and let the icing cascade slowly back into the bowl. It should remain clearly visible on the surface for about 5-6 seconds before slowly disappearing back into the rest of the icing. This indicates the perfect consistency for outlines.
Step 5: Achieving Flooding Consistency (Faster Ribbon Test). For flooding (filling in the outlines), the icing needs to be thinner and more fluid. Using the same ribbon test, the icing should cascade off your spatula and almost instantly disappear into the rest of the icing, leaving virtually no trace. This allows for smooth, even coverage.
Icing Consistency Pro Tip: It’s easy to make royal icing too thin, which will prevent it from setting hard and cause colors to bleed. Practice is key to finding your ideal consistency: thin enough to spread easily without excessive pressure, but thick enough to set firmly and be opaque.
Step 6: Prepare Piping Bags. Transfer your outlining consistency icing and flooding consistency icing into separate piping bags. If you don’t have piping tips, simply snip a tiny corner off the bag.
A Quick Royal Icing Tutorial for Decorating:
Here’s a simplified overview of how to ice your sugar cookies with royal icing:
Step 1: Size the Piping Tip/Hole. Start by cutting a very small tip off the outline piping bag – smaller than you think you need. Test a line on a piece of parchment paper. If the line squiggles or breaks, snip the tip just a tiny bit bigger. Repeat this test until you can achieve a thin, straight, consistent line with gentle pressure. Do the same for the flooding bag, but cut a larger opening to allow for a good flow of icing without needing to squeeze too hard.
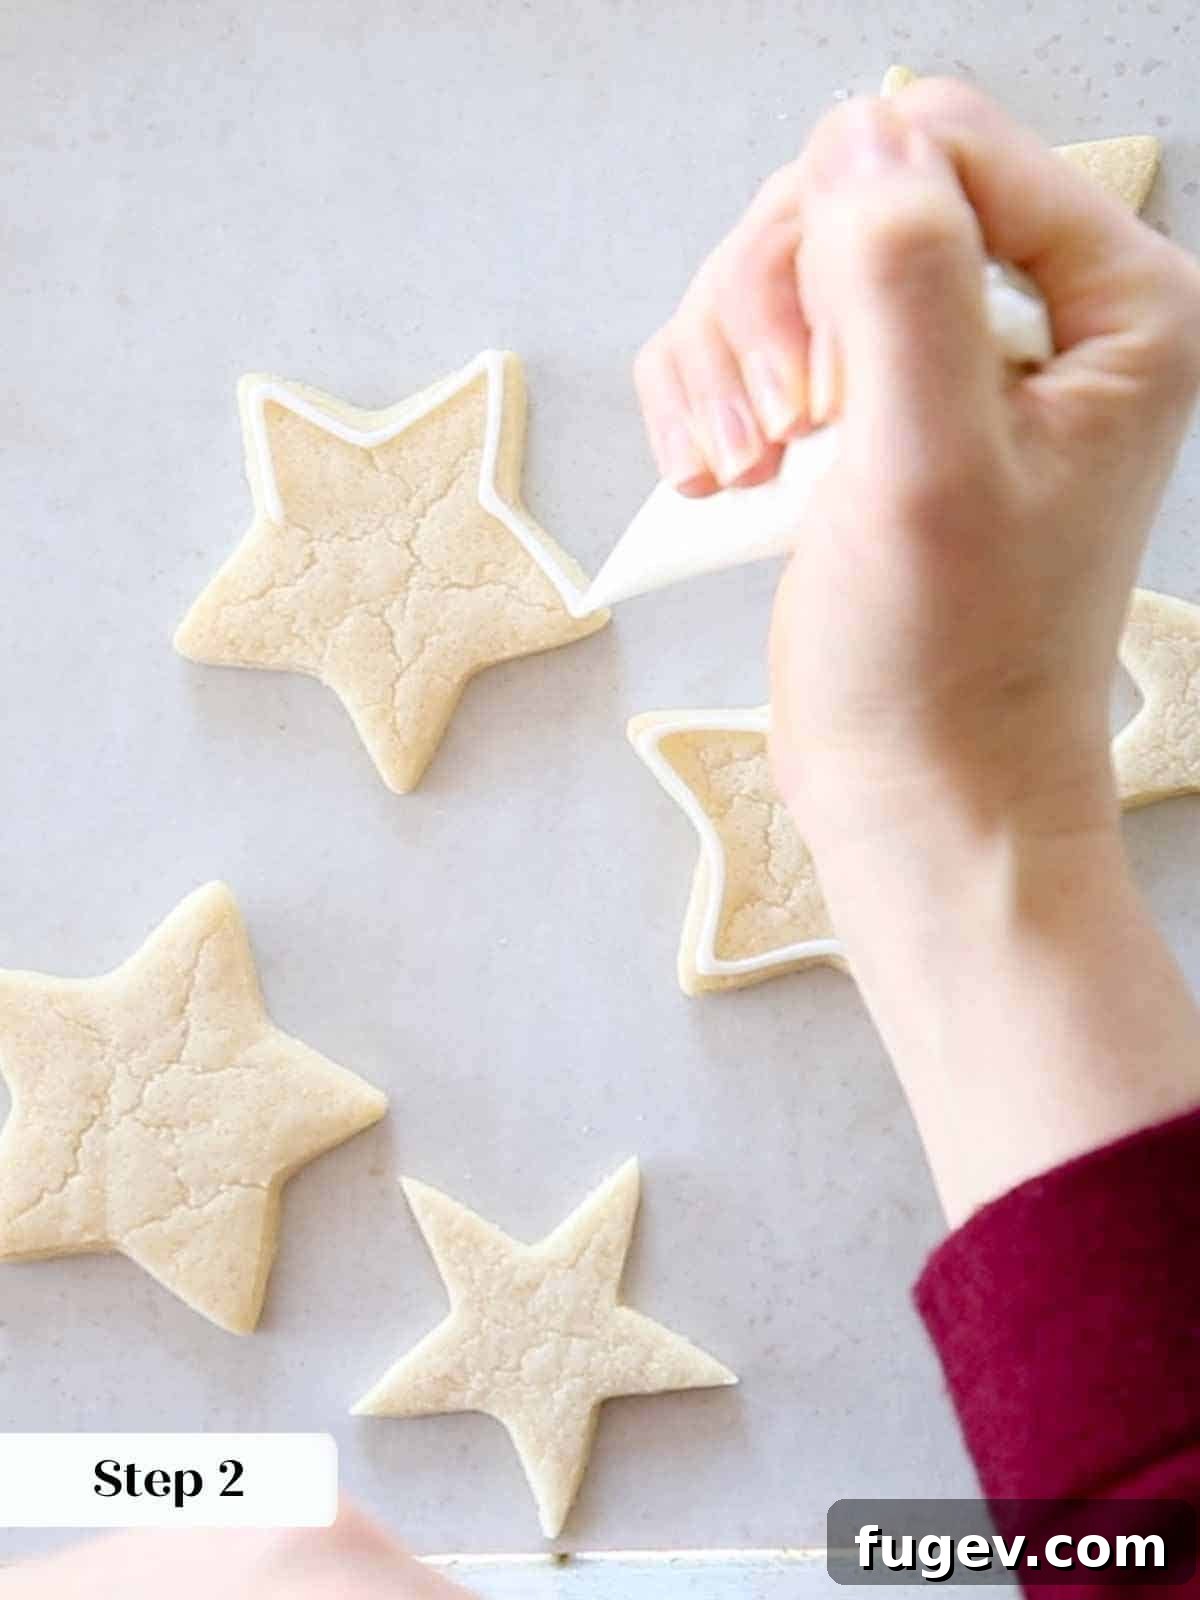
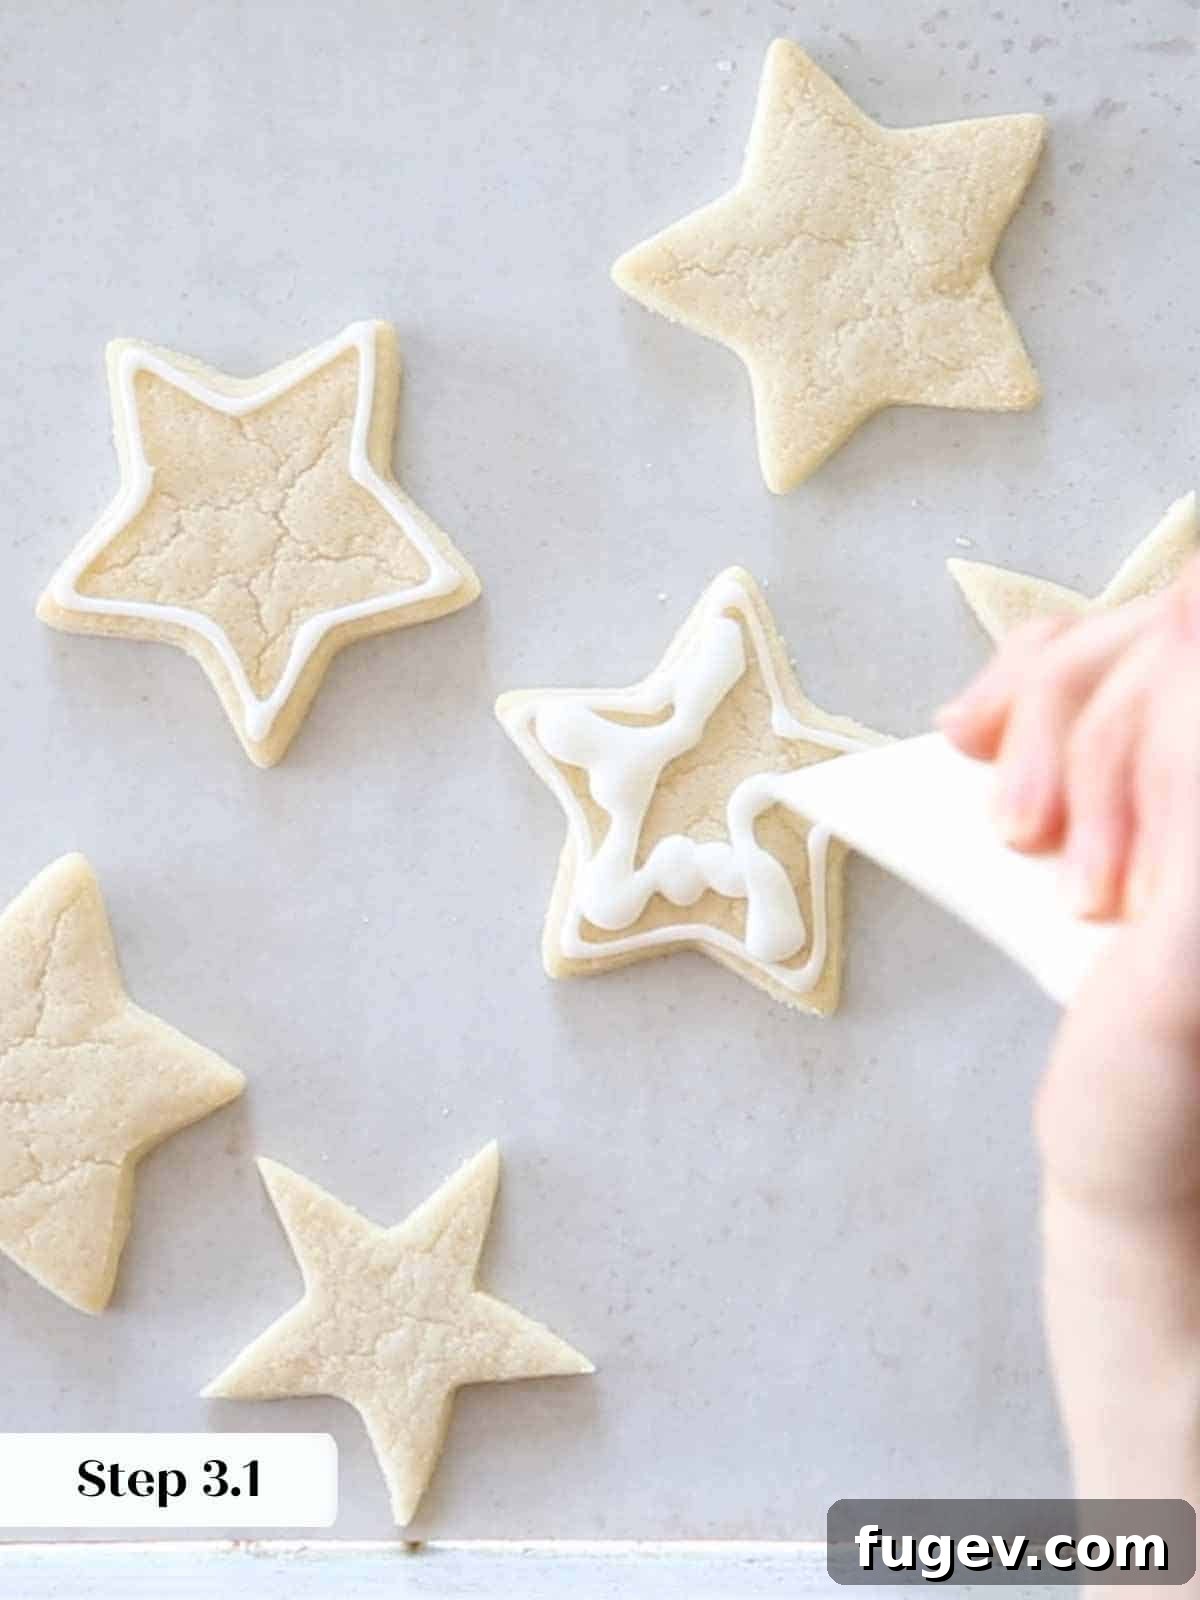
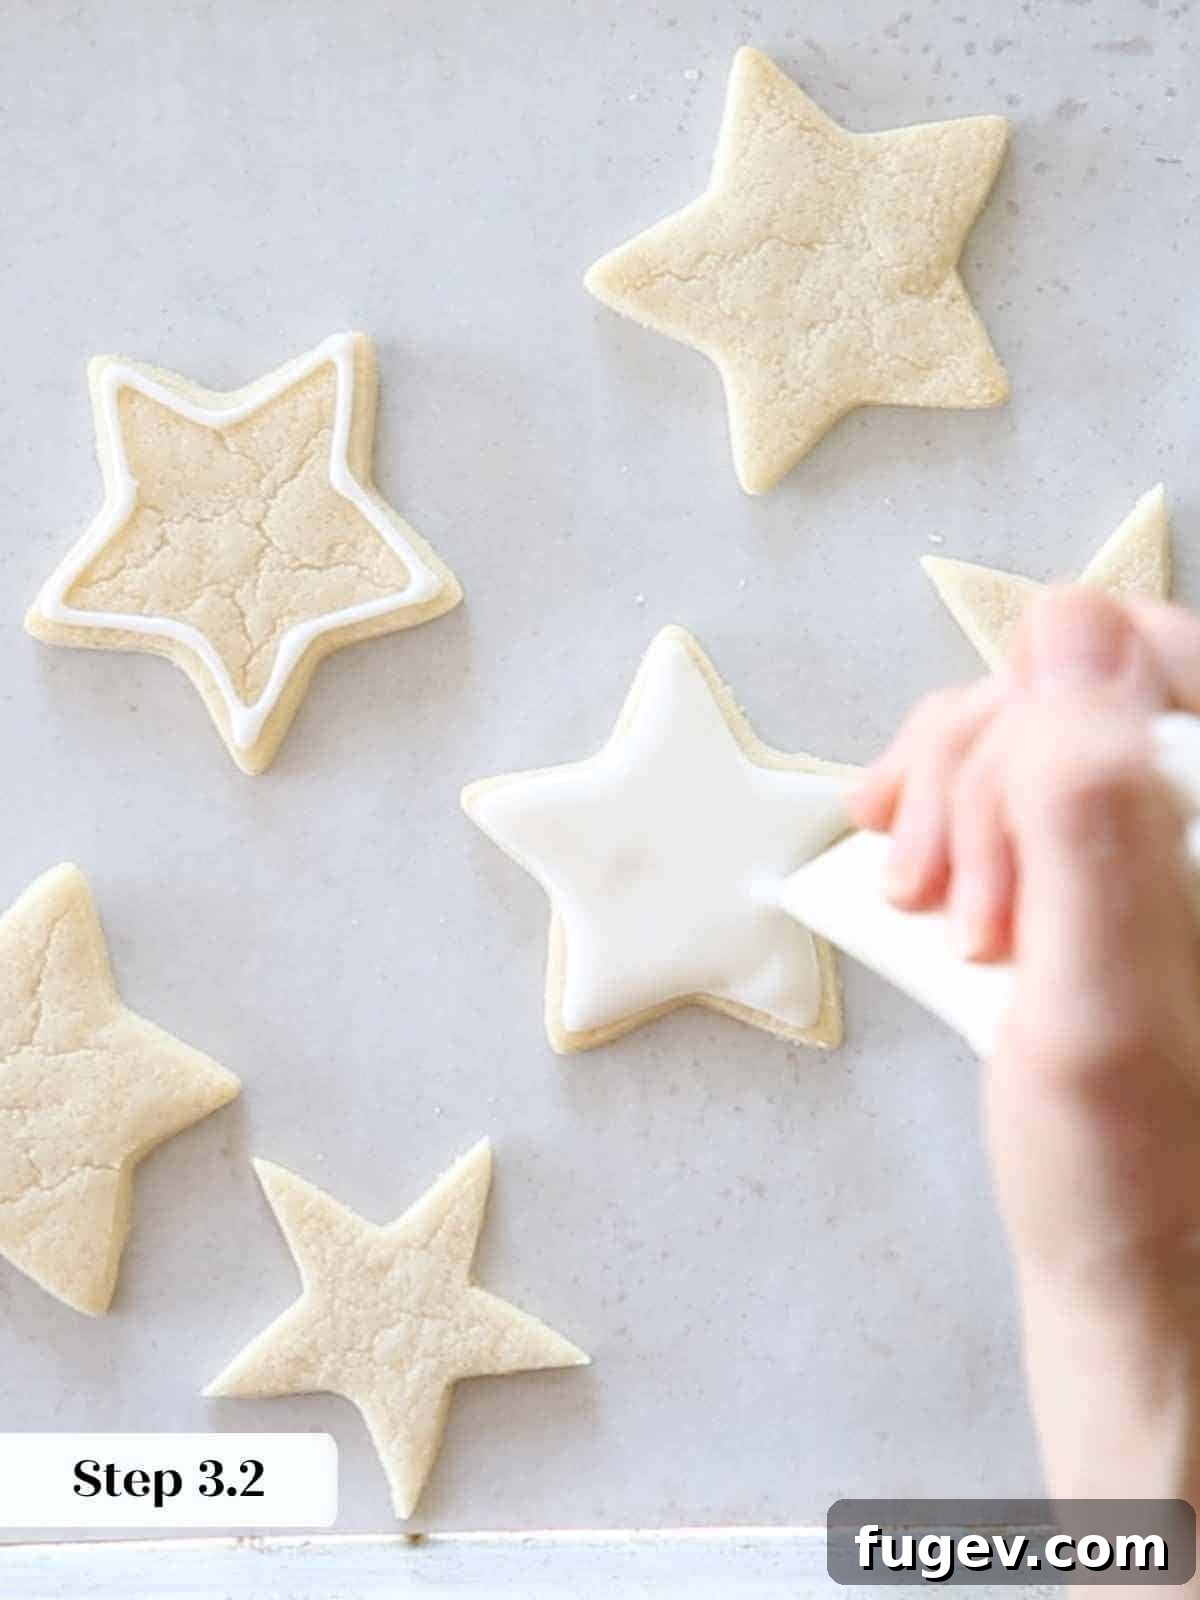
Step 2: Outline Your Cookies. Working with 1-3 cookies at a time, use your outlining bag to carefully trace the perimeter of each cookie. Leave a small 1/16th-inch border from the very edge of the cookie to prevent the flooding icing from running off.
Step 3: Flood the Cookies. Switch to your flooding bag. Squeeze a squiggle of the thinner icing inside the outline, covering the entire surface of the cookie you are decorating. Use a cake tester, a wooden skewer, or even the tip of your flooding piping bag (my lazy but effective method!) to gently spread the icing into one smooth, even layer. You should aim for complete coverage so the cookie is not visible through the icing, but not so thick that it overflows the outline. Ideally, the outline should blend seamlessly with the flood. If a visible line remains, try flooding fewer cookies at a time in subsequent attempts to work faster.
Efficiency Tip: Using the piping bag tip itself to spread the icing offers the advantage of easily adding more icing as you go, ensuring perfect coverage without switching tools.
Step 4: Layering and Drying Between Colors. If your design involves multiple colors or layers (like piping buttons on a Santa’s coat or different sections of a cap), allow the first layer of icing to set for at least 30 minutes before adding the next. This crucial drying time prevents colors from sinking into each other or bleeding, ensuring crisp, distinct designs.
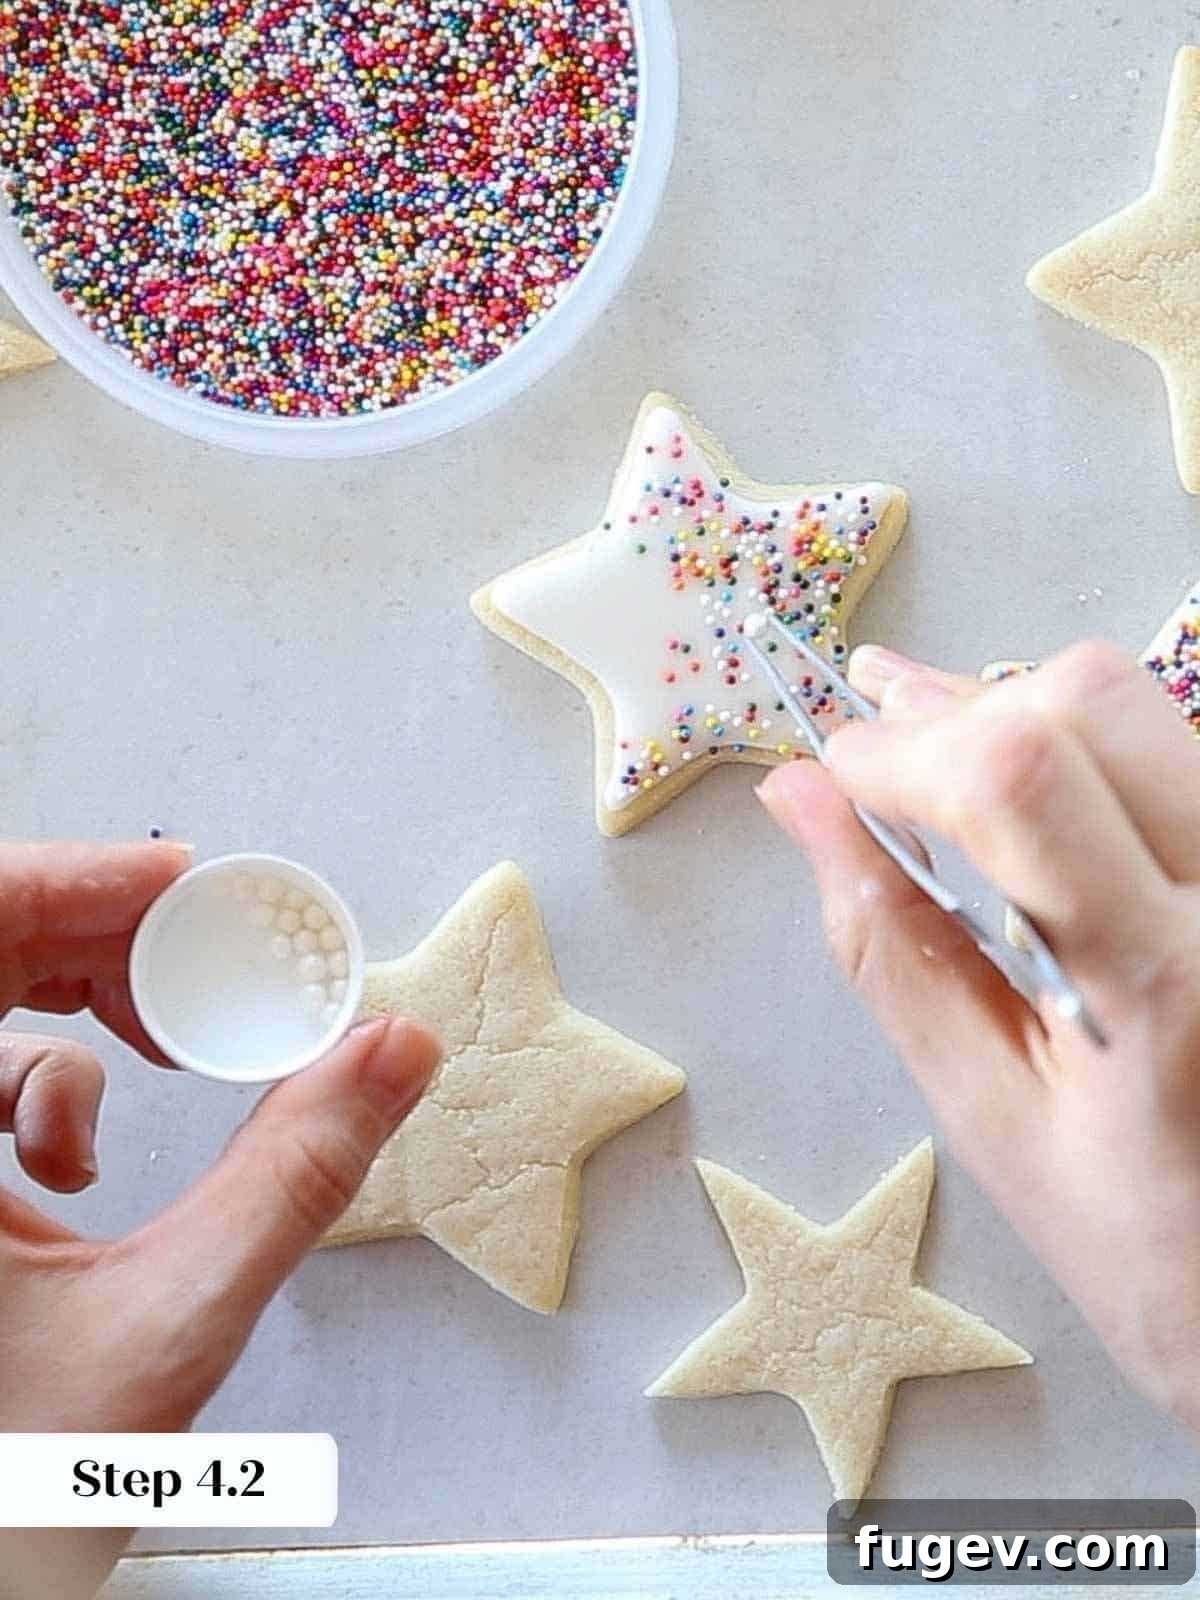

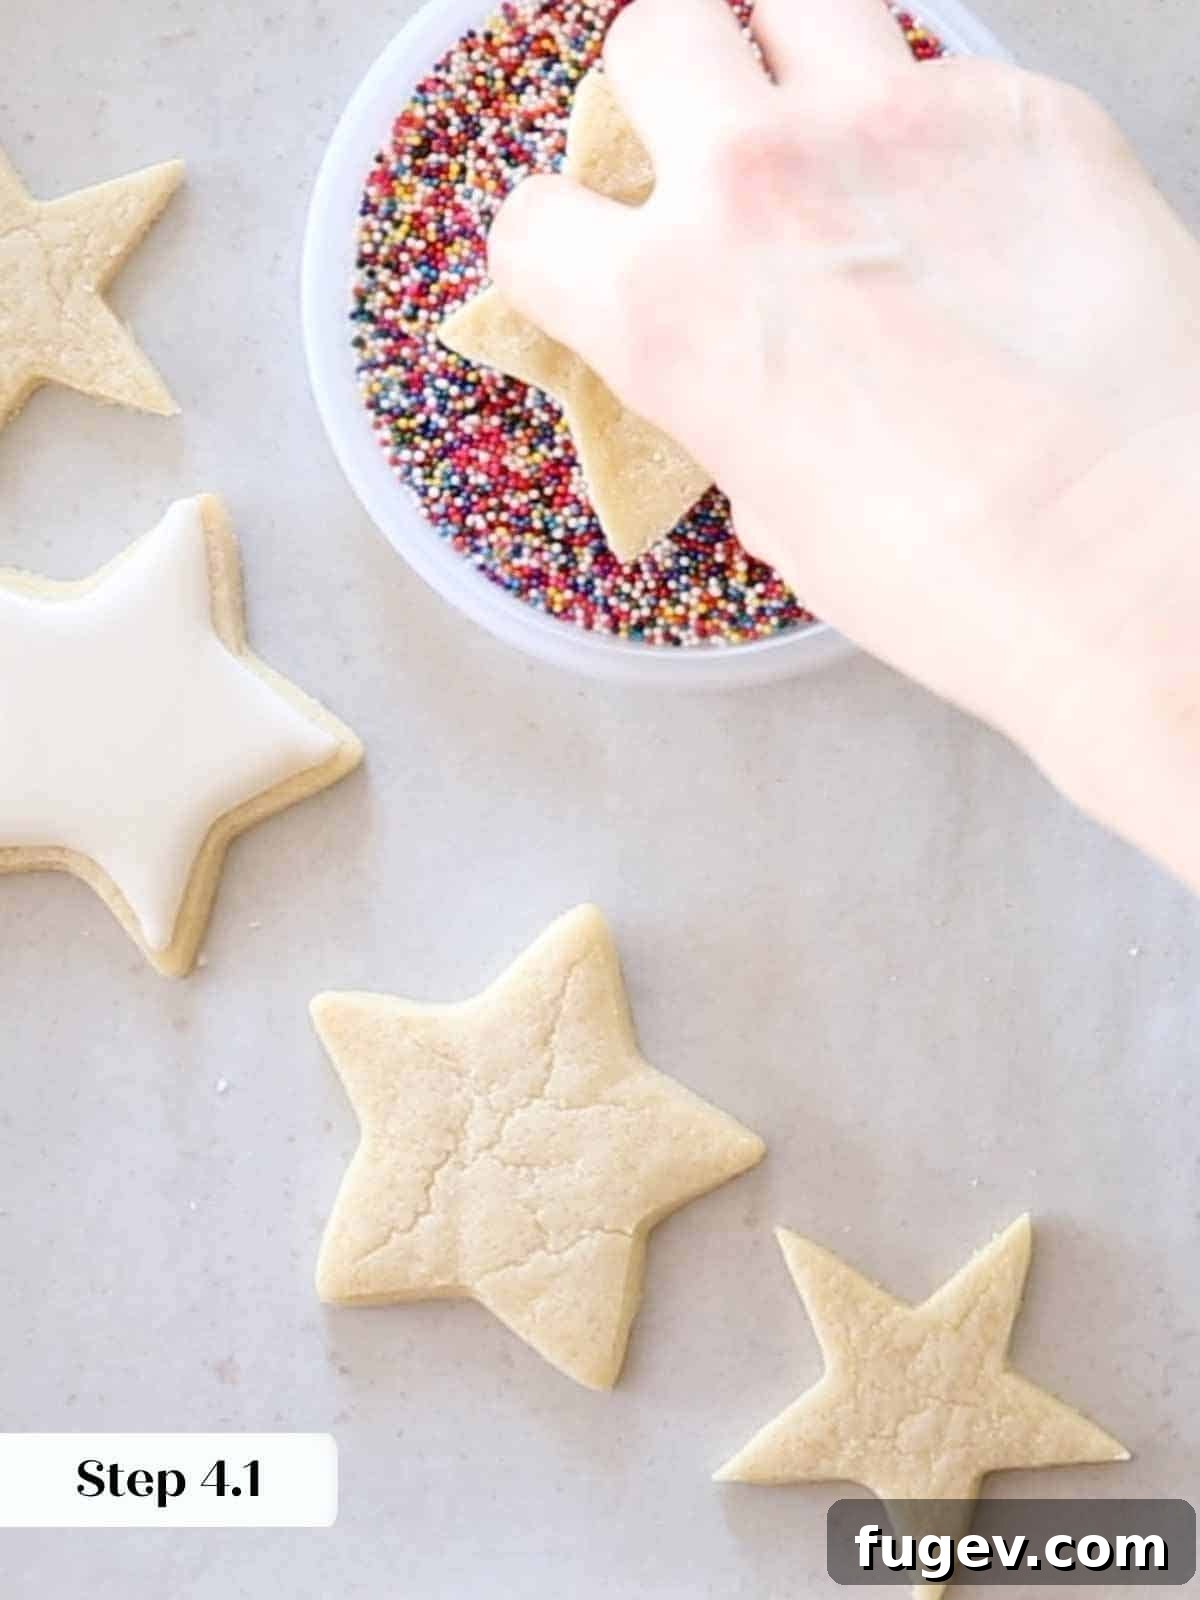
Step 4.2: Adding Sprinkles and Decorative Elements. To fully cover a cookie with sprinkles or jimmies, flood the cookie as described. Then, wait approximately 3 minutes (about the time it takes to flood 3 outlined cookies) before confidently dipping the entire cookie into your desired sprinkles. You want the icing to be tacky but not fully set, allowing the sprinkles to adhere without causing the icing to run. Alternatively, for more precise placement, sprinkle jimmies or add decorative elements like sugar pearls or edible gold balls using tweezers – a touch that truly elevates your cookie artistry!
Royal Icing Drying & Storage: Royal icing requires ample time to dry properly. Allow your decorated cookies to dry at room temperature overnight, uncovered. This extended air exposure is essential for the icing to harden completely. Once fully dry (typically 24 hours), you can carefully stack them. If wrapping, ensure the plastic wrap does not touch the icing surface. Avoid refrigerating or freezing royal iced cookies, as the moisture can be absorbed by the icing, causing it to soften, bleed colors, and ruin your hard work.
Troubleshooting Common Sugar Cookie Issues
Even experienced bakers encounter hiccups. Here’s how to address common problems with cut-out sugar cookies:
- Cookies Spreading Too Much:
- Ensure your butter is melted but not hot. Hot butter can cause sugar to dissolve too much.
- Make sure your dough is adequately chilled (at least 2 hours, preferably longer). Cold dough holds its shape better.
- Avoid overmixing the dough, which can develop gluten and lead to spreading.
- Check your oven temperature with an oven thermometer; an inaccurate oven can cause problems.
- Ensure you’re using the correct amount of flour (measure by weight for precision if possible).
- Cookies Are Tough or Dry:
- Do not overmix the dough once flour is added. Mix just until combined.
- Avoid adding too much extra flour when rolling. Use the parchment paper technique to prevent this.
- Don’t overbake the cookies. Bake only until the centers look matte and edges are barely golden.
- Dough is Crumbly or Hard to Roll:
- If the dough feels too dry after mixing, try kneading it gently by hand for a minute or two to bring it together. The warmth of your hands can help.
- Ensure your butter was truly melted (not just softened) and fully emulsified with the sugar and egg.
- If the dough is too cold from chilling, let it sit at room temperature for 10-15 minutes to soften slightly before rolling.
- Icing is Too Thin or Doesn’t Set:
- This is often due to too much liquid. Add powdered sugar, one tablespoon at a time, to thicken it.
- Ensure your dried egg whites/meringue powder ratio is correct for the amount of powdered sugar.
- Humidity can affect royal icing. On humid days, you might need slightly less liquid.
Recipe FAQs: Your Questions Answered
Store your soft sugar cookies decorated with royal icing at room temperature for up to 10 days. It’s crucial to allow the royal icing to fully set for 24 hours before stacking them to prevent sticking or damage. If you plan to wrap them, wait at least 3 hours for the surface to dry completely, and ensure the plastic wrap doesn’t touch the icing.
Absolutely! These sugar cookies bake wonderfully from a frozen state. There’s no need to adjust your oven temperature; simply add an additional 1-2 minutes to the baking time, depending on the size and thickness of your cookies. This is a fantastic time-saver for fresh-baked treats on demand.
This recipe is incredibly versatile for make-ahead preparation! You can halt the process at several points: prepare the dough and freeze it (rolled or unrolled) before cutting. Even better, roll and cut your cookie shapes, then freeze the individual cut cookies between layers of parchment paper. When you’re ready to bake, transfer them directly from the freezer to the oven!
I’ve successfully scaled this recipe up significantly, even using an 80-quart stand mixer! For larger batches, you might find adding a small amount of milk helpful to bring the dough together more easily, especially if mixing by hand is impractical. When scaling up, precise weighting of ingredients is crucial. Even a slight excess of flour in a large batch can significantly impact the dough’s consistency and prevent proper incorporation.
Yes, these are excellent cookies for shipping! Their robust nature means they travel well without being too fragile. They remain delicious for up to 10 days after being iced, and their flat, firm surface allows for neat stacking. They make for a perfect homemade gift. For an added bonus, consider including some of the best snickerdoodle cookies; they are also remarkably sturdy for shipping!
More Delicious Cookie Recipes You’ll Love
If you’ve enjoyed mastering these soft cut-out sugar cookies, here are more cookie recipes from my kitchen that you’re sure to adore:
Cookie Recipes
Cinnamon Sugar Cookies
Cookie Recipes
Chewy Molasses Cookies
Cookie Recipes
Chai Sugar Cookies
Cookie Recipes
Funfetti Cookies
If you tried this recipe and loved it, please leave a 🌟 star rating and let me know how it goes in the comments below. I love hearing from you; your comments make my day!

Soft Cut-Out Sugar Cookies
Chef Lindsey
15 minutes
8 minutes
30 minutes
23 minutes
40 Cookies
Comment
Print Recipe
Ingredients (US Customary)
For the Cookies:
- 2 ½ cups all-purpose flour *see note for volume conversion
- ½ teaspoon baking powder
- ½ teaspoon kosher salt
- ½ cup unsalted melted butter
- 1 cup granulated sugar
- 1 large whole egg
- 2 teaspoons vanilla extract
For Royal Icing:
- 1 box powdered sugar (1 lb / 454g)
- 6 ½ tablespoons fresh lemon juice (approx. 2 medium lemons, 85g)
- ¼ cup dried egg whites (or meringue powder, 22g)
- Milk (as needed for consistency, approx. 20g)
For a Simple Cookie Icing (Alternative):
- ¾ cup powdered sugar
- ¼ teaspoon vanilla extract
- 3-5 teaspoons milk
Instructions
Make the cookie dough:
-
In a large bowl, whisk together the flour, baking powder, and kosher salt. Set this mixture aside.
-
In another large bowl, melt the butter (e.g., in the microwave) until it’s just liquid, but not hot. Whisk in the granulated sugar until combined, then add the whole egg and vanilla extract. Whisk vigorously until the mixture is fully emulsified and smooth, with no visible streaks of butter or egg.
-
Slowly stir the prepared flour mixture into the wet ingredients.
-
The dough may appear dry initially. Finish incorporating the flour by hand, gently squeezing the dough together until it forms a cohesive mass. This method helps to quickly incorporate the flour without overdeveloping the gluten.
-
Roll the dough while it is at room temperature. Aim for approximately ¼ inch thickness. For optimal results, roll the dough between two pieces of parchment paper. Alternatively, you can roll it out on a lightly floured surface.
-
Refrigerate the rolled dough until it is firm and thoroughly chilled. While 30 minutes is a minimum, allowing it to chill for 2 hours or even overnight will result in the most tender cookies by relaxing the gluten.
Cut & bake cookies:
-
When you are ready to bake, preheat your oven to 325° F (160° C) for convection or 350° F (175° C) for conventional. Line two baking sheets with parchment paper. (If you rolled your dough between parchment, you can use those same sheets.)
-
Gently peel the parchment from both sides of the dough, then use a lightly floured cookie cutter to cut your desired shapes. Arrange the cut cookies on the prepared baking sheets. Chill the cut cookies again for about 20 minutes before baking to help them hold their shape.
-
Bake in the preheated oven for 7-9 minutes, or until the cookies appear matte in the center and show a few small cracks. The edges might just begin to show a slight golden color. For even results, bake cookies of the same shape and size on one sheet.
-
Transfer the baked cookies to a wire rack and allow them to cool completely before applying any icing.
Make Royal Icing:
-
In a large bowl, or in the bowl of a stand mixer fitted with the whisk attachment, combine the dried egg whites (or meringue powder) and lemon juice. Whisk until soft peaks form.
-
Add all the powdered sugar and continue to whisk until the mixture is fully combined and smooth.
-
Separate the icing into different bowls if you plan to use various colors, and add food dye as desired. Carefully monitor the consistency; if it becomes too thin from the dye, add a small amount of extra powdered sugar.
-
For outlining consistency, perform the “ribbon test”: Lift your spatula, and the icing should slowly cascade off, remaining clearly visible on the surface for about 5-6 seconds before smoothly disappearing.
-
For flooding consistency, using the same ribbon test, the icing should cascade off your spatula and almost instantly disappear into the rest of the icing.
For the simple icing (alternative to royal icing):
-
Simply whisk together all the ingredients for the simple icing. Add milk gradually, a little at a time, until the icing flows smoothly from your whisk but briefly holds a distinct line on the surface before slowly blending back in.
Recipe Video
A video tutorial for making these soft sugar cookies will be displayed here soon! In the meantime, please refer to the detailed written instructions above.
Notes
Yield: This recipe typically yields approximately 40 cookies when rolled ¼ inch thick and cut with a 2-inch cookie cutter.
Technique Highlights:
- One-bowl dough with melted butter for ease.
- Rolling between parchment paper eliminates extra flour.
- Two-stage chilling for optimal shape retention and tenderness.
Variations: Get creative by using citrus zest (lemon, orange) in the sugar, experimenting with different extracts (almond, peppermint, coffee), or adding small mix-ins like mini chocolate chips or sprinkles to the dough.
Storage: Soft sugar cookies decorated with royal icing can be stored at room temperature for up to 10 days. Ensure the icing is completely set (24 hours for stacking, 3 hours before wrapping with plastic wrap without touching the surface) to prevent softening or bleeding. Avoid refrigeration or freezing of iced cookies due to moisture concerns.
The Original 2014 Recipe (for returning bakers): To recreate the earlier, softer, slightly cakey rolled sugar cookie, make these modifications: Add an additional ½ teaspoon of baking powder to the dry ingredients. During Step 3 (integrating the flour mixture), also add ½ cup of buttermilk. Do this by alternating additions between the dry flour mixture and the buttermilk, starting and ending with the flour mixture. Regular milk can be used as a substitute for buttermilk. For this original version, it is essential to chill the dough before rolling, and generously flour your work surface before rolling and cutting.
Nutrition (per serving)
Carbohydrates: 23g |
Protein: 2g |
Fat: 3g |
Saturated Fat: 2g |
Polyunsaturated Fat: 0.1g |
Monounsaturated Fat: 1g |
Trans Fat: 0.1g |
Cholesterol: 10mg |
Sodium: 74mg |
Potassium: 30mg |
Fiber: 0.2g |
Sugar: 16g |
Vitamin A: 77IU |
Vitamin C: 1mg |
Calcium: 7mg |
Iron: 0.4mg
Enjoyed this recipe? Leave a comment below!
Before You Go: Explore More Baking Delights
I sincerely hope you enjoyed this professional chef-tested recipe for soft cut-out sugar cookies. These cookies are perfect for bringing joy to any occasion, whether a festive holiday gathering or simply a sweet treat for your loved ones.
Don’t stop your baking adventure here! Be sure to explore our extensive collection of other delicious cookie recipes. You might discover your next favorite, like this delightful spritz cookie recipe, ideal for holiday baking, or my convenient and flavorful ice box cookies. Happy baking!