

There’s nothing quite like the comforting aroma and delightful taste of freshly baked scones. These simple yet elegant lemon scones are elevated by the vibrant flavor of fresh citrus zest, making them an irresistible treat for any time of day. What truly sets this recipe apart is its incredible ease: these are classic drop scones, meaning you can skip the fuss of biscuit cutters and intricate shaping. They emerge from the oven beautifully rustic, with perfectly crumbly interiors and golden, textured outsides – exactly how a truly good scone should be.
Craving more berry goodness? You can easily adapt this recipe to make Lemon Blueberry Scones, adding a burst of fruity sweetness to your citrusy delight.

Table of Contents
- Why These Lemon Scones Are a Must-Try
- Understanding Scones: A Brief History and Definition
- Key Ingredients for Perfect Lemon Scones
- The Delightful (Optional) Lemon Glaze
- How to Bake Fluffy Lemon Drop Scones: Step-by-Step
- Serving Suggestions for Your Homemade Scones
- Storage and Freezing Tips for Scones
- Expert Tips for Scone Perfection
- Scone Variations to Explore
- Frequently Asked Questions About Scones
- More Scones Recipes to Inspire You
- Easy Lemon Scones Recipe Card
Why These Lemon Scones Are a Must-Try
If you’re looking for a baking project that delivers maximum flavor with minimal effort, these lemon drop scones are your answer. Here’s why this recipe will quickly become a cherished favorite:
- Effortless Drop Scone Method: Forget the fuss of rolling dough and cutting perfect shapes. This is a drop scone recipe, meaning you simply spoon mounds of dough onto your baking sheet. Each scone will have its own unique, charmingly rustic appearance with delightful bumps and cracks, promising a truly homemade feel. This method is not only easier but often results in a more tender scone as the dough is handled less.
- Ultimate Make-Ahead Flexibility: This recipe is incredibly forgiving and flexible. You can prepare the dough in advance and store it in the refrigerator for up to three days, ready to be baked fresh whenever a craving strikes. Even better, scones can be frozen both baked or unbaked, offering unparalleled convenience. Imagine having fresh, warm scones on a busy weekday morning with almost no effort!
- Bursting with Bright Citrus Flavor: The star of these scones is the vibrant lemon zest, which infuses every bite with a fresh, tangy aroma. While lemon is undeniably delicious, this recipe is also wonderfully versatile. Feel free to experiment with other citrus varieties like lime zest for a zippier flavor, orange zest for a sweeter note, or even grapefruit zest for a more complex, slightly bitter touch. A combination of zests can also create an exciting flavor profile.
- Perfect Texture Every Time: These scones consistently achieve that sought-after texture – fluffy and tender on the inside, with a perfectly crumbly, slightly crusty exterior. The secret lies in the cold butter and minimal handling, which we’ll discuss in detail, ensuring a light and airy crumb.
- A Versatile Treat: Whether you’re hosting a sophisticated brunch, enjoying a quiet morning coffee, or simply need a pick-me-up afternoon snack, these lemon scones fit the bill beautifully. They’re not overly sweet, making them a wonderful complement to a variety of beverages and spreads.
Understanding Scones: A Brief History and Definition
Originating from Scotland, scones hold a special place in British culinary traditions, especially as an essential component of afternoon tea. But what exactly is a scone, and how does it differ from other baked goods?
At their core, scones are a type of quick bread, meaning they are leavened with baking powder or baking soda rather than yeast, allowing for a much quicker preparation time. They share a common ancestry and similar ingredients with American biscuits, often made from flour, fat (butter), a liquid (milk or cream), and a leavening agent. However, there are some subtle but important distinctions:
- Texture: A well-made scone boasts a delightful contrast: a light, fluffy, and tender interior, often described as crumbly or flaky, encased in a golden-brown, slightly crusty exterior. This distinct texture is achieved through the careful incorporation of cold butter, which creates pockets of steam during baking.
- Sweetness Level: Generally, scones tend to be a little sweeter than their American biscuit counterparts, which are often served as savory dinner rolls or with gravies. While not excessively sweet, scones typically contain a moderate amount of sugar, making them perfect for breakfast, brunch, or a mid-morning or afternoon snack. They are often enjoyed plain or with a light glaze, jam, clotted cream, or butter.
- Serving Tradition: While delicious with coffee, scones are most famously associated with traditional British tea time. They are designed to be enjoyed alongside a warm cup of tea, providing a delicate and satisfying counterpoint to the beverage.
Our lemon drop scones perfectly embody these characteristics, offering a truly authentic scone experience with the added brightness of citrus.
Key Ingredients for Perfect Lemon Scones
Creating exceptional scones begins with understanding the role of each ingredient. Here’s a breakdown of what you’ll need and why each component is vital for that signature scone texture and flavor:
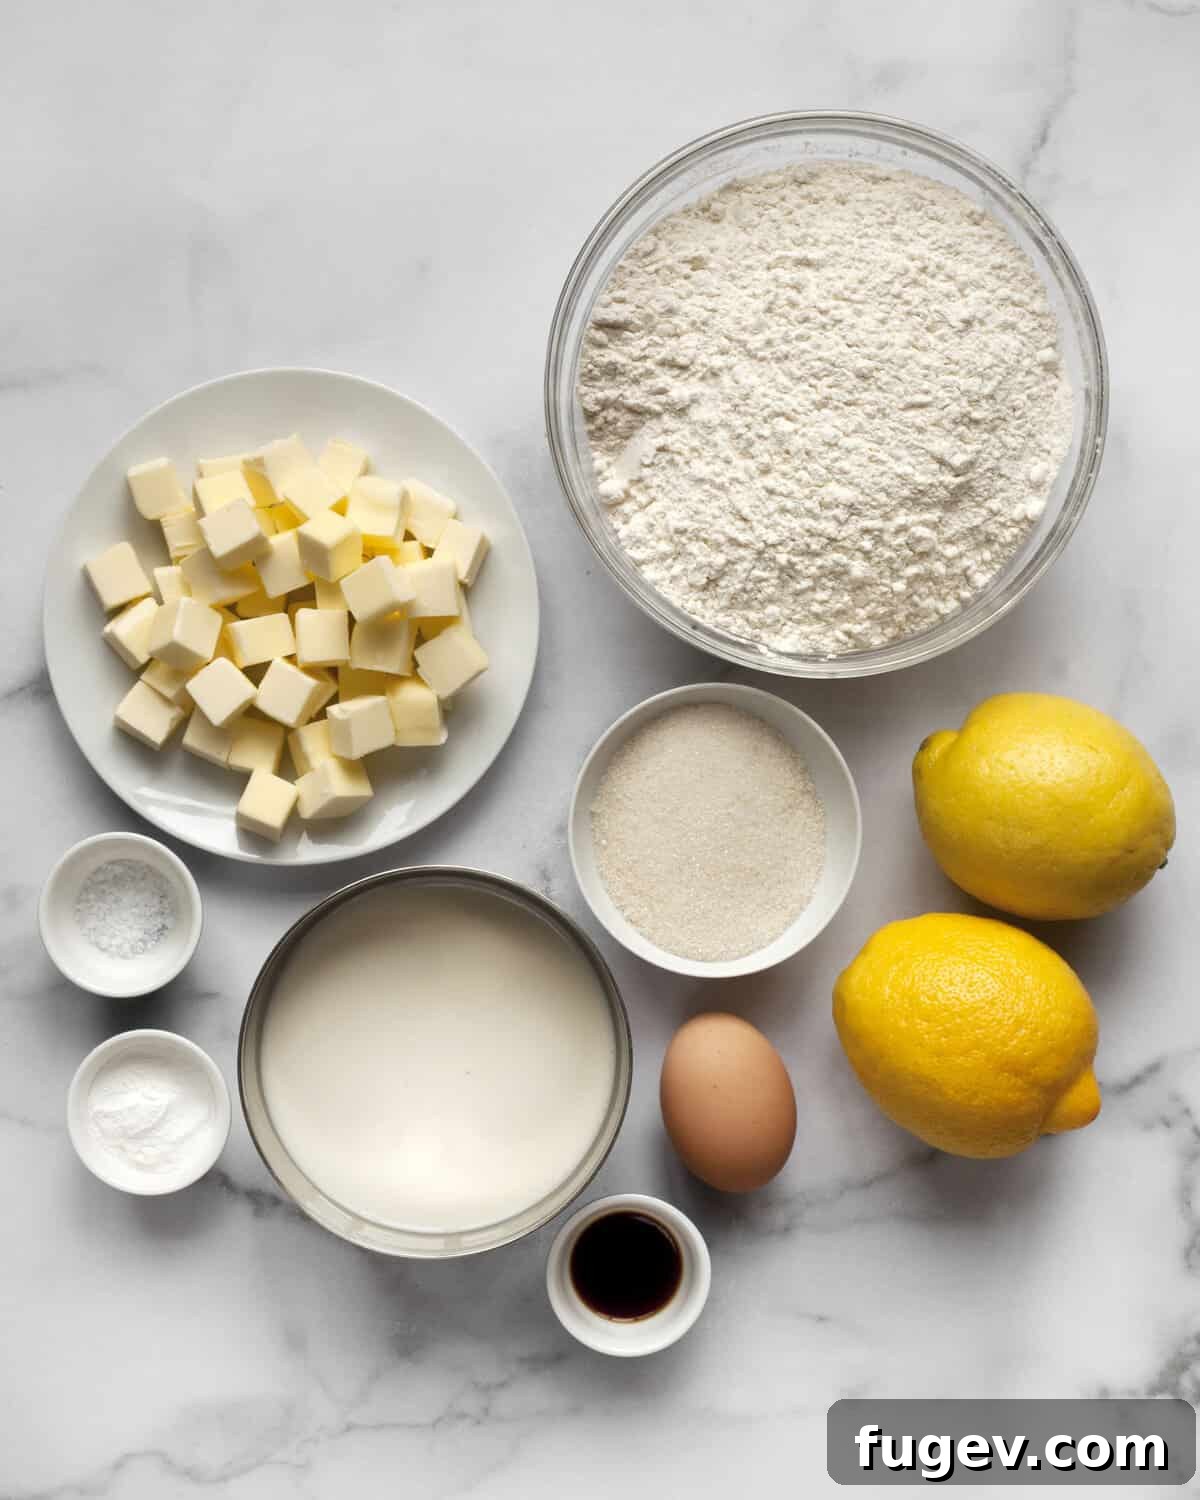
- All-Purpose Flour: This forms the foundational structure of your scones. Using standard all-purpose flour provides the ideal balance for a tender, yet satisfyingly structured crumb. Avoid using high-protein bread flour, which can lead to a tougher scone.
- Chilled Unsalted Butter: This is arguably the most critical ingredient for achieving that classic flaky, crumbly scone texture. Unlike cookies where butter is often creamed, for scones, cold, firm butter is cut or rubbed into the flour in small pieces. These cold butter pieces create pockets within the dough. As the scones bake, the butter melts and releases steam, pushing up the layers of dough and resulting in a light, airy, and layered interior. Using unsalted butter gives you control over the overall salt content of your recipe.
- Fresh Lemon Zest: The star flavor! I recommend zesting at least two fresh lemons to ensure a pronounced, bright, and invigorating citrus aroma throughout the scones. Always opt for fresh zest over lemon extract, as the extract often delivers an artificial flavor that can overpower the delicate balance of the scone. The oils in fresh zest provide a natural, fragrant burst of lemon.
- Granulated Sugar: These scones are lightly sweetened with granulated sugar. This provides just enough sweetness to complement the tartness of the lemon without making them overly dessert-like. It also aids in browning and contributes to the tender texture.
- Baking Powder: As a quick bread, baking powder is the primary leavening agent responsible for helping your scones rise beautifully. Ensure your baking powder is fresh for optimal results; old baking powder can lead to flat, dense scones.
- Salt: A small amount of salt is essential in both sweet and savory baking. It doesn’t just add its own flavor but crucially enhances and balances all the other flavors in the scone, bringing out the best in the lemon and vanilla.
- Large Egg: One large egg is whisked with the wet ingredients, adding richness, moisture, and helping to bind the dough together, contributing to a more tender crumb and better structure.
- Milk: Most types of milk work well, from skim to reduced-fat, or even non-dairy alternatives like oat milk. While some scone recipes call for heavy cream for extra richness, milk provides ample moisture and still yields a wonderfully tender scone, often being a more readily available ingredient in most kitchens. A splash more is also used for brushing the tops for a golden finish.
- Vanilla Extract: A teaspoon of vanilla extract offers a subtle hint of warmth and sweetness that beautifully rounds out the bright, zesty citrus flavor, adding depth without competing with the lemon.
The Delightful (Optional) Lemon Glaze
While these lemon scones are absolutely sublime enjoyed plain, a simple lemon glaze can add an extra layer of sweetness and a tangy finish that truly enhances the citrus profile. It’s a quick addition that makes them feel even more special.
To prepare the glaze, simply whisk together 1 tablespoon of fresh lemon juice with about 1/2 cup of powdered sugar (confectioners’ sugar). Continue whisking until you achieve a smooth, pourable consistency. You might need to adjust by adding a tiny bit more lemon juice if it’s too thick, or a touch more powdered sugar if it’s too thin. The key is to get a consistency that drizzles nicely but doesn’t run off completely. It’s crucial to allow your scones to cool completely on a wire rack before drizzling them with the icing. Applying glaze to warm scones will result in a messy, melted glaze rather than a set, elegant finish.
How to Bake Fluffy Lemon Drop Scones: Step-by-Step
Baking these delightful lemon scones is a straightforward process. Follow these steps carefully to ensure a perfect batch every time:
Preparation: Preheat your oven to 400°F (200°C). Line two large baking sheets with parchment paper. This prevents sticking and ensures even baking.
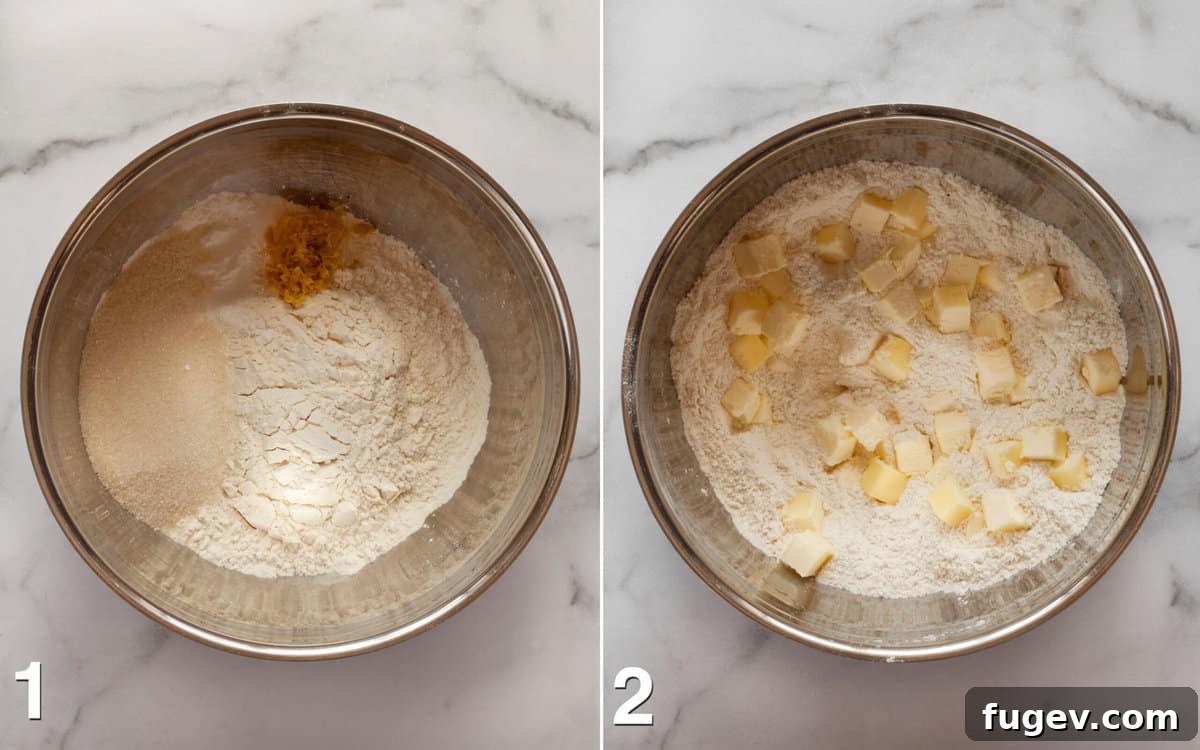
- Combine Dry Ingredients: In a large mixing bowl, thoroughly stir together the all-purpose flour, granulated sugar, baking powder, salt, and fresh lemon zest. Make sure the lemon zest is well distributed, as this will ensure even flavor throughout your scones.
- Incorporate the Cold Butter: Add the cold, cubed unsalted butter to the dry ingredients. Using a pastry blender (also known as a pastry cutter), two forks, or even your fingertips, cut or rub the butter into the flour mixture. The goal is to break the butter into pea-sized clumps or large coarse crumbs. Resist the urge to overwork the mixture; those distinct pieces of butter are vital for creating steam and developing the desired layered, flaky texture during baking.
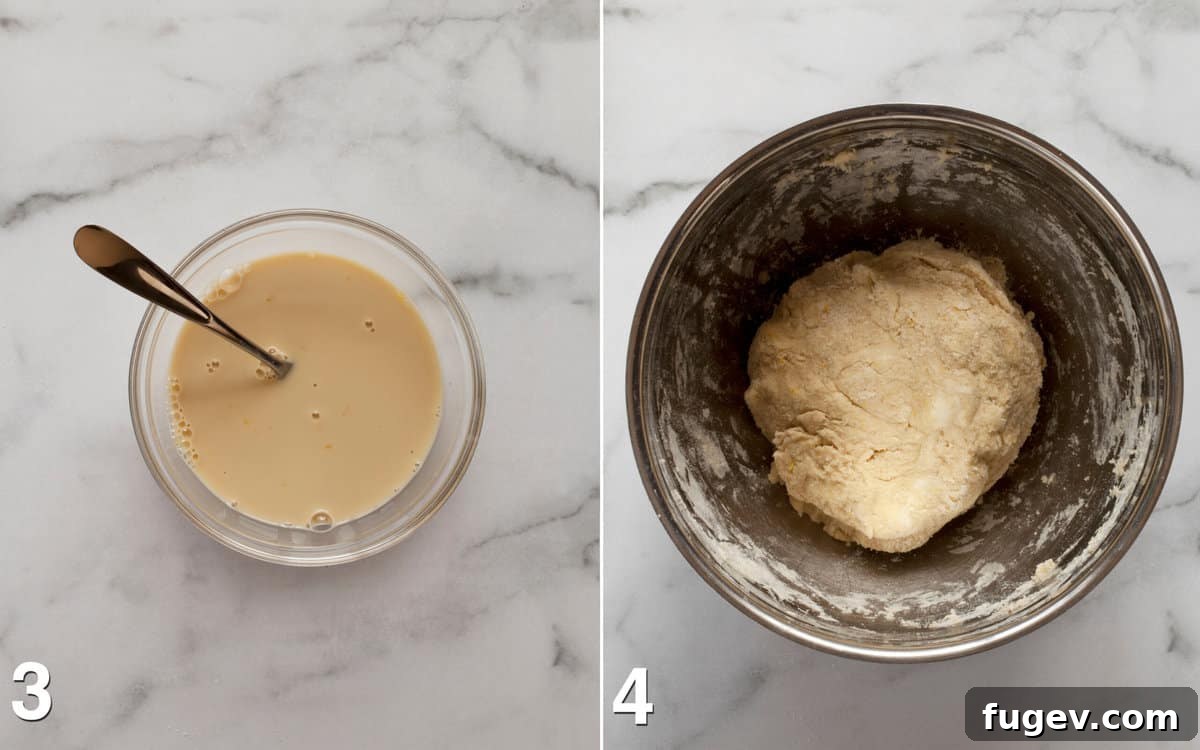
- Whisk Wet Ingredients: In a separate, smaller bowl, whisk together the large egg, milk, and vanilla extract until well combined.
- Combine Wet and Dry Mixtures: Pour the wet ingredients into the dry ingredients. Stir gently with a spoon or spatula until the dough just comes together and looks shaggy. Avoid over-mixing! The dough should still look a bit rustic and unrefined. At this point, gently press the dough together into a cohesive ball using your hands, right in the bowl. There’s no need to turn it out onto a floured surface, minimizing mess and handling.
- Portion and Prepare for Baking: Using a cookie scoop (a large one, about 1/4 to 1/3 cup capacity is ideal) or your hands, scoop mounds of dough onto the prepared baking sheets. Space them approximately 3 inches apart to allow for spread. Before baking, lightly brush the tops of the scones with a little extra milk. This step helps them achieve a beautiful golden-brown color and a slightly crispier crust.
- Bake to Golden Perfection: Transfer the baking sheets to your preheated oven. Bake for approximately 18-20 minutes, or until the scones are beautifully light golden brown on top and their characteristic cracks have formed. The internal temperature should reach about 200-205°F (93-96°C).
- Cooling: Once baked, immediately transfer the scones to a wire rack to cool. This prevents the bottoms from becoming soggy and allows the exterior to crisp up further, contributing to that perfect texture.

Serving Suggestions for Your Homemade Scones
The anticipation of biting into a warm, freshly baked scone is part of its charm. While it’s tempting to enjoy them straight from the oven, exercising a little patience will reward you with the best possible experience. Allow your scones to cool for at least 10-15 minutes on a wire rack, or even to room temperature. This crucial cooling period allows the exterior to firm up and develop its intended crusty texture, which would be lost if eaten piping hot. The flavors also meld and become more pronounced as they cool slightly.
These lemon scones are fantastic on their own, but can also be elevated with various accompaniments:
- Classic with Butter or Jam: A simple spread of butter or your favorite fruit jam (strawberry, raspberry, or marmalade are excellent choices) is always a winner.
- The British Way: For an authentic experience, serve them with clotted cream and a dollop of jam.
- With Tea or Coffee: They are the quintessential companion to a hot cup of tea or a robust coffee.
- Optional Lemon Glaze: Drizzle with the optional lemon glaze described above for an extra layer of sweetness and tang.
- Fresh Berries: A side of fresh berries, particularly blueberries or raspberries, provides a lovely contrast in texture and taste.
Storage and Freezing Tips for Scones
Scones are undoubtedly at their peak freshness and texture on the day they are baked. However, with proper storage and freezing techniques, you can extend their deliciousness and enjoy them later. This recipe offers fantastic flexibility for make-ahead convenience!
Storing Baked Scones:
If you bake the entire batch, allow them to cool completely before storing. Place them in an airtight container at room temperature for up to 1-2 days. To refresh their texture and bring back that delightful crusty exterior, pop them into a 300°F (150°C) oven for about 5 minutes before serving.
Freezing Unbaked Scones (Highly Recommended!):
Freezing unbaked scone dough is a game-changer for spontaneous fresh scones. Here’s how:
- After portioning the dough onto baking sheets (Step 5 of the recipe), instead of baking, place the entire baking sheet into the freezer.
- Once the scone balls are completely frozen solid (this usually takes 1-2 hours), you can transfer them to a freezer-safe airtight container or a heavy-duty freezer bag. This prevents them from sticking together.
- Store in the freezer for up to 1 month.
- To Bake from Frozen: There’s no need to thaw! Simply arrange the frozen scone dough balls on a parchment-lined baking sheet and bake them in a preheated 400°F (200°C) oven for 18-20 minutes, or until golden brown and cooked through. You might need to add a minute or two to the baking time compared to fresh dough.
Freezing Baked Scones:
If you have leftover baked scones, you can also freeze them:
- Ensure the scones are completely cooled.
- Wrap each scone individually in plastic wrap, then place them in an airtight freezer bag or container.
- Freeze for up to 1 month.
- To Thaw and Reheat: Thaw frozen baked scones in a 325°F (160°C) oven for 12-14 minutes, or until warmed through and the crust has crispied up again.
Expert Tips for Scone Perfection
Achieving light, flaky, and delicious scones consistently involves a few key techniques. Keep these expert tips in mind for your best batch yet:
- Keep Your Butter COLD: This is arguably the most crucial tip. Cold butter, cut into small pieces and quickly incorporated into the flour, is what creates those desirable pockets of steam during baking, leading to flaky layers. If your butter gets too warm, the scones will be dense and tough. You can even cube the butter and then pop it back into the freezer for 10-15 minutes before using.
- Don’t Overwork the Dough: Scones thrive on minimal handling. Over-mixing or kneading the dough develops the gluten in the flour too much, resulting in tough, chewy scones instead of light, tender ones. Once the wet ingredients are added, stir only until the dry ingredients are just moistened and the dough looks shaggy. Then, gently press it into a ball. A few lumps are perfectly fine!
- Measure Flour Correctly: For consistent results, always spoon your flour into the measuring cup and then level it off with a straight edge (like a knife). Scooping flour directly from the bag can compact it, leading to too much flour and a dry, dense scone.
- Use Fresh Leavening Agents: Baking powder loses its potency over time. Ensure yours is fresh for optimal rise. You can test its freshness by adding a teaspoon to a cup of hot water; if it bubbles vigorously, it’s good to go.
- Preheat Your Oven Properly: A hot oven from the start is important for the initial burst of rise (oven spring). Ensure your oven is fully preheated to 400°F (200°C) before placing the scones inside.
- Don’t Be Afraid to Make Ahead: As mentioned, scone dough is very accommodating. You can prepare it up to 3 days in advance and store it, covered, in the refrigerator. This allows you to have freshly baked scones with minimal morning prep.
- Embrace Freezing for Convenience: Take full advantage of the ability to freeze scone dough. This is the secret to having fresh, warm scones on demand, even on busy weekday mornings. Bake only what you need and store the rest in the freezer.
- Brush with Milk for a Golden Finish: The milk wash before baking isn’t just for aesthetics. It helps the scones brown beautifully and contributes to a slightly crisper exterior.
Scone Variations to Explore
While these lemon scones are perfect as is, their base recipe is incredibly versatile. Once you master the basic technique, feel free to get creative with flavor additions:
- Berry Blast: Incorporate 1/2 to 3/4 cup of fresh or frozen berries (blueberries, raspberries, chopped strawberries) into the dough when you add the wet ingredients.
- Spice It Up: Add 1/2 teaspoon of ground cinnamon or cardamom to the dry ingredients for a warm, aromatic twist.
- Nutty Crunch: Fold in 1/2 cup of finely chopped nuts like almonds, pecans, or walnuts for added texture and richness.
- Chocolate Chip: For a sweeter scone, mix in 1/2 cup of mini chocolate chips or chopped white chocolate.
- Herbaceous: For a savory scone, reduce sugar to 2 tablespoons, omit vanilla, and add 2 tablespoons of chopped fresh herbs (rosemary, thyme, chives) and a sprinkle of black pepper. Cheese can also be added.
Frequently Asked Questions About Scones
- Q: Why are my scones tough?
- A: Tough scones are almost always a result of overworking the dough. Too much kneading develops gluten, which leads to a chewy texture. Handle the dough as little as possible.
- Q: My scones didn’t rise. What went wrong?
- A: This could be due to old, inactive baking powder, or if your butter melted before baking. Ensure your leavening agent is fresh and your butter remains cold until it hits the oven.
- Q: Can I use heavy cream instead of milk?
- A: Yes, absolutely! Heavy cream will make the scones even richer and more tender. Adjust the amount slightly if the dough seems too wet or dry, as cream has a higher fat content.
- Q: What’s the best way to zest a lemon?
- A: Use a microplane zester to remove only the bright yellow outer layer (the zest), avoiding the bitter white pith underneath. Rotate the lemon as you go.
- Q: How do I know when my scones are done?
- A: Scones are done when they are golden brown on top and bottom, and a skewer inserted into the center comes out clean. They should also feel firm to the touch.
More Scones Recipes to Inspire You
If you’ve fallen in love with homemade scones, you’ll definitely want to try these other delightful variations:
- Cinnamon Maple Scones
- Strawberry Almond Scones
Easy Lemon Scones Recipe
These customizable lemon drop scones are bursting with citrus flavor and deliver the perfect crumbly texture you crave in a scone. They’re incredibly easy to make and perfect for any occasion.
Rating: 5 out of 5 stars (based on 1 review)
By: Paige Adams
Prep time: 20 minutes
Cook time: 20 minutes
Total time: 40 minutes
Yields: 16 scones

Pin Recipe
Ingredients
- 3 cups all-purpose flour
- 3 teaspoons baking powder
- 1/3 cup granulated sugar
- 1/4 teaspoon kosher salt
- Zest of 2 lemons
- 6 ounces (1-1/2 sticks) chilled unsalted butter, cubed
- 1 large egg
- 3/4 cup milk, plus extra for brushing tops
- 1 teaspoon vanilla extract
Instructions
- Preheat the oven to 400°F (200°C). Line 2 baking sheets with parchment paper.
- In a large bowl, stir together the all-purpose flour, baking powder, granulated sugar, salt, and lemon zest.
- Use a fork or pastry blender to cut the cold, cubed butter into the dry ingredients until the mixture resembles pea-sized clumps. Alternatively, rub the butter and flour together with your fingertips.
- In a small separate bowl, whisk together the egg, 3/4 cup milk, and vanilla extract. Pour this wet mixture into the flour-butter mixture. Stir until the dough is just combined and looks shaggy. Gently press the dough together into a ball using your hands, keeping it in the bowl.
- Scoop the dough by 1/4 to 1/3-cup mounds onto the prepared baking sheets, spreading them about 3 inches apart. A cookie scoop works well for this.
- Brush the tops of the scones with a little milk to help them brown evenly.
- Bake for 18-20 minutes, or until the scones are light golden brown and cracked on the top.
- Transfer the baked scones to a wire rack to cool completely.
Notes
- Citrus Variation: Instead of lemon zest, you can easily substitute with lime, orange, or grapefruit zest for a different flavor profile.
- Make-Ahead Dough: The scone dough can be prepared up to 3 days in advance. Cover the bowl tightly and store it in the refrigerator.
- Best Fresh: Scones are most delicious on the day they are baked. Store leftovers in an airtight container at room temperature for 1-2 days. To refresh, warm them in a 300°F (150°C) oven for about 5 minutes.
- Freezing Unbaked Scones: Portion the dough onto a lined sheet pan and freeze until solid. Once frozen, transfer to an airtight container or freezer bag for up to 1 month. Bake directly from frozen at 400°F (200°C) for 18-20 minutes (no thawing needed).
- Freezing Baked Scones: Cool completely, then wrap individually and store in an airtight container for up to 1 month. Thaw and reheat in a 325°F (160°C) oven for 12-14 minutes.
- Optional Lemon Glaze: Whisk 1 tablespoon fresh lemon juice with 1/2 cup powdered sugar until pourable. Adjust consistency with more juice or sugar as needed. Drizzle over completely cooled scones (placing scones on a wire rack over a lined sheet pan makes for easy cleanup).
Nutrition (per scone, approximation)
- Calories: 190 kcal
- Carbohydrates: 23g
- Protein: 3g
- Fat: 9g
- Saturated Fat: 6g
- Polyunsaturated Fat: 0.5g
- Monounsaturated Fat: 2g
- Trans Fat: 0.3g
- Cholesterol: 34mg
- Sodium: 126mg
- Potassium: 50mg
- Fiber: 1g
- Sugar: 5g
- Vitamin A: 300IU
- Vitamin C: 0.5mg
- Calcium: 66mg
- Iron: 1mg
Nutrition information is an estimate and may vary based on specific ingredients and preparation.
Additional Info
Course: Quick Breads & Muffins, Breakfast, Brunch, Snack
Cuisine: British, American
Did you make this recipe?
We’d love to see your creations! Mention @lastingredient on Instagram and tag it #lastingredient!