
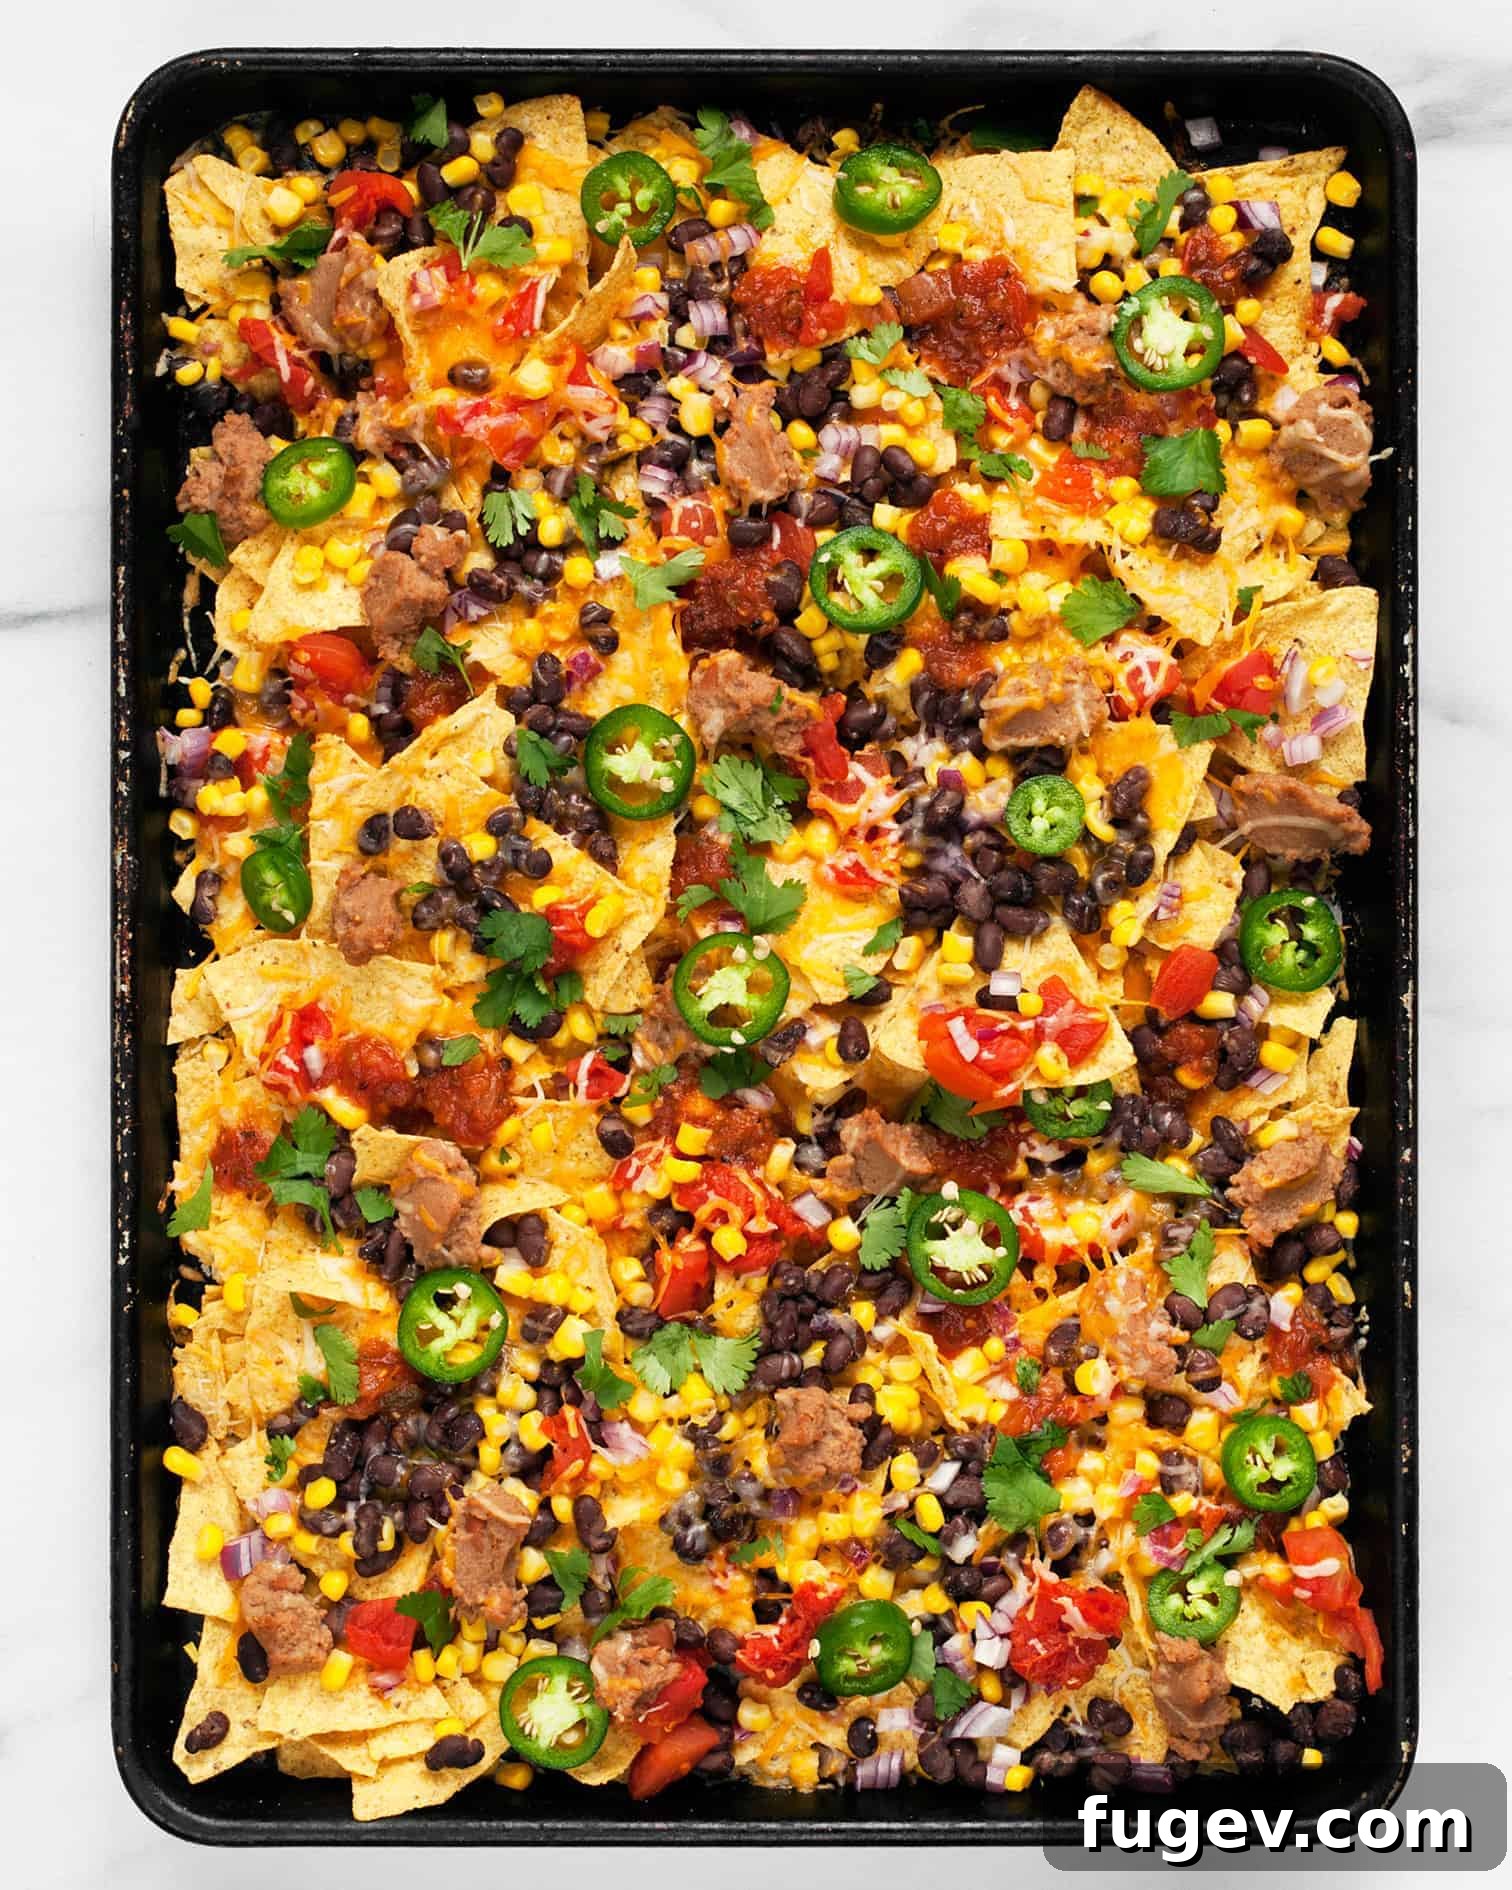
Get ready to elevate your snack game with these incredibly easy and customizable Sheet Pan Nachos! Piled high with savory black beans, creamy refried beans, sweet corn, crisp red onions, and juicy tomatoes, these nachos are an absolute crowd-pleaser. Whether you’re hosting a lively Super Bowl party, a casual get-together with friends, or simply need a quick and satisfying family meal, this recipe delivers maximum flavor with minimal effort. They can be effortlessly kept vegetarian, offering a robust and fulfilling option for plant-based eaters, or you can enhance them with shredded rotisserie chicken or perfectly seasoned ground beef for the meat lovers in your group. This recipe isn’t just about food; it’s about bringing people together over a deliciously simple, shareable appetizer that everyone will rave about.
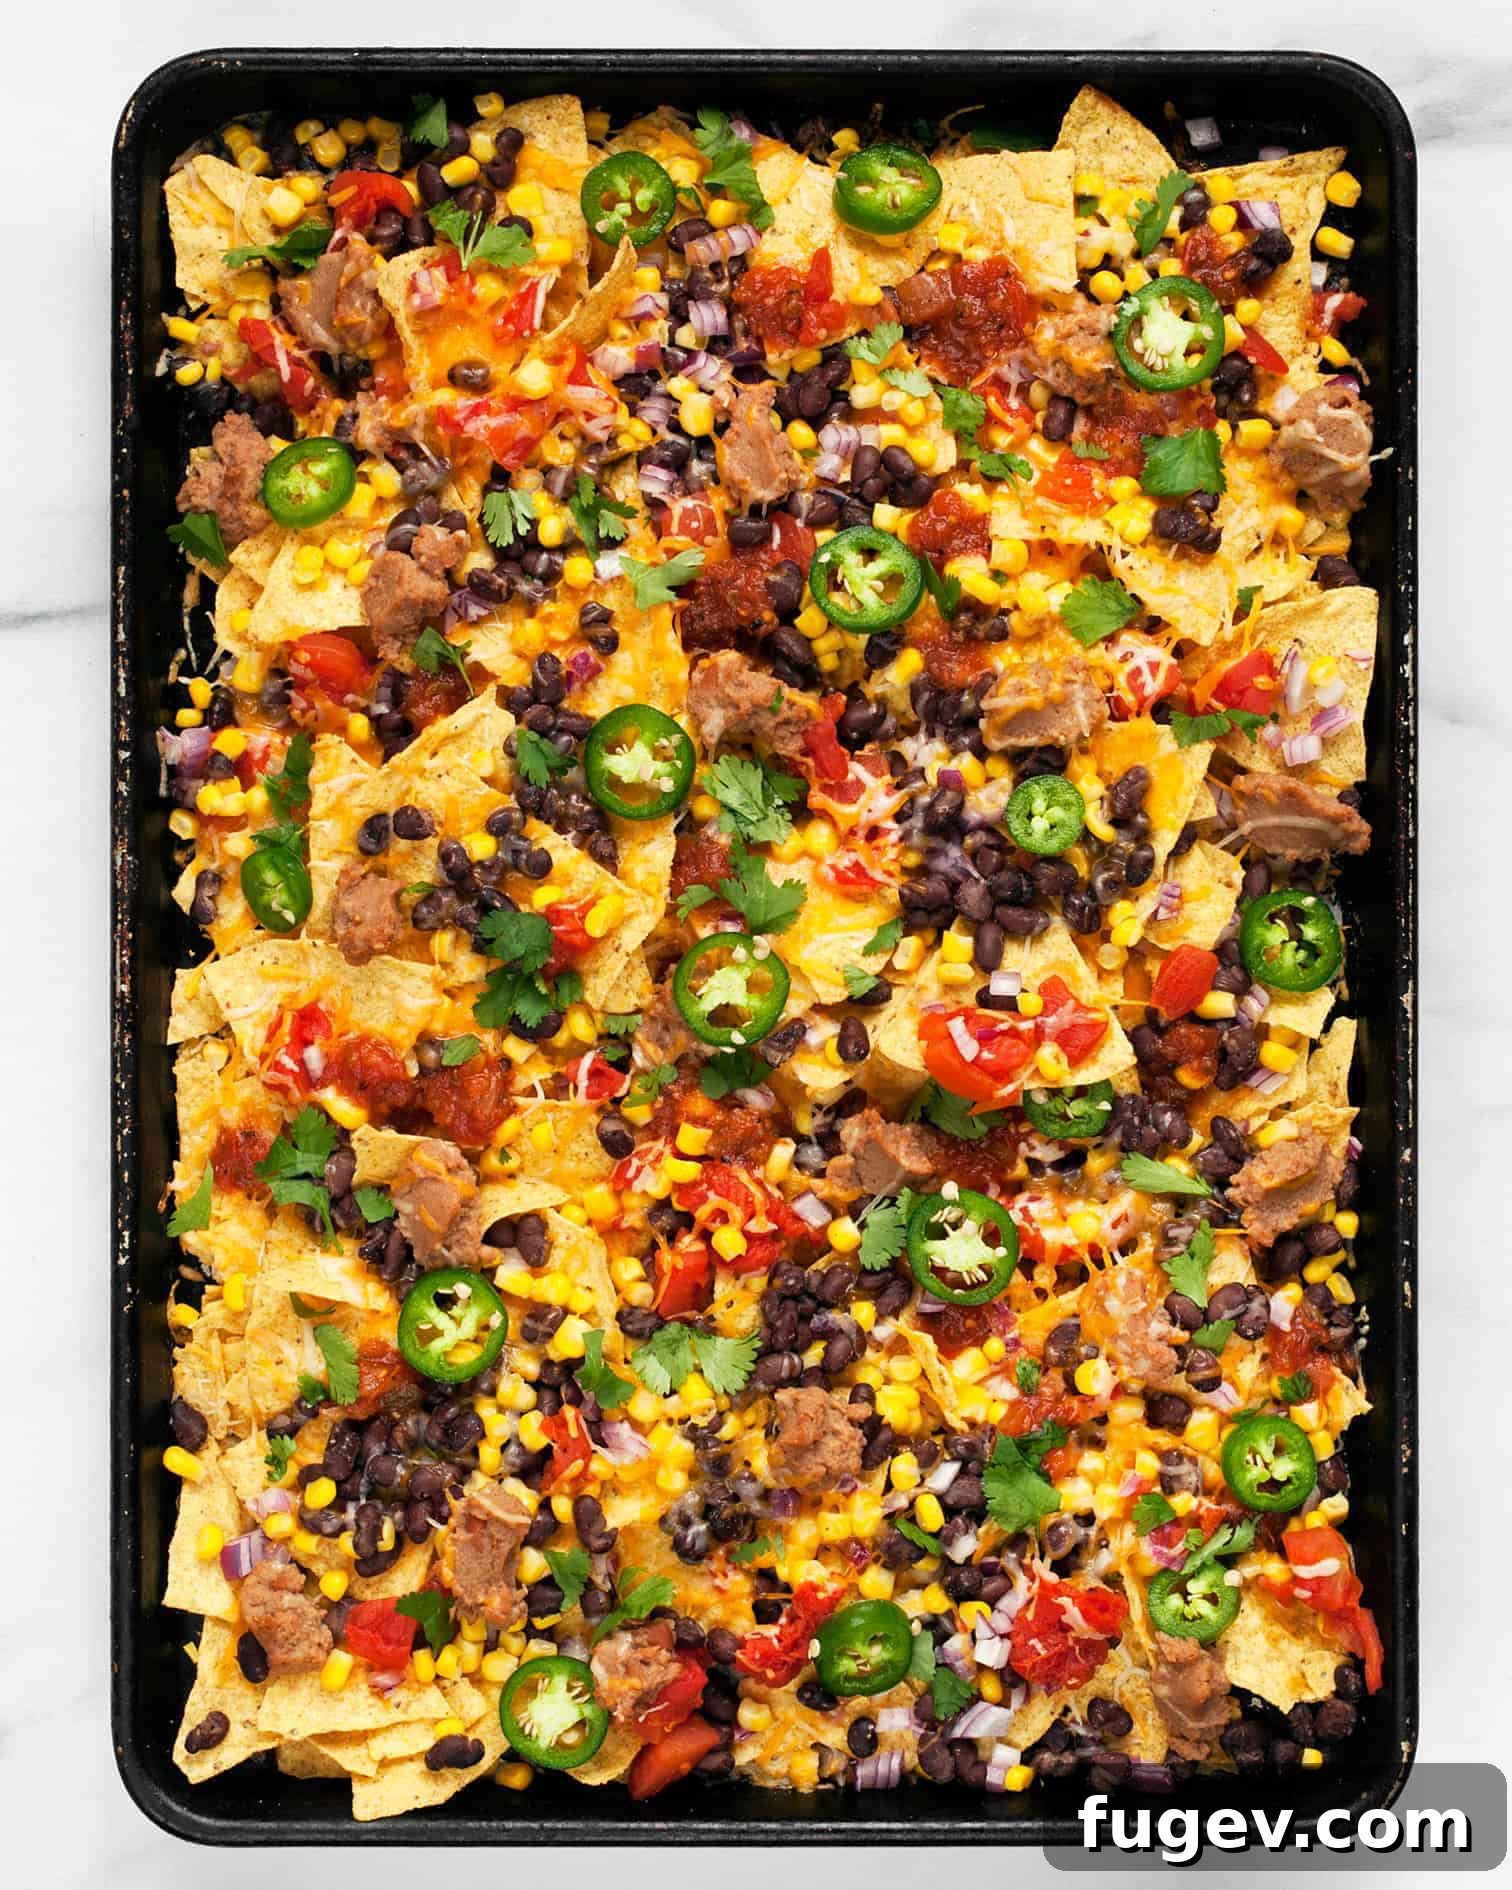
Table of Contents
- Why You’ll Love This Ultimate Nacho Recipe
- Essential Ingredients for Perfect Nachos
- Exciting Optional Additions and Toppings
- How to Make Easy Sheet Pan Nachos
- Customizing Your Nachos: Vegetarian, Meat-Lover & Beyond
- Top Tips for the Best Sheet Pan Nachos
- Frequently Asked Questions About Nachos
- Sheet Pan Nachos Full Recipe Card
Why You’ll Love This Ultimate Nacho Recipe
Preparing food for a gathering shouldn’t be stressful, especially when you want to enjoy the event yourself! This sheet pan nacho recipe is designed for maximum enjoyment and minimum fuss, making it an absolute favorite for countless reasons. Here’s why these nachos will quickly become your go-to appetizer for almost any occasion:
They are the Ultimate Game-Day Snack (and Beyond!)
When the stakes are high, and the cheering is loud, you need a snack that can keep up with the energy. These Sheet Pan Nachos are not just for Super Bowl Sunday; they are perfect for any sporting event, a casual movie night, a lively birthday party, or simply a fun weeknight dinner at home. They are the epitome of “assembly, not cooking,” requiring little to no active prep time other than some quick chopping. This means you spend less time in the kitchen stirring, frying, or baking, and more time enjoying the company of your guests and the excitement of the moment. Despite their inherent simplicity, they turn out incredibly impressive, with layers of savory, cheesy goodness in every bite, making them a guaranteed hit with any crowd. The hands-on nature of nachos also encourages sharing and conversation, adding to the festive atmosphere.
Effortlessly Customizable for Every Palate
Entertaining a diverse group often means catering to various tastes and dietary preferences. This sheet pan nacho recipe shines in its remarkable adaptability. It’s incredibly easy to customize, ensuring everyone stays happy and well-fed, regardless of their preferences or restrictions. Whether you have vegetarian guests, meat-loving friends, or those with a penchant for extra spice or a milder flavor, these nachos can be tailored to suit. You can easily divide the pan into sections for different toppings, or simply offer optional additions on the side, allowing each person to create their perfect plate. This flexibility takes the stress out of meal planning and entertaining, letting you focus on being a present and charming host rather than a short-order cook. You can even experiment with different cheese blends, bean types, or spice levels to truly make this recipe your own every time you prepare it.
Quick & Convenient for Last-Minute Gatherings
Imagine your guests arriving, and you’re still able to whip up a delicious, hot appetizer without missing a beat of conversation. That’s the magic of these Sheet Pan Nachos. You can have all your ingredients prepped and ready to go in advance, neatly chopped and portioned. Then, when your guests arrive or the cravings hit, you simply assemble and bake. The baking time is incredibly short—just 5-7 minutes—meaning warm, gooey, delicious nachos can be on the table almost instantly after assembly. This allows you to remain engaged with your guests, rather than being stuck in the kitchen performing last-minute cooking tasks. The quick turnaround time also makes them ideal for spontaneous decisions to host or when you’re simply too busy for an elaborate meal but still want something satisfying and flavorful. Everyone can then dig into the warm, fresh nachos together, fostering a wonderful communal dining experience.
Essential Ingredients for Perfect Nachos
Creating sensational sheet pan nachos begins with a thoughtful selection of fresh, high-quality ingredients. While the core recipe is wonderfully simple, each component plays a crucial role in building layers of irresistible flavor and satisfying texture. Here’s a detailed look at what you’ll need to gather for this crowd-pleasing dish:
- Tortilla Chips: These are the bedrock of your nacho creation! The choice of chip is surprisingly important; opt for a sturdy, thick-cut variety that can confidently hold up to the weight and moisture of your toppings without becoming soggy or breaking too easily. While any brand you love will work, consider restaurant-style chips or those infused with a hint of lime for an extra zesty kick that brightens the overall flavor profile. Avoid overly thin or heavily seasoned chips that might compete with your toppings.
- Shredded Mexican Cheese Blend: For that quintessential, gooey, melty experience, a Tex-Mex or Mexican cheese blend is your best bet. These blends typically combine cheeses like Monterey Jack, sharp cheddar, and often asadero or queso blanco, specifically chosen for their superior melting properties and balanced flavor. While convenient, pre-shredded cheese is often coated with anti-caking agents that can hinder a truly smooth melt; for the absolute best results, consider shredding your own cheese from a block. Other great options include pepper jack for a little heat or a mix of white cheddar and mozzarella.
- Black Beans: These versatile legumes add a fantastic source of plant-based protein and fiber, making your nachos more substantial and satisfying, especially for vegetarian versions. Canned black beans are perfectly acceptable and convenient; just remember the crucial step of draining and rinsing them thoroughly under cold water. This removes excess sodium and starch, improving both their flavor and texture on the nachos. Canned pinto beans can also be used as a delicious, creamy alternative.
- Corn: Whether it’s the peak of summer corn season or the dead of winter, corn adds a lovely burst of natural sweetness and vibrant color that makes your nachos visually appealing and taste fantastic. Canned or frozen corn works wonderfully here. If using frozen corn, ensure you thaw it completely by running it under cold water in a strainer and draining it very well to prevent any excess moisture from making your chips soggy. Fresh corn cut straight off the cob (and perhaps lightly grilled) is a gourmet touch if time allows.
- Tomatoes: Fresh, finely diced tomatoes bring a burst of juicy freshness and a hint of bright acidity that beautifully cuts through the richness of the cheese and beans. A medium-sized, ripe tomato, finely diced, integrates well with the other toppings. For a different textural element or a sweeter bite, you could also use halved or quartered cherry or grape tomatoes. Ensure they are drained slightly if they are very juicy.
- Red Onions: Finely chopped red onions contribute a mild pungency and a beautiful pop of purple color to your nacho platter. Their crisp texture adds a welcome contrast to the softer ingredients. If you find the flavor of raw red onions too strong or sharp, you can mellow them by soaking the chopped pieces in cold water for 10-15 minutes, then draining thoroughly, before adding them to the nachos.
- Refried Beans: Don’t underestimate the power of creamy refried beans! They act as a wonderful binder, helping to hold toppings in place, and add a rich, earthy flavor and hearty texture. They are particularly important if you’re keeping the nachos vegetarian, contributing significant substance. For easy and even distribution, spoon them in small dollops across the chips rather than attempting to spread them in a single layer.
- Jalapeños: For those who appreciate a touch of heat and a tangy zest, thinly sliced fresh jalapeños are a must-have topping. They add a vibrant, spicy kick that perfectly complements the other savory and sweet flavors. If you prefer less heat, simply remove the seeds and white membranes from the jalapeño before slicing, as this is where most of the capsaicin (heat) resides. Pickled jalapeños are also a great option, offering a milder, tangy flavor profile.
- Fresh Cilantro: A vibrant finishing touch, a generous sprinkle of torn fresh cilantro leaves provides a refreshing, herbaceous aroma and flavor that is distinctly Mexican-inspired and truly elevates the dish. While I’m a huge cilantro-lover, I know it’s a divisive herb! If you’re not a fan, or if your guests have a preference against it, feel free to skip it entirely. Sliced green onions (scallions) are an excellent substitute, offering a similar fresh, bright, and slightly oniony flavor without the unique taste of cilantro.
- Salsa: A good quality store-bought salsa offers convenience and a delicious burst of fresh, tangy flavor. You can choose mild, medium, or hot depending on your preference and the heat level you desire. For an extra fresh and chunky option, consider swapping it out for homemade pico de gallo, which adds more diced tomato, onion, and cilantro. Alternatively, you can include both a traditional salsa and pico de gallo on the side for guests to add as they please.
Exciting Optional Additions and Toppings
The true genius of sheet pan nachos lies in their incredible versatility. While the core recipe is fantastic on its own, these optional additions allow you to customize your platter to an even greater degree, adding extra layers of flavor, texture, and heartiness. Don’t hesitate to get creative and tailor your nachos to your specific cravings or guest preferences!
- Cooked Protein (Shredded Chicken, Ground Beef, or Chorizo): Adding a fully cooked protein instantly transforms your nachos into a more substantial meal.
- Shredded Rotisserie Chicken: This is a game-changer for speed and convenience! Simply shred a store-bought rotisserie chicken for instant savory goodness and a tender texture.
- Taco-Seasoned Ground Beef/Turkey: Brown your favorite ground meat (beef, turkey, or even plant-based crumble), drain any excess fat, and liberally mix in your favorite taco seasoning for an authentic, deeply flavorful Tex-Mex taste.
- Carne Asada or Steak Strips: For a more gourmet touch, thinly sliced and seasoned cooked steak or carne asada adds a rich, savory depth.
- Cooked and Crumbled Chorizo: If you love a spicy, rich, and distinctly savory kick, cooked and crumbled Mexican chorizo is an excellent choice.
Important Note: Any protein you add should be fully cooked and, ideally, warm before assembling the nachos. For ultimate flexibility, especially when catering to different dietary needs, you can even add the proteins *after* baking (see customization tips below for more details).
- Sour Cream or Greek Yogurt: A generous dollop of cool, tangy sour cream or plain Greek yogurt (a fantastic, healthier alternative) provides a wonderful cooling contrast to the richness and any potential spice of the nachos. Always wait to add this until your nachos are fresh out of the oven and just before serving to prevent it from curdling or melting excessively into a watery mess.
- Guacamole or Diced Avocados: Creamy, fresh, and utterly delicious, homemade guacamole or simply perfectly diced fresh avocados are always a welcome addition to any chip-based dish. They add healthy monounsaturated fats, a smooth, luxurious texture, and a bright, earthy flavor that beautifully balances the crunch of the chips and the savory toppings.
- Sliced Black Olives: A classic nacho topping, sliced black olives contribute a distinct salty, briny flavor and a soft texture. They’re an easy addition that many people love and visually appealing against the other vibrant ingredients.
- Thinly Sliced Radishes: For an unexpected yet absolutely delightful twist, thinly sliced radishes offer a refreshing, crisp texture and a subtle peppery bite. They add a much-needed crunch that cuts through the richness and brightens the overall flavor profile, making each mouthful more dynamic.
- Queso Fresco or Cotija Cheese: Beyond the melty cheese blend, crumbling some fresh, salty queso fresco or cotija cheese over the *baked* nachos adds another dimension of authentic Mexican flavor and a slightly different, crumbly texture. These cheeses don’t melt like cheddar but provide a wonderful salty tang.
- Pickled Red Onions: If you adore the tangy zest of pickled vegetables, quick pickled red onions add a beautiful vibrant color and a sharp, sweet-sour crunch that complements the savory and rich toppings perfectly. They can be made ahead and stored.
- Hot Sauce: For those who crave an extra layer of fiery heat, a few dashes or a drizzle of your favorite hot sauce (like Cholula, Tapatio, or a smoky chipotle sauce) added right before serving can really kick things up a notch.
How to Make Easy Sheet Pan Nachos
Making these sheet pan nachos is less of a complicated cooking project and more of an artful assembly. The true secret to success lies in careful layering, ensuring every single chip gets a generous coating of deliciousness. Follow these simple, straightforward steps for perfectly baked, irresistibly cheesy, and flavorful nachos every single time:
First and foremost, preheat your oven to a robust 400 degrees F (200 degrees C). This high heat is absolutely crucial for quickly melting the cheese and warming the toppings through without over-baking and making your tortilla chips soggy. If your oven has a convection setting, feel free to use it; it can help achieve an extra crispness on the chips and a more even melt.
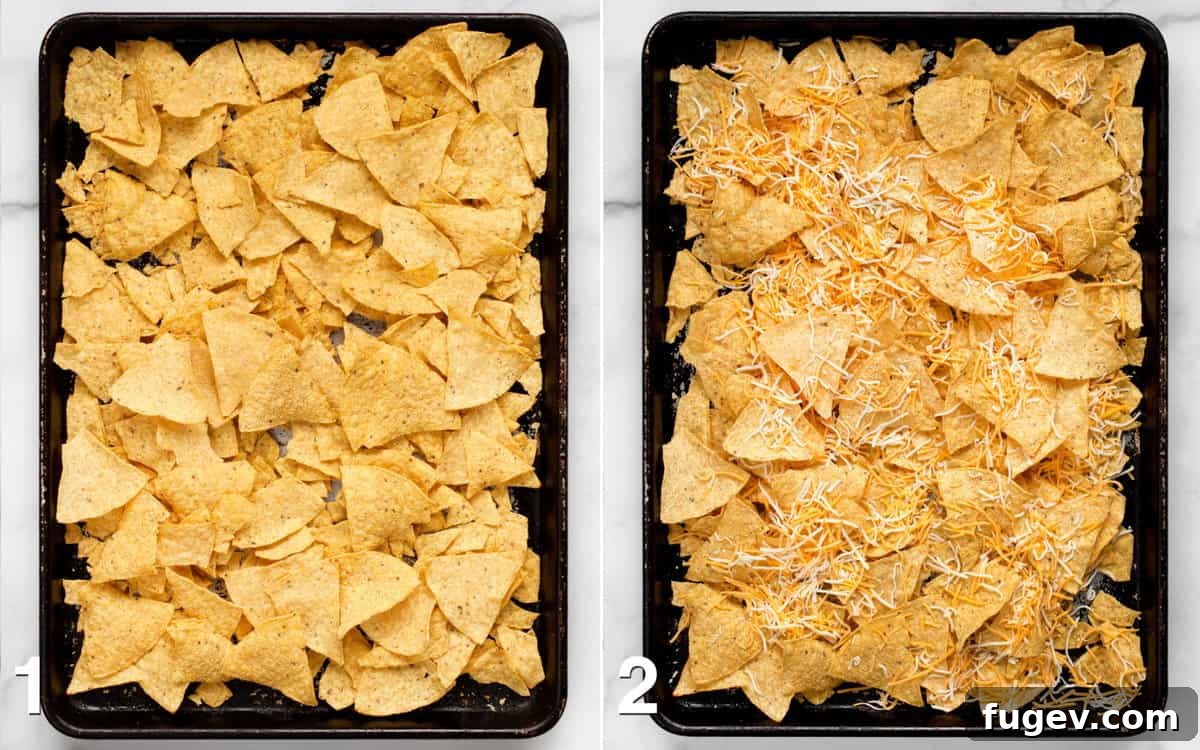
- Prepare the Base Layer of Tortilla Chips: Begin by spreading a full 10-ounce bag of sturdy tortilla chips evenly across a large 13-inch by 18-inch baking sheet. Don’t be too precious about perfect single layers; some overlapping is perfectly fine and actually creates delightful hidden pockets of cheesy goodness and toppings. Your goal is to utilize as much of the pan’s surface area as possible to ensure even heating and thorough topping distribution. For the easiest cleanup imaginable, we highly recommend lining your baking sheet with a sheet of parchment paper or aluminum foil first.
- Apply the Initial Layer of Cheese: Sprinkle about one cup of your chosen shredded Mexican cheese blend generously over the spread-out chips. For the best possible coverage and to prevent chips from being completely bare, take a moment to gently toss the chips around a bit. This simple action helps ensure that some cheese falls underneath them, creating a foundational layer. This initial layer of cheese acts as a subtle barrier, protecting the chips from becoming overly soft once other potentially wet ingredients are added, and provides a delightful cheesy surprise throughout.
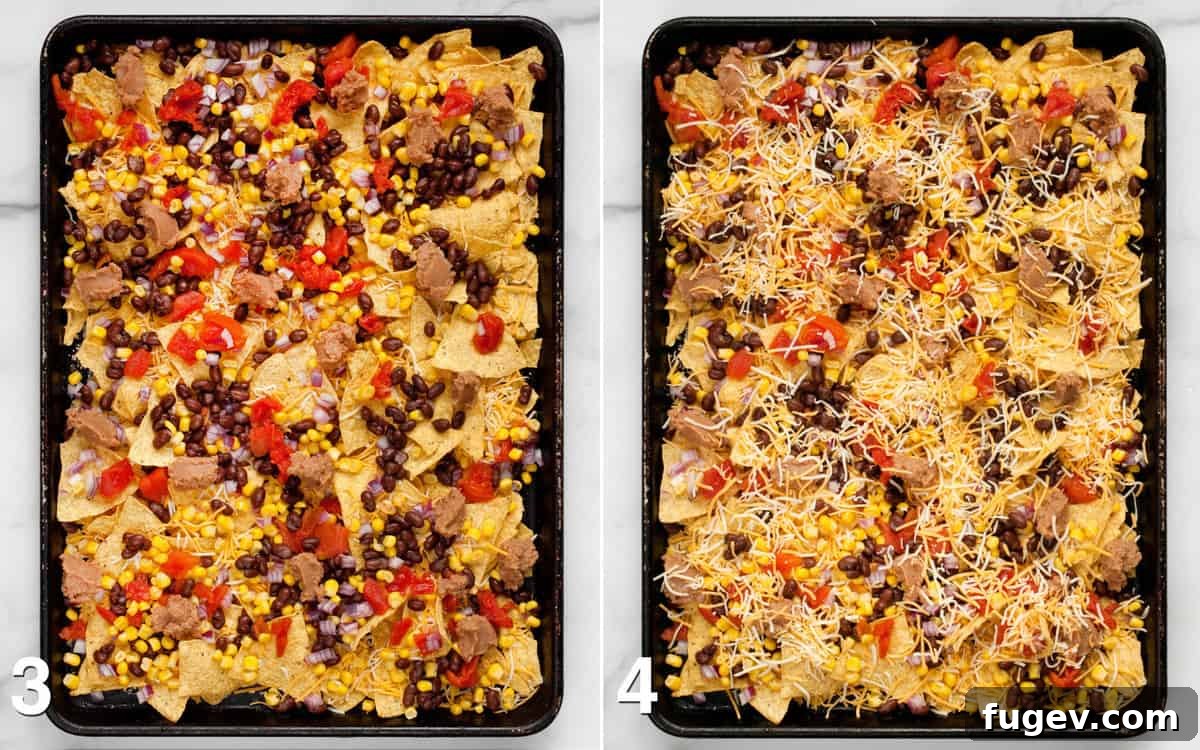
- Distribute the Core Toppings Evenly: Now it’s time to add the heart of your nachos. Evenly distribute the drained and rinsed black beans, thawed corn, finely chopped red onions, and diced tomatoes over the cheesy chips. Next, using a spoon, gently dollop small, random amounts of the creamy refried beans all over the nachos. This combination of whole and mashed beans provides incredible texture and a satisfying heartiness. If you’re incorporating cooked protein like shredded chicken or seasoned ground beef, layer it now to ensure it heats through evenly with the other toppings.
- Add the Final Layer of Cheese: To truly crown your creation, top the nachos with another half cup to a full cup of the shredded cheese, depending entirely on your personal preference for cheesiness. Ensure that most, if not all, of the delicious toppings are covered by this final, generous layer of cheese; this not only helps to hold everything together as it melts but also protects drier ingredients from scorching during baking and guarantees a beautifully gooey finish.
- Bake to Golden Perfection: Carefully transfer the loaded sheet pan to your preheated oven and bake for just 5-7 minutes. It’s important to keep a close eye on them during this short baking time; the goal is for the cheese to be perfectly melted and gloriously gooey, and all the toppings warmed through, without allowing the chips to burn or become overly crisp. The edges of the chips should turn a light golden color and remain crisp, signaling they are perfectly done.
- Garnish and Serve Immediately for Maximum Enjoyment: Once your nachos emerge from the oven, immediately finish them with fresh, uncooked toppings. This is the ideal moment to add thinly sliced fresh jalapeños (if using for an extra kick), a generous sprinkle of vibrant, torn cilantro, and a drizzle of your favorite salsa. You can also add other desired fresh toppings like crisp sliced radishes, briny black olives, a cooling dollop of Greek yogurt or sour cream, or a creamy scoop of guacamole. Serve them piping hot and let everyone dig in right from the pan! For an extra chunky tomato and onion kick, spoon on some homemade or store-bought pico de gallo, which adds even more fresh flavor and delightful texture.
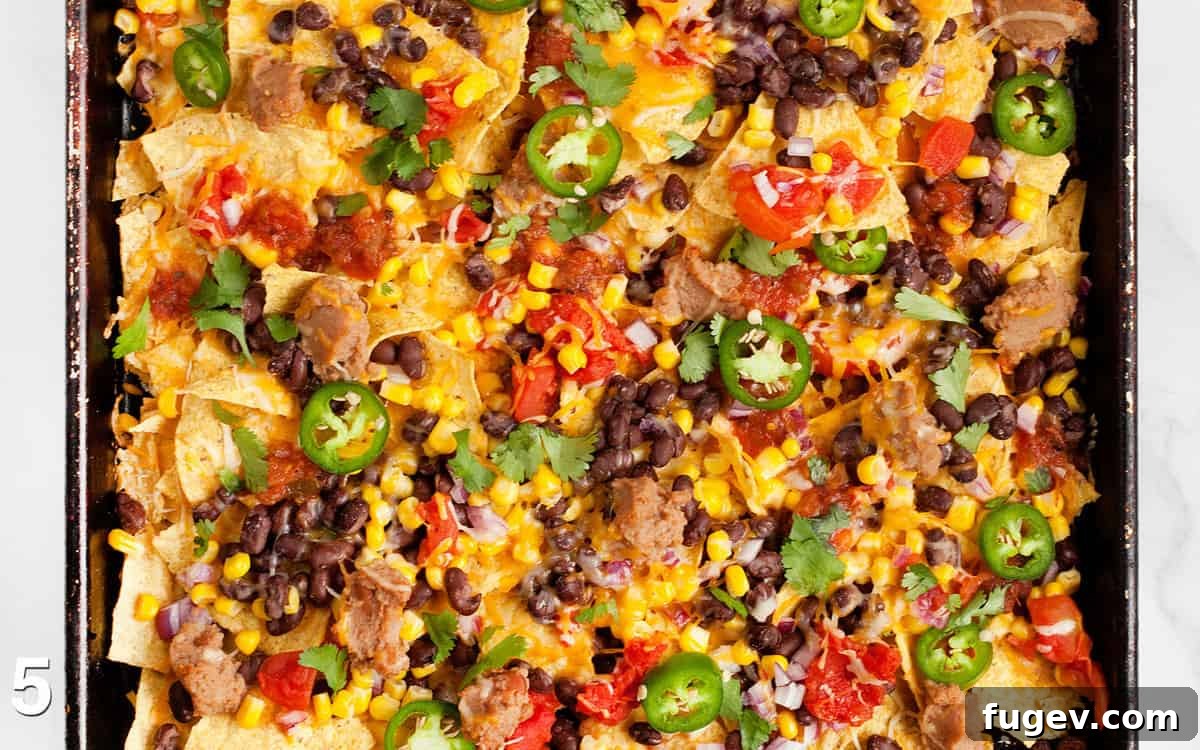
Customizing Your Nachos: Vegetarian, Meat-Lover & Beyond
One of the greatest advantages of sheet pan nachos is how easily they adapt to different dietary preferences, allowing you to cater to everyone at your table without extra fuss. This makes them a perfect dish for entertaining diverse groups. Here are a few smart strategies to ensure both vegetarians and meat-eaters, as well as those with other preferences, enjoy a spectacular and satisfying nacho experience:
Keeping Your Nachos Wholly Vegetarian (or Vegan!)
The base recipe, as detailed with black beans, refried beans, corn, tomatoes, and onions, is already a wonderfully robust and incredibly satisfying vegetarian meal. The combination of black beans and creamy refried beans provides ample plant-based protein, dietary fiber, and a delightfully hearty texture that makes these nachos feel substantial even without meat. To make them even more filling or to add extra nutritional value, consider incorporating additional vegetables such as sautéed bell peppers, thinly sliced zucchini, or crumbled cooked mushrooms into your layers. For those following a vegan diet, making these nachos is also incredibly straightforward: simply follow the recipe as written, substituting the traditional dairy cheese with a high-quality, plant-based shredded cheese blend that is known to melt well. Additionally, double-check that your chosen brand of refried beans is vegan-friendly (as some traditional brands may use lard, so always check the ingredient label). All other listed main ingredients are naturally plant-based.
Seamlessly Incorporating Protein for Meat Lovers
While I often prefer to keep my nachos vegetarian, adding a fully cooked protein is a fantastic and popular way to satisfy the carnivores in your group or to simply make the nachos a more complete and protein-rich meal. Remember, the golden rule is that any meat you add should be pre-cooked and, ideally, seasoned for maximum flavor:
- Shredded Chicken: For ultimate convenience, use leftover roasted chicken, grilled chicken, or store-bought rotisserie chicken. Simply shred it finely for easy distribution.
- Taco-Seasoned Ground Beef or Turkey: Brown your ground meat of choice (beef, turkey, or even lean bison), drain any excess fat thoroughly, and then mix in your favorite taco seasoning blend. This infuses the meat with an authentic, deeply flavorful Tex-Mex taste that complements the other toppings beautifully.
- Carne Asada or Thin Steak Strips: For a more gourmet touch and a richer flavor, thinly sliced and seasoned cooked steak or marinated carne asada pieces make for an elevated nacho experience.
- Cooked and Crumbled Chorizo: If you’re a fan of bold, spicy flavors, cooked and crumbled Mexican chorizo adds a rich, distinctly savory, and spicy component that truly stands out.
Smart Strategies for Mixed Dietary Groups
When you’re hosting a mixed group of vegetarians and meat-eaters, there are a couple of excellent, stress-free options to manage customization effectively:
- Post-Baking Protein Addition (The Easiest Method): This is arguably the simplest and most foolproof method. Prepare and bake the entire large sheet pan of nachos completely vegetarian, following the main recipe. Once they come out of the oven, simply offer a separate bowl of warm, pre-cooked shredded chicken or seasoned ground beef on the side. This allows meat-eaters to spoon their preferred protein directly onto their individual servings, ensuring the main vegetarian portion remains untouched and pure. This method is fantastic for large gatherings as it minimizes effort and ensures no cross-contamination.
- Dividing the Pan (For Integrated Options): For a slightly more integrated approach, you can divide your nacho preparation onto two smaller, quarter-sized sheet pans. Assemble one pan completely as a vegetarian version, with all the standard toppings. On the second quarter-sheet pan, add your chosen cooked protein (like taco meat or chicken) along with the other toppings before baking. This method creates two clearly distinct batches from the oven – one vegetarian and one meat-inclusive – making it very easy for guests to choose their preferred option.
No matter which method you choose, these Sheet Pan Nachos are incredibly accommodating, making your hosting duties much simpler and significantly more enjoyable. It’s a recipe that truly makes customizing extremely easy, allowing everyone at your table to enjoy their perfect, personalized plate of nachos.
Top Tips for the Best Sheet Pan Nachos
While sheet pan nachos are inherently simple to throw together, a few clever tips and tricks can elevate them from merely good to absolutely unforgettable. Follow these guidelines closely to ensure every bite of your creation is packed with explosive flavor, perfect texture, and that irresistible cheesy goodness:
Master the Art of Layering and Scattering
The true secret to truly great nachos isn’t just about having delicious toppings; it’s crucially about how those toppings are distributed. You want a harmonious blend of melted cheese and your favorite nacho ingredients spread evenly throughout the chips, not just piled on top. Think of it as building a delicious, edible landscape! Start with a base layer of chips, then a good sprinkle of cheese. Next, add about half of your other prepared toppings, followed by another generous sprinkle of cheese. Then, layer on the remaining toppings, and finally, crown your creation with the last layer of cheese. This strategic layering technique ensures that almost every single chip has a good chance of being covered with gooey melted cheese and a variety of delicious ingredients, effectively preventing those disappointing dry, bare chips at the bottom of the pile.
Strategic Cheese Placement for Proteins
If you’re opting to include a cooked protein like seasoned ground beef, tender shredded chicken, or flavorful chorizo, be especially mindful of where you place your cheese in relation to the meat. Since these proteins are already fully cooked, your main goal in the oven is merely to heat them through without drying them out or making them tough. A smart strategy is to layer the cooked protein over the chips and then cover it generously with a good amount of shredded cheese. The cheese acts as a protective blanket, effectively shielding the meat from direct oven heat, which helps to keep it moist and flavorful as it warms. It also crucially helps to meld the flavors of the meat and cheese together beautifully, creating a cohesive and satisfying bite.
Amplify Flavor with Well-Seasoned Proteins
Never underestimate the power of seasoning! Don’t just add plain, unseasoned cooked chicken or beef to your nachos; give it a significant flavor boost beforehand. For chicken, marinate it in your favorite taco seasoning or a mix of Mexican spices (like cumin, chili powder, paprika, and garlic powder) before cooking and shredding. For ground beef or turkey, brown it thoroughly and then mix in your preferred taco seasoning while it’s still warm in the pan. This infuses the meat with a vibrant, zesty, and deeply satisfying flavor that will permeate throughout your entire nacho platter, making each and every bite even more complex and delicious.
The “Dollop Method” for Refried Beans
Refried beans can sometimes be a bit tricky to spread evenly across a bumpy landscape of chips without creating a dense, overwhelming layer. The simple yet effective “dollop method” makes this effortless. Instead of trying to spread a thick, continuous layer, use a spoon to drop small, random dollops of refried beans across the chips. This ensures you get creamy, flavorful pockets of beans in bite-sized amounts distributed throughout the entire pan, rather than one large, heavy layer. It also contributes to achieving an interesting and varied textural experience with each bite you take.
Extra Cheese, Post-Bake Melty Magic
For an extra luxurious and truly ultra-cheesy experience, here’s a pro tip: sprinkle a little extra shredded cheese (perhaps about a quarter to a half cup) over the nachos immediately after you pull them out of the oven. The intense residual heat from the freshly baked nachos and the hot baking pan will be more than enough to melt this additional cheese quickly and beautifully, creating even more gooey, stretchy, cheesy goodness on contact. Just be mindful not to go excessively overboard, or you might cool down the entire batch too much, affecting the serving temperature.
Preventing Soggy Nachos: A Crucial Step
Soggy nachos are a cardinal sin in the world of appetizers! To effectively avoid this unfortunate outcome, ensure your oven is fully preheated to the recommended high temperature (400°F / 200°C) before placing the nachos inside. Bake them just until the cheese is perfectly melted and bubbly – this usually takes precisely 5-7 minutes. Do not overbake! Also, try to avoid overloading the pan with too many wet ingredients, as excessive moisture can create steam and quickly soften your crisp chips. Finally, and most importantly, always add fresh, moist, or cold toppings like sour cream, guacamole, and salsa *after* the nachos have come out of the oven, just before you serve them.
Prep Ahead for Stress-Free Serving
While the actual assembly and baking of these nachos is incredibly quick, you can make your life even easier and the process even faster by doing a bit of prep work in advance. Chop all your vegetables (onions, tomatoes, jalapeños), rinse and thoroughly drain your canned beans and corn, and shred your cheese earlier in the day or even the day before. If you plan to use any cooked protein, prepare and cook it in advance and store it separately in the refrigerator. When it’s finally time to serve, all you’ll have left to do is the quick assembly and the short bake, allowing you more time to relax and enjoy!
Frequently Asked Questions About Nachos
Absolutely! This recipe is incredibly adaptable to individual preferences, and if you’re a true cheese lover, you are more than welcome to add an extra half cup or even a full cup of shredded cheese. Just be aware that a larger quantity of cheese might take a minute or two longer to melt completely and achieve that perfect gooey consistency. Keep a close eye on your nachos in the oven to prevent the chips from over-browning or becoming too crisp while the cheese melts to glorious perfection.
Lining your baking pan is entirely optional, but it is a practice we highly recommend for convenience. Using parchment paper or aluminum foil (and perhaps a light spray of cooking oil on top for extra non-stick properties) will make your cleanup significantly quicker and easier, especially if any cheese or other ingredients melt and stick to the pan. If you choose not to line it, make sure your baking pan is adequately greased or uses a non-stick coating.
Making delicious vegan nachos is surprisingly simple and requires only a couple of substitutions! Follow the recipe exactly as written, but swap out the traditional shredded Mexican cheese blend with your favorite high-quality plant-based shredded cheese. Many excellent vegan cheese alternatives are now available that melt beautifully. Additionally, always ensure that your chosen brand of refried beans is vegan-friendly (some traditional brands may use lard, so it’s crucial to check the ingredient list). All other listed main ingredients in this recipe are naturally plant-based and suitable for a vegan diet.
Unfortunately, nachos are truly at their absolute best when enjoyed immediately after they are made, while the chips are crisp and the cheese is piping hot and gooey. Regrettably, leftovers do not store well. When refrigerated, the tortilla chips tend to absorb moisture from the various toppings, becoming unpleasantly soggy and losing their texture. Furthermore, if you’ve added fresh, cooling toppings like sour cream or guacamole, these will not reheat well in the oven. It’s always best practice to prepare just enough to be eaten in one sitting, or plan for them to be entirely finished!
A standard half-sheet pan, typically measuring approximately 13×18 inches (33×45 cm), is ideally suited for making a large batch of nachos. Its generous surface area allows you to spread the tortilla chips and toppings in a relatively thin layer, which is crucial for promoting even heating, uniform cheese melting, and optimal crispness of the chips. If you don’t have a half-sheet pan, you can easily use two smaller quarter-sheet pans (9×13 inches), which also works wonderfully, especially if you want to prepare separate vegetarian and meat-inclusive versions simultaneously.
The high heat of the oven is essential for quick cheese melting, but it also means the chips can burn if left unattended or baked for too long. To prevent this, always place your nachos on the middle rack of your oven. Most importantly, keep a very close watch on them during the baking process! As soon as the cheese is fully melted, beautifully bubbly, and the edges of the tortilla chips just start to turn a light golden brown, they are perfectly ready. Don’t be afraid to pull them out slightly early rather than risking over-baking and burnt chips.
Sheet Pan Nachos
Paige Adams
Pin
10 minutes
5 minutes
15 minutes
8
Ingredients
- 1 10-ounce bag tortilla chips
- 1-1/2 – 2 cups shredded Mexican cheese blend
- 1 15-ounce can black beans, rinsed and drained
- 1 cup canned or frozen corn, thawed if frozen
- 1 medium tomato, diced
- 1 small red onion, roughly chopped
- 1 cup refried beans
- Cooked chicken, ground beef or chorizo, optional
- 1 jalapeno, thinly sliced (for garnish)
- 1 handful cilantro leaves, torn (for garnish)
- 1/3 cup salsa (for garnish)
Instructions
-
Preheat the oven to 400 degrees F (200°C). Line a 13×18-inch baking sheet with parchment paper for easy cleanup, if desired.
-
Spread the tortilla chips evenly across the prepared sheet pan. Sprinkle 1 cup of the shredded cheese over the chips. Gently toss the chips and cheese together to ensure some cheese gets underneath the chips.
-
Evenly distribute the black beans, corn, diced tomatoes, and chopped red onions over the chips. Using a spoon, dollop the refried beans across the chips. If using, add cooked chicken, ground beef, or chorizo at this stage. Sprinkle the remaining 1/2 cup to 1 cup of cheese over all the toppings.
-
Bake the nachos in the preheated oven for 5-7 minutes, or until the cheese is thoroughly melted, bubbly, and the chips are slightly golden.
-
Remove from oven. Immediately top with thinly sliced jalapeños, torn cilantro leaves, and salsa. Serve hot with optional additions like sour cream, guacamole, or sliced radishes.
Notes
- Sour cream or Greek yogurt
- Guacamole or diced avocados
- Sliced black olives
- Thinly sliced radishes
- Sliced scallions (They can also be used instead of cilantro for a different fresh flavor.)
- Queso fresco or cotija cheese
- Pickled red onions
- Hot sauce
You can bake the nachos on smaller sheet pans (e.g., quarter sheet pans) if you want to prepare separate vegetarian and non-vegetarian versions simultaneously.
Any protein that you add, such as chicken, ground beef, or chorizo, should be already cooked before adding it to the nachos.
Nachos are at their absolute best when eaten immediately after they are made, and they do not keep well as leftovers due to the chips becoming soggy.
Nutritional information provided is an estimate and does not include additional proteins or optional toppings, as these can vary significantly.
Nutrition
Carbohydrates: 43g |
Protein: 10g |
Fat: 9g |
Saturated Fat: 2g |
Polyunsaturated Fat: 4g |
Monounsaturated Fat: 2g |
Trans Fat: 0.03g |
Cholesterol: 4mg |
Sodium: 620mg |
Potassium: 367mg |
Fiber: 8g |
Sugar: 3g |
Vitamin A: 336IU |
Vitamin C: 8mg |
Calcium: 155mg |
Iron: 2mg
Nutrition information is automatically calculated and should only be used as an approximation. Actual values may vary based on specific ingredients and preparation methods.
Additional Info
Appetizer, Main Dish, Snack
Tex-Mex, American
Did you make this recipe?
Mention @lastingredient on Instagram and tag it #lastingredient!