
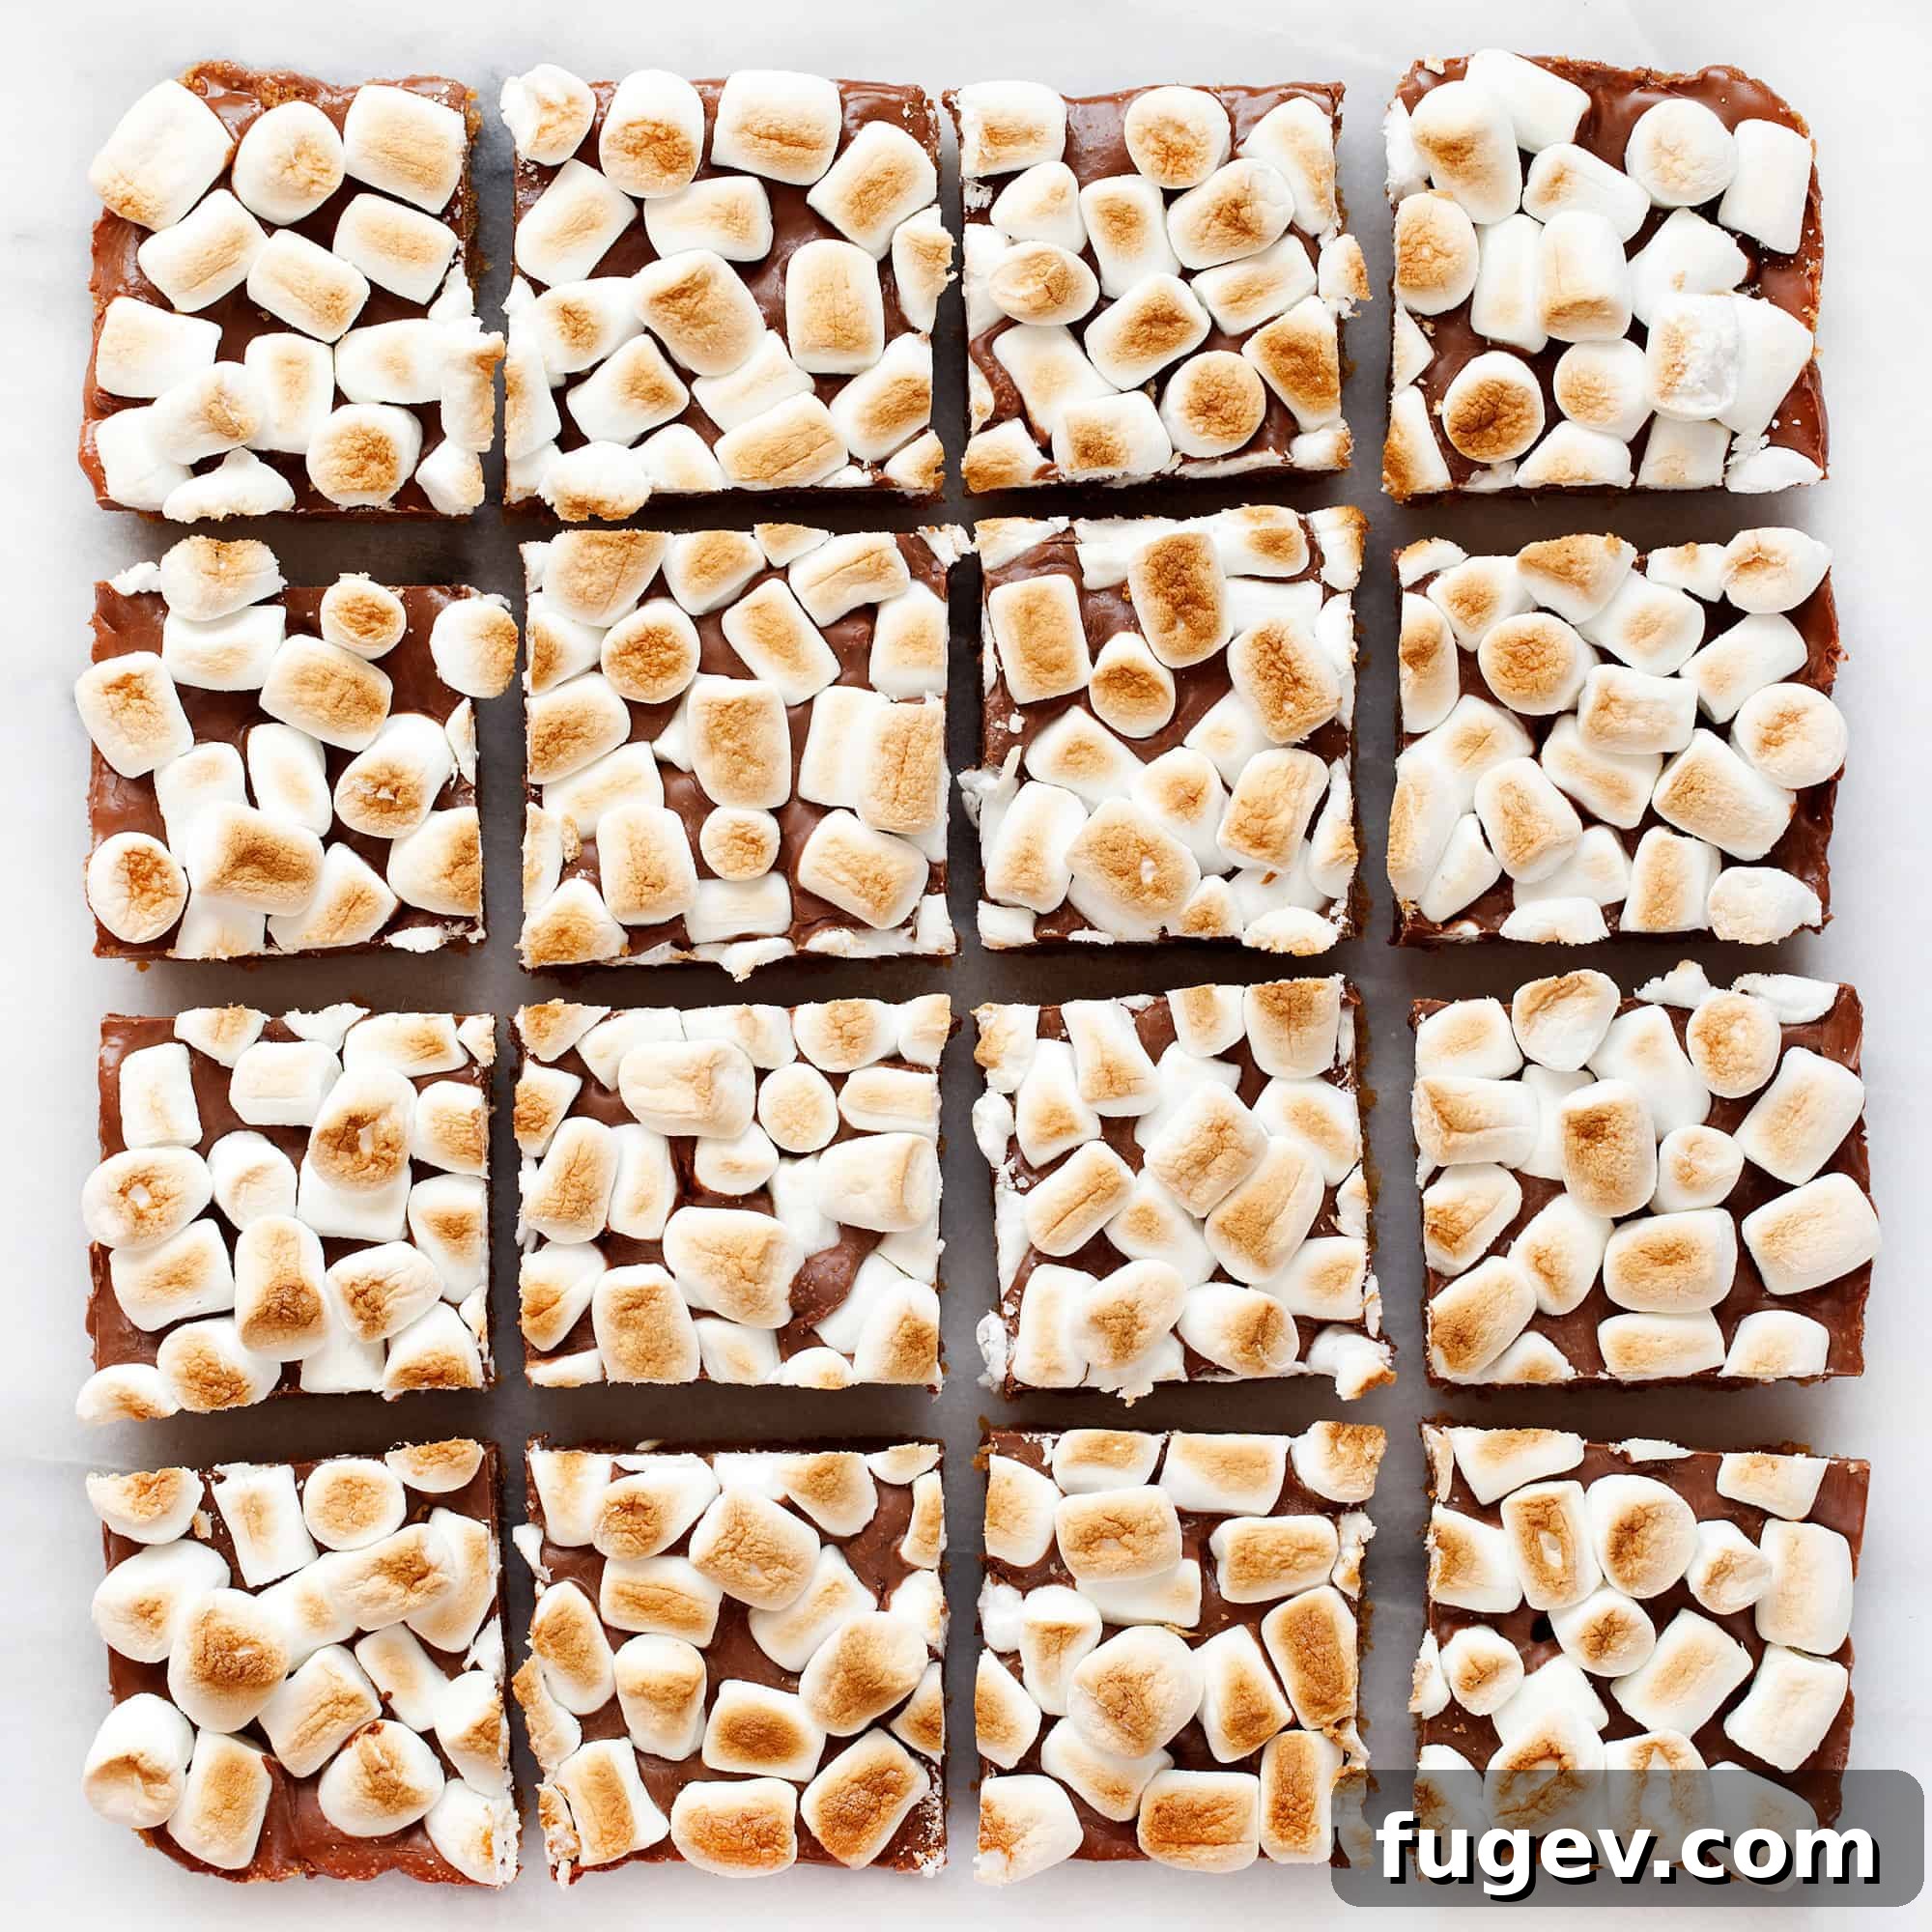
There’s something universally comforting and undeniably delicious about s’mores. That magical combination of crunchy graham crackers, gooey melted chocolate, and perfectly toasted marshmallows evokes cherished memories of summer nights, crackling campfires, and shared laughter. But what if you could capture that iconic flavor profile and bring it into your kitchen, no open flame or smoky clothes required? Enter **S’more Bars**: a brilliant, fuss-free way to enjoy this beloved classic anytime the craving strikes.
These homemade S’more Bars are a celebration of convenience and flavor. They feature an irresistibly thick, buttery graham cracker crust, generously slathered with a luscious layer of melted milk chocolate, and crowned with a fluffy blanket of mini marshmallows, toasted to golden perfection right in your oven. It’s all the joy of traditional s’mores, neatly packaged into a convenient, shareable bar that’s perfect for any occasion, from a casual family treat to a dazzling party dessert.
Bringing the Campfire Spirit Home: A Personal Connection to S’mores
I’ll be the first to admit, I’m not exactly an outdoors enthusiast. When brainstorming activities for a weekend escape, camping rarely, if ever, makes it onto my list of preferred activities. While I don’t demand luxurious 5-star accommodations, I certainly appreciate the conveniences and comforts of modern living. This might seem a little surprising, especially considering I spent many formative summers immersed in the classic camp experience.
My camp memories are vivid and cherished: the creative energy of arts & crafts, the thrill of archery, invigorating hikes through nature, and the undeniable highlight – cookouts by the roaring fire. S’mores were always the grand finale of these campfire gatherings, an eagerly anticipated treat after a day filled with adventures. I remember patiently holding my marshmallow at just the right distance from the glowing embers, carefully rotating it to achieve that coveted, evenly toasted, golden-brown exterior, avoiding the dreaded fiery char. It was an art form, a test of patience, and ultimately, a reward of pure sugary bliss.
As much as I loved those campfire moments, the thought of recreating them at home often felt daunting. The smoke, the elaborate setup, the unpredictable weather – it all seemed a bit much for a casual craving. That’s why these S’more Bars became my perfect solution. They capture all the nostalgic essence of a campfire s’more, but with the added ease and clean comfort of baking in your own kitchen. No smoke in your hair, no sticky ash, no wrestling with unpredictable flames – just pure, unadulterated s’mores satisfaction in a perfectly portioned bar.
Why S’more Bars Are the Ultimate Dessert Innovation
These s’more bars aren’t just a delicious treat; they’re a revelation for anyone who loves the classic s’mores experience but seeks a more convenient and accessible way to enjoy it. Here’s why they stand out as an absolute must-try recipe for your dessert repertoire:
- No Campfire Necessary: The most significant advantage! Forget gathering firewood, dealing with smoke, or waiting for perfect outdoor conditions. These bars bring the magic of the campfire indoors, allowing you to indulge in the iconic s’mores flavor year-round, regardless of the weather.
- Effortlessly Easy to Make: With simple, readily available ingredients and straightforward steps, this recipe is incredibly beginner-friendly. Even novice bakers can achieve impressive, professional-looking results, making it an excellent choice for a quick dessert fix or a fun, engaging project with children.
- Perfect for Any Occasion: From casual family desserts and school lunchbox treats to impressive party contributions and elegant potluck dishes, s’more bars are incredibly versatile. They travel exceptionally well, are easy to serve without extra utensils, and are always a guaranteed crowd-pleaser that disappears quickly.
- Clean and Convenient: Unlike individual s’mores that can be tricky to assemble, messy to eat, and often leave you with sticky fingers, these bars are pre-portioned and hold together beautifully. This means less mess for everyone and a more enjoyable eating experience.
- Year-Round Enjoyment: Why limit s’mores to the summer months? These bars allow you to savor that unique blend of sweet, crunchy, and gooey flavors during fall, winter, and spring. They provide a comforting, nostalgic treat for any season, bringing a touch of summer warmth to colder days.
The Anatomy of a Perfect S’more Bar: Layers of Delight
Understanding the role of each component is key to appreciating the delightful harmony that defines these S’more Bars. Each carefully crafted layer plays a crucial part in creating the ultimate no-campfire s’mores experience, delivering distinct textures and flavors that meld together beautifully.
1. The Golden Graham Cracker Crust: The Crispy Foundation
The foundation of our S’more Bars is a rich, buttery graham cracker crust. This isn’t just any crust; it’s designed to be thick, sturdy, and packed with that distinctive honey-graham flavor we all know and love. The process begins by crushing whole graham crackers into fine, even crumbs. These crumbs are then generously combined with melted unsalted butter, a touch of granulated sugar for an extra hint of sweetness, and a pinch of sea salt to expertly balance the rich flavors. When this mixture is pressed firmly into the pan and baked to a perfect golden brown, it transforms into a wonderfully fragrant, slightly crispy, and incredibly robust base that truly mimics the crunch of a traditional graham cracker while providing a stable, delicious platform for the layers above.
2. The Velvety Milk Chocolate Layer: The Gooey Heart
Nestled luxuriously between the crunchy graham cracker crust and the fluffy marshmallow topping is a generous layer of smooth, melted milk chocolate. This is where the quintessential “gooey” factor of a s’more truly comes into play. We recommend using good quality milk chocolate chips, as they melt beautifully and provide that classic, sweet, creamy flavor that pairs so perfectly with the graham crackers and marshmallows. Spreading the melted chocolate evenly over the slightly cooled crust ensures it sets just enough to hold the marshmallows firmly in place, yet remains delightfully soft and yielding with every indulgent bite. Remember, the quality of your chocolate makes a noticeable difference in the final taste, so choose a brand you truly enjoy!
3. The Toasted Mini Marshmallow Crown: The Fluffy Finish
No s’more is complete without the iconic marshmallow, and our S’more Bars proudly feature a generous, pillowy topping of mini marshmallows. These small wonders are artfully scattered over the melted chocolate layer, and then, thanks to a quick trip under the broiler, they achieve that signature golden-brown, lightly caramelized, and slightly crispy exterior, while remaining wonderfully soft and gloriously gooey on the inside. The broiler method is an ingenious and highly effective substitute for a traditional campfire, giving you all the visual appeal and textural magic without any outdoor hassle. The key here is absolute vigilance: watch them closely, as marshmallows can go from perfectly golden to unfortunately burnt in a matter of mere seconds!
S’more Bars Recipe
Paige Adams
20
12
32
16
bars
Print Recipe
Ingredients
- Nonstick cooking spray
- 18 whole graham crackers, crumbled (about 2 ½ cups crumbs)
- 6 ounces unsalted butter (1-1/2 sticks), melted
- 1/4 cup granulated sugar
- 1/4 teaspoon sea salt
- 10 ounces milk chocolate chips
- 3 cups mini marshmallows
Instructions
-
Prepare the Pan: Preheat your oven to 350 degrees F (175 C). Line an 8-inch square baking pan with aluminum foil, ensuring a slight overhang on the sides for easy lifting. Grease the foil generously with nonstick cooking spray.
-
Make the Graham Cracker Crust: In a food processor, pulse the whole graham crackers until they are finely crushed into crumbs. Add the melted butter, granulated sugar, and sea salt to the food processor. Pulse again until the mixture is well combined and resembles wet sand. Press this mixture firmly and evenly into the bottom of the prepared baking pan. Bake for 10-12 minutes, or until the crust is lightly toasted and golden brown around the edges. Remove from oven and let it cool for at least 15 minutes.
-
Melt the Chocolate: While the crust is baking, prepare your chocolate layer. Place the milk chocolate chips in a heatproof bowl. Bring about 1 inch of water to a low simmer in a medium saucepan. Place the bowl of chocolate over the simmering water, ensuring the bottom of the bowl does not touch the water. Stir frequently until the chocolate is completely melted and smooth. Alternatively, you can melt the chocolate in a microwave-safe bowl in 30-second intervals, stirring well after each interval until smooth.
-
Assemble the Bars: Once the graham cracker crust has cooled slightly, spread the melted chocolate evenly over the top of the crust. Immediately scatter the mini marshmallows generously over the chocolate layer, gently pressing them down slightly to ensure they adhere to the chocolate.
-
Toast the Marshmallows: Carefully preheat your broiler. Place the pan with the s’more bars under the broiler. Watch very closely! Toast the marshmallows until they are beautifully golden brown and slightly puffed, typically about 1-2 minutes. This can happen quickly, so do not walk away from the oven. Once toasted, remove the pan from the oven and let the bars cool completely at room temperature before attempting to cut them. Cooling helps the chocolate set and makes for clean squares. Cut into 16 even squares and serve.
Nutrition Information
Per Serving (1 bar):
- Calories: 273 kcal
- Carbohydrates: 34g
- Protein: 1g
- Fat: 15g
- Saturated Fat: 9g
- Polyunsaturated Fat: 0.4g
- Monounsaturated Fat: 3g
- Trans Fat: 0.3g
- Cholesterol: 23mg
- Sodium: 149mg
- Potassium: 82mg
- Fiber: 1g
- Sugar: 22g
- Vitamin A: 266IU
- Calcium: 28mg
- Iron: 1mg
Nutrition information is automatically calculated and should be used as an approximation.
Additional Recipe Information
Dessert, Cookies & Bars
American
Did you make this irresistible S’more Bars recipe?
We’d love to see your creations! Mention @lastingredient on Instagram and tag it with #lastingredient!
Expert Tips for Crafting Your Best S’more Bars
While this S’more Bars recipe is incredibly straightforward, a few key tips and tricks can significantly elevate your baking experience and ensure a truly outstanding result every time. Master these nuances for perfectly delicious bars:
- Achieving the Ideal Graham Cracker Crumbs: For the best crust texture that holds together beautifully, aim for fine, even crumbs. A food processor is your best tool for this, quickly transforming whole crackers into a consistent texture. If you don’t have one, place graham crackers in a sturdy zip-top bag, seal it, and crush them thoroughly with a rolling pin or the bottom of a heavy pan. Ensure there are no large chunks, as these can create an uneven and crumbly crust.
- Pressing the Crust Firmly: A common mistake that can lead to a fragile crust is not pressing the mixture firmly enough into the pan. Use the flat bottom of a drinking glass, a measuring cup, or even your knuckles to compact the graham cracker mixture thoroughly and evenly into the prepared pan. This crucial step prevents the crust from crumbling too much when you cut the bars and provides a solid, delicious base.
- Quality Chocolate Matters: While standard milk chocolate chips work wonderfully, investing in good quality milk chocolate will significantly enhance the depth of flavor in your bars. You can also chop up a premium milk chocolate bar for an even smoother melt and richer taste. For those who prefer a less sweet treat, a blend of milk and semi-sweet chocolate chips can offer a delightful balance.
- Melting Chocolate Safely: When utilizing the double boiler method, always ensure that the water in the saucepan comes to a gentle simmer and never touches the bottom of the bowl containing the chocolate. This prevents the chocolate from overheating, burning, or seizing. Stir constantly for an even, velvety melt. If using a microwave, melt the chocolate in short 30-second intervals, stirring thoroughly after each to distribute heat and prevent scorching.
- Broiler Vigilance is Key: This is perhaps the most critical step for perfect marshmallows. Marshmallows toast incredibly fast under a broiler. Position your oven rack so the marshmallows are a few inches (typically 4-6 inches) from the heat source. Do not walk away from the oven for even a second! They can transition from perfectly golden to unfortunately burnt in the blink of an eye. Once they reach your desired level of toastiness and slight puffiness, remove them immediately.
- Cooling Completely Before Cutting: Patience is a true virtue, especially with S’more Bars. Allowing the bars to cool completely, preferably at room temperature for several hours or even in the refrigerator for about an hour, is absolutely crucial. This provides ample time for the chocolate layer to set and firm up, ensuring clean, neat cuts and preventing the bars from falling apart when sliced.
- Using Foil for Easy Removal: The aluminum foil lining, with a generous overhang on the sides, will be your best friend during the entire process. Once the bars are completely cooled and set, you can simply use the foil edges to lift the entire slab of s’more bars out of the pan, making the cutting process much easier and keeping your baking pan spotless.
Creative Variations & Thoughtful Serving Suggestions
While the classic S’more Bar is absolute perfection on its own, there’s always room for a little creativity and personalization! Here are some exciting ideas to customize your bars and elevate their serving presentation:
Exciting Variations to Explore:
- Diverse Chocolate Choices: Don’t limit yourself to just milk chocolate! Experiment with different types of chocolate to find your favorite. Dark chocolate chips offer a richer, less sweet profile, while white chocolate chips can add a creamy, distinct flavor. For an extra layer of decadence, consider swirling in some peanut butter chips or a generous dollop of chocolate hazelnut spread with your milk chocolate.
- Crust Enhancements: Infuse your graham cracker crust with additional flavors. A pinch of cinnamon or nutmeg can add a warm, spiced undertone, perfect for autumn. For an added textural crunch and nutty flavor, mix in a tablespoon or two of finely chopped pecans, walnuts, or even crushed pretzels into the crust mixture before pressing.
- Additional Toppings: After the marshmallows are broiled to perfection, consider drizzling the finished bars with extra melted chocolate (dark or white for a beautiful contrast) or a decadent caramel sauce. A sprinkle of flaky sea salt over the chocolate layer before adding marshmallows can beautifully enhance and balance the sweet flavors. Chopped up candy bars (like Snickers, Reese’s Peanut Butter Cups, or even peppermint patties) could also be pressed into the soft chocolate layer before broiling.
- Flavored Marshmallows: While mini marshmallows are the standard and work wonderfully, if you’re feeling adventurous, seek out gourmet flavored marshmallows. Options like vanilla bean, caramel, or even peppermint (for a festive holiday twist) can introduce exciting new dimensions to your S’more Bars.
Thoughtful Serving Suggestions:
- Warm or Room Temperature: S’more Bars are incredibly delicious both slightly warm, when the chocolate is extra gooey and the marshmallows are incredibly soft, and at room temperature once fully set, offering a firmer bite. For a truly warm treat, gently heat individual bars in the microwave for just 10-15 seconds.
- Pair with Ice Cream: Elevate this dessert by serving a slightly warm S’more Bar with a generous scoop of premium vanilla bean ice cream. The delightful contrast of the warm, gooey bar against the cold, creamy ice cream creates an irresistible à la mode experience.
- Dollop of Whipped Cream: A fresh dollop of homemade whipped cream, perhaps lightly sweetened with vanilla, can add a light, airy, and creamy contrast to the rich sweetness and textures of the bars, making each bite even more luxurious.
- Perfect Beverage Pairings: These indulgent bars pair wonderfully with a tall, cold glass of milk, a comforting mug of hot cocoa (especially on a chilly evening), or even a robust cup of coffee or a shot of espresso to cut through the sweetness.
Bringing the Campfire Home, One Irresistible Bar at a Time
These S’more Bars are far more than just a simple dessert; they are a delightful invitation to revisit cherished childhood memories and create joyous new ones, all from the comfortable confines of your kitchen. They perfectly embody the simple pleasure of a classic s’more – that impeccable symphony of crunchy graham cracker, melting chocolate, and toasted marshmallow – without any of the traditional outdoor fuss or unpredictable elements. Whether you’re an avid camper deeply missing the taste of the wild, or simply someone who deeply appreciates an easy-to-make, utterly satisfying sweet treat, these bars are guaranteed to become a new, enduring favorite in your household.
So, preheat your oven, gather your straightforward ingredients, and prepare to be utterly amazed by how effortlessly and deliciously you can recreate the magic of s’mores. Share these delightful creations with your closest friends and family, pack them for an outdoor picnic, or simply enjoy a quiet moment of pure indulgence with a single bar and a perfectly brewed cup of coffee. No matter how you choose to savor them, these homemade S’more Bars are sure to bring a radiant smile to your face and a comforting touch of nostalgic sweetness to your entire day. Happy baking!