
Homemade Black and White Ice Cream Sandwiches: A Timeless Summer Delight
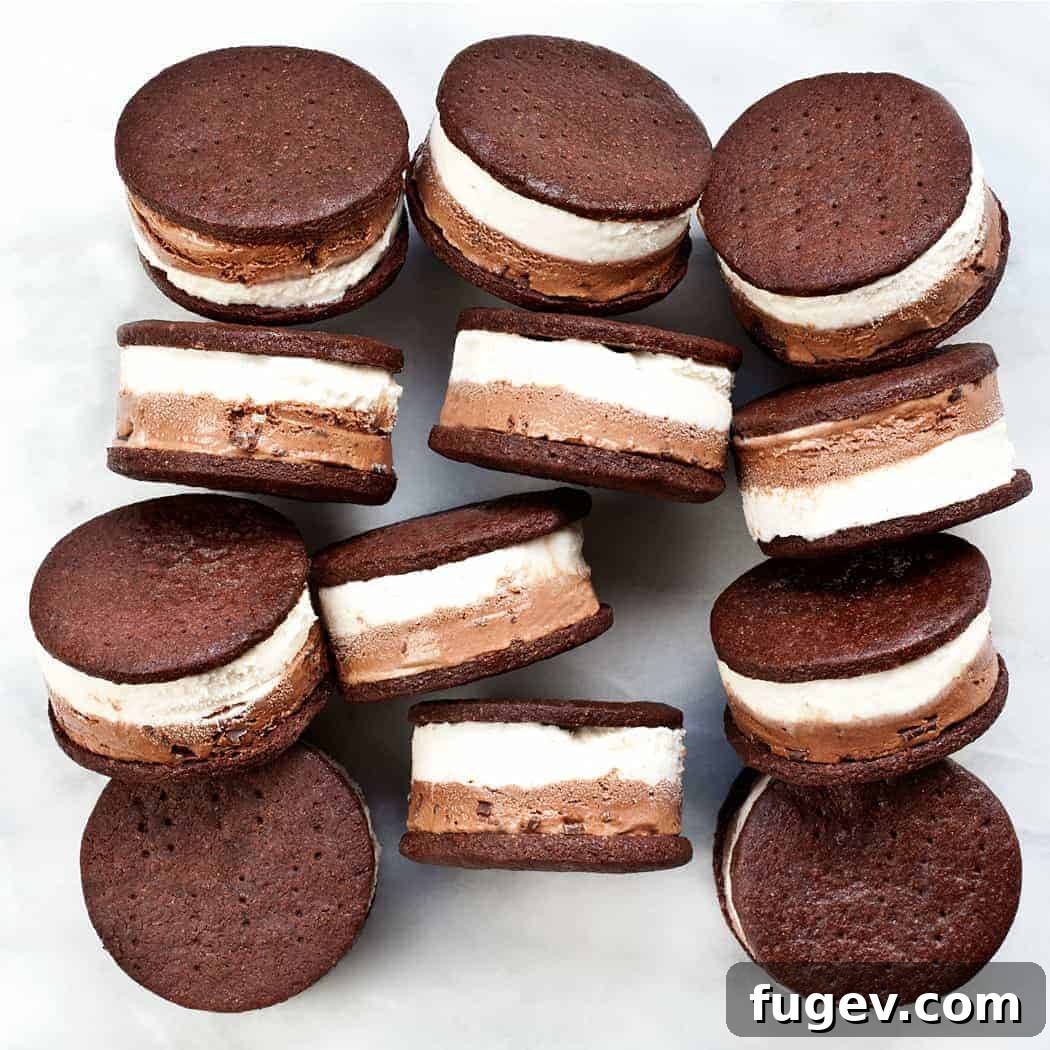
There are few things as comforting and universally loved as a perfectly crafted ice cream sandwich, especially when it features the iconic duo of chocolate and vanilla. Our homemade Black and White Ice Cream Sandwiches bring this classic combination to life with equal stripes of rich chocolate and creamy vanilla ice cream, all nestled between two crisp, thin chocolate cookies. It’s a dessert that perfectly balances two distinct flavors, creating a harmonious symphony of taste and texture in every bite. Forget store-bought versions; these handcrafted treats are a revelation, promising a refreshing escape on even the hottest summer days.
The Ultimate Summer Indulgence: Why Ice Cream Sandwiches Reign Supreme
What defines your favorite summer sandwich? For many, it’s not about savory fillings or crisp vegetables, but rather a luscious, thick layer of cold, creamy ice cream perfectly squashed between two delectable cookies. Nothing truly beats an ice cream sandwich! They represent the pinnacle of summer desserts – a portable, refreshing, and deeply satisfying treat that brings a smile to every face.
Beyond their inherent deliciousness, ice cream sandwiches offer a fantastic opportunity for culinary creativity and smart kitchen management. They are hands down the best way to utilize any leftover homemade cookies you might have on hand (assuming you manage to save some!). Pair them with that forgotten pint of ice cream tucked away at the back of your freezer, and you’ve got a gourmet dessert ready in minutes, or at least, after a little freezing time. Once they’re perfectly frozen, I often cut them into quarters. This not only makes them easier to handle and share but also helps them last a little longer, allowing you to savor the joy over multiple sittings or share with more friends without overindulging.
Crafting Your Own Black and White Masterpiece
The beauty of homemade treats lies in the control you have over every element. For these particular black and white ice cream sandwiches, we focused on baking thin, yet sturdy, chocolate cookies. The key here is achieving a cookie that is firm enough to hold the ice cream without crumbling, but still tender enough to bite through easily when frozen. We opted for round cookies this time, a choice driven by a relaxed, summer-inspired vibe. While cutting them into perfect rectangles might demand a ruler and a level of precision that feels too formal for a laidback summer project, the charm of a rustic round cookie is undeniable.
The real artistry comes in the ice cream layering. Taking the time to freeze a distinct layer of chocolate ice cream, followed by an equally prominent stripe of vanilla, ensures that classic black and white contrast. This careful layering isn’t just for aesthetics; it guarantees that you get a taste of both beloved flavors in every single bite, elevating the experience beyond a simple scoop. And don’t fret if you end up with a few leftover two-tone ice cream scraps from the cutting process; those marbled extras are often the best little chef’s treats, perfect for a quick taste test or an impromptu mini sundae!
Black and White Ice Cream Sandwiches
Paige Adams
1 hr
15 mins
8 hrs
9 hrs 15 mins
12
Ingredients
- 2/3 cup unsweetened cocoa powder sifted
- 3/4 teaspoon kosher salt
- 1/2 teaspoon baking powder
- 1-1/4 cups all-purpose flour
- 1/2 cup unsalted butter at room temperature
- 1/2 cup packed light brown sugar
- 2/3 cup granulated sugar
- 1 large egg at room temperature
- 1 teaspoon vanilla extract
- 2 pints chocolate ice cream
- 2 pints vanilla ice cream
Instructions
-
Prepare the Chocolate Cookie Dough: In a medium bowl, whisk together the sifted cocoa powder, kosher salt, baking powder, and all-purpose flour. Set aside. In the bowl of a stand mixer fitted with the paddle attachment, cream the softened unsalted butter and both types of sugar (light brown and granulated) until the mixture is light, fluffy, and pale in color, which should take approximately 3 to 4 minutes. Incorporate the large egg and vanilla extract, beating until fully combined and the mixture achieves a light and airy consistency. Gently press the prepared cookie dough into a flat disk, about 1/2-inch thick, and wrap it tightly with plastic wrap. Chill the dough in the refrigerator for a minimum of two hours. This chilling step is crucial for preventing the cookies from spreading too much during baking and ensuring they maintain their shape. The dough can be prepared up to two days in advance, making it a great make-ahead component.
-
Layer the Ice Cream: Begin by lining a 13-inch by 9-inch baking pan with two layers of plastic wrap, ensuring there’s enough overhang on all sides to cover the ice cream later. Allow the chocolate ice cream to soften slightly at room temperature for about 5-10 minutes. It should be pliable enough to spread but not completely melted. Transfer the softened chocolate ice cream to a large bowl and whisk it gently until it’s smooth and has a consistency similar to thick cake batter. This helps remove any air pockets and makes it easier to spread evenly. Using an offset spatula, carefully spread the chocolate ice cream into a uniform layer in the prepared baking pan. Place the pan in the freezer until the chocolate layer is firm, typically 20-30 minutes. Once firm, repeat the exact same process with the vanilla ice cream, spreading it evenly over the chocolate layer. Once both layers are in place, cover the pan tightly with the overhanging plastic wrap and freeze for at least 8 hours, or preferably overnight, until the ice cream block is completely solid.
-
Bake the Cookies: Preheat your oven to 350°F (175°C). Lightly flour a clean work surface to prevent sticking. Remove the chilled cookie dough from the refrigerator and roll it out evenly to an approximate thickness of 1/8-inch. Using a 2-1/2 inch round cookie cutter, cut out 24 cookies. Gather any dough scraps, gently reroll them, and cut out additional cookies until all the dough is used. Arrange the cut-out cookies on a parchment paper-lined baking sheet, spacing them about 1-inch apart to allow for slight expansion. Before baking, gently prick the tops of each cookie with the tines of a fork. This helps prevent large bubbles from forming and ensures a flat surface for the ice cream. Bake for 12-15 minutes, or until the edges are set and the centers are firm. Once baked, remove from the oven and allow the cookies to cool completely on the baking sheets before handling. This is crucial for their crispness and structural integrity.
-
Assemble the Ice Cream Sandwiches: To begin assembly, turn over half of your cooled chocolate cookies (these will be the bottom halves). Carefully remove the frozen layered ice cream block from the baking pan using the plastic wrap as handles. Place it on a cutting board. Using the same 2-1/2 inch round cookie cutter you used for the cookies, carefully cut out discs of the frozen chocolate and vanilla ice cream. It’s essential to wipe the cookie cutter clean after each cut to prevent smearing the distinct ice cream layers and ensure clean lines. Using an offset spatula or a thin metal spatula, gently lift an ice cream disc and place it precisely onto one of the turned-over cookies. Immediately top it with another cookie, right side up. Work swiftly during this assembly process to minimize ice cream melting. As you complete each sandwich, place it back into the freezer. Once all sandwiches are assembled, freeze them for an additional 2 hours to firm up. Finally, wrap each individual ice cream sandwich tightly in plastic wrap or parchment paper, then transfer them to an airtight container or freezer bag. Freeze for an additional 8 hours, or overnight, to ensure they are rock-solid and ready for enjoyment.
Notes
Nutrition
Calories: 649kcal | Carbohydrates: 101g | Protein: 9g | Fat: 25g | Saturated Fat: 14g | Polyunsaturated Fat: 1g | Monounsaturated Fat: 8g | Trans Fat: 0.3g | Cholesterol: 69mg | Sodium: 509mg | Potassium: 488mg | Fiber: 5g | Sugar: 64g | Vitamin A: 590IU | Vitamin C: 1mg | Calcium: 170mg | Iron: 3mg
Nutrition information is automatically calculated and should only be used as an approximation.
Additional Info
Dessert, Ice Cream
American
Did you make this recipe?
Mention @lastingredient on Instagram and tag it #lastingredient!
Tips for Perfect Homemade Ice Cream Sandwiches Every Time
- Chill Your Dough: Don’t skip the chilling step for the cookie dough. It prevents spreading and ensures your cookies hold their shape, giving you uniform surfaces for your ice cream layers.
- Soften Ice Cream Just Enough: The ice cream should be soft enough to spread easily but not melted. Over-softened ice cream will refreeze with an icier texture. A quick whisk helps achieve an even consistency.
- Work Quickly: Ice cream melts fast! Have all your tools and ingredients ready before you start assembling. Return assembled sandwiches to the freezer as soon as possible.
- Clean Cuts: When cutting ice cream discs, wipe your cookie cutter clean after each cut. This prevents color transfer and ensures neat, defined layers, especially crucial for the black and white aesthetic.
- Proper Freezing for Firmness: Allow ample time for the assembled sandwiches to freeze completely. This ensures they are solid, less messy, and easier to eat. Overnight freezing is ideal.
- Storage is Key: Individually wrap each sandwich tightly in plastic wrap or parchment paper, then store them in an airtight container or freezer bag. This prevents freezer burn and keeps them fresh for longer.
- Experiment with Flavors: While chocolate and vanilla are a classic, feel free to get creative! Imagine swapping vanilla for mint, strawberry, or even coffee ice cream. Different cookie bases can also open up new flavor profiles.
More Ways to Enjoy Your Summer Treats
While these Black and White Ice Cream Sandwiches are undeniably delicious on their own, there are many ways to elevate your summer dessert experience. Consider serving them alongside a fresh fruit platter for a contrasting, light accompaniment. For an extra decadent touch, a drizzle of warm chocolate fudge or a sprinkle of chopped nuts can transform them into an even grander treat. These sandwiches are also fantastic for parties – make a large batch ahead of time and pull them out as a stunning, ready-to-serve dessert that’s guaranteed to impress your guests.
Hosting a themed gathering? These black and white delights fit perfectly into a monochromatic party scheme or as a sophisticated nod to classic diner desserts. They’re also wonderfully portable, making them ideal for picnics, barbecues, or simply enjoying on your porch on a warm evening. Their individual serving size makes them easy to distribute, minimizing mess and maximizing enjoyment.
Conclusion: Sweet Memories, Homemade Happiness
There’s an unparalleled joy in creating something delicious from scratch, and these homemade Black and White Ice Cream Sandwiches are no exception. They’re more than just a dessert; they’re an experience – a nostalgic trip back to simpler times, a celebration of classic flavors, and a testament to the simple pleasure of a well-made treat. By following this detailed guide, you can confidently craft your own batch of these stunning and incredibly satisfying ice cream sandwiches, perfect for sharing with loved ones or savoring all to yourself. Get ready to impress with this timeless classic that proves two flavors truly are better than one!